
Installation Guide

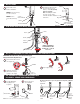


5 - ACTIVATE FAUCET
6 - SET AND FIX TEMPERATURE (MODEL EAF-225, SEE PAGE 4)
SETTINGS
B
Optional — To fix temperature, set lever to the desired
position, then remove lever and plug hole with Cap.
B
Activate Faucet and check for leaks.
If Faucet does not function, refer to the
Troubleshooting section of this instruction manual.
A
Activate Faucet by pressing the button one (1)
time, then immediately step away.
Faucet will run for four (4) seconds and the range
will automatically adjust to its environment.
Wait ten (10) seconds after water shuts off before
using Faucet.
A
Adjust lever to set temperature.
B
Loosen Screw with
hex wrench and
remove Cap.
A
Close Supply
Stop(s).
C
Move Battery Retainer tab
away from Battery. Remove old
Battery. Dispose of properly.
E
Open Supply Stop(s).
NOTE: Replace Battery when red LED indicator flashes each time
faucet is in use or when faucet stops functioning.
3
D
Insert a new 6 Volt Type CR-P2
Lithium Battery. The red LED
will flash for one (1) minute.
Reinstall Battery Cover. If LED
doesn’t flash or if it just lights
up, remove and then reinsert
the Battery. If water flows
continuously after inserting the
new Battery and opening the
Supply Stops, remove and then
reinsert the Battery.
-CLICK
SETTINGS
Function Press Button LED Signal
Continuous Run — 2 minute default setting
(adjustable from 1 - 20 minutes)
1 time for 2 seconds 5 short flashes
reset:
1 time or will reset
automatically after 2 minutes
Temporary Off 2 times (double click) 5 short flashes followed by periodic flashing
reset:
1 time or will reset
automatically after 2 minutes
Auto Set Range Adjustment 2 times (double click) and then 1 time for 5 seconds 5 short flashes followed by 4 short flashes
7 - BATTERY REPLACEMENT (EAF-250/275)