
Installation Sheet

INSTALLATION
Check that all parts are included in original
packaging for proper installation.
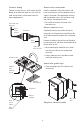
Package contents:
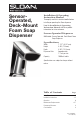
Foam soap dispenser (1)
Dispenser shank nut, washer and packing
Connector case, stainless steel panhead
screws (2) and adhesive pad (1)
Tubing (1)
Foam tank case unit (1)
Screw kit (4-screw kit x 1)
Foam tank case key (2)
Tube clamp (2)
Wire clip (2)
Tools needed:
Drill
1/8” drill bit
1/4” masonry bit (if attaching to
concrete wall)
1” hole drill for drilling through countertop
Adjustable wrench or basin wrench
Phillips head and slotted screwdrivers
Utility knife
Hammer
Ruler/tape measure
Cautions
Before using the dispenser, thoroughly read the
“Precautions” attached to the liquid products.
Immediately clean any spill on the floor
to help avoid falling, injuries or other hazards.
Choosing Installation Placement
For indoor use only.
Do not install in areas with high humidity or
where the unit may be exposed to direct sunlight.
Install the unit on a sturdy horizontal surface that
is in ambient temperature (0-35°C/32°-95°F).
Make sure foam tank case unit will be accessable
from the underside of sink.
Prior to Installation
An electrical outlet is needed for operation. It
should be protected from any contact with water
and be within the range of the power cord
(approx. 70”.) If no outlet is available, consult
licensed electrician. (GFI outlet suggested per
code.)
Locate final position of foam soap dispenser and
drill 1” hole in counter top.
STEP 1.
Remove unnecessary components
Remove unnecessary components from washbowl
or horizontal surface that are mounted on the
area where the foam soap dispenser will be
installed.
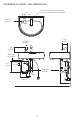
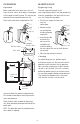
STEP 2.
Install foam soap
dispenser
Insert the foam soap dispenser shank into the
mounting hole. Secure the foam soap dispenser
to the countertop using shank packing, washer
and nut.
Foam soap
dispenser
Shank
1” hole in
counter top
Packing
Washer
Nut
3