
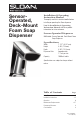
Installation Sheet
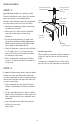

Removing tubes
When removing a tube from a fitting, remove the
clamp first and then pull out the tube from the
fitting.
To reconnect a removed tube to a fitting, retrim
tip of the tube at right angle prior to connecting.
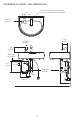
INSTALLATION
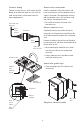
Foam soap tube
from foam soap
dispenser
Air tube from foam
soap dispenser
Foam soap
tube fitting
Air tube
fitting
Fittings
connection label
Foam tank
case unit
Tube clamps
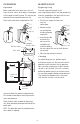
STEP 3.
Install foam tank case unit to wall
Before installing on the wall, check that no other
piping and wiring is running behind hole
locations. Wall should be sufficiently reinforced or
risk failure due to foam tank case unit falling.
• Determine a temporary position for mounting
the foam tank case unit.
• Make sure unit is within reach of the liquid
soap and air tube from the foam soap
dispenser.
• Use the mounting bracket as a guide, mark
where holes need to be drilled. Important:
Make sure bracket and foam tank
case unit is mounted level.
• When installing onto a concrete wall, drill holes
1.125” deep using a 1/4” masonry drill bit.
Insert wall anchors into the holes and mount
the dispenser using screws.
• When installing onto a wood wall, drill holes
using a 1/8” drill bit and attach the dispenser
using screws.
STEP 4.
Connect foam soap tube and air tube
Connect the foam soap tube and air tube from
the foam soap dispenser into the soap tube fitting
and air tube fitting found on top of the foam tank
case unit, respectively.
• Check soap tube tags and align with correct
fittings as indicated on the fittings connection
label.
• Cut the soap tube and the air tube at suitable
lengths. Ends should be cut at right angles and
tubes should be free of kinks and bends when
connected.
• Insert soap tube and air tube into respective
fittings and secure with
tube clamps.
4