
Installation Sheet
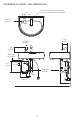

6
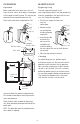
Replacing Soap
The foam soap indicator light on the
foam soap dispenser blinks and stops dispensing
when the soap bottle in the foam tank case unit
runs out. Change the soap bottle.
• Turn the key to open the foam tank
case unit
cabinet door.
• Remove the joint
cap and dip tube
and discard empty
soap bottle.
• Insert the dip tube
and attach the
joint cap to the
new bottle and
install the bottle in
the tank cabinet. Be sure to attach the joint
cap securely.
• Close the door and lock using key.
Cleaning
For reliable long-term use, perform regular
maintenance for the unit. Be sure to turn off the
operation switch and check that the operation
light is off when maintenance is done. Remove
soil with a soft, dry cloth. If the unit is seriously
polluted on portions other than the hand sensor,
use wet cloths properly diluted neutral detergent.
Then remove the detergent with a soft damp
cloth and then rub with a soft, dry cloth.
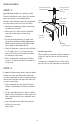
MAINTENANCE
Operation
Mount soap bottle to the foam tank case unit.
Press the reset switch, which begins the pumping
cycle to purge air from the tube. This step may be
required twice to completely prime the unit.
Place hands under foam soap dispenser. The
sensor will detect the presence (approximately
0.6 seconds) and dispense foam soap from the
foam soap dispenser.
Check for leaks from the bottle or dispensing
unit. Soap should only be dispensed through the
outlet spout.
NOTE: This procedure must be completed every
time a bottle is replaced.
OPERATION
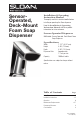
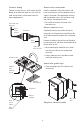
Liquid soap
bottle
Reset switch
Operation light
Operation switch
Operation panel
Foam tank
case unit
Joint cap
Joint cap
Joint
cap