
Installation Sheet


9
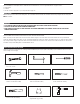
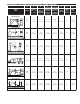
TROUBLESHOOTING INSTRUCTIONS
NOTE: To automatically check battery strength, troubleshoot, diagnose and report faucet issues with a
wireless device, use the Sloan SmartPhone APP. The APP is available free-of-charge at the Apple
iPhone APP store for iOS devices or the Google Play APP store for Android devices. For more
information about the APP and its capabilities please visit www.Sloan.com.
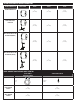
LED indicator light in the IR (infrared) sensor is red.
A. Battery power is low.
Install four (4) new AA sized alkaline batteries. Check that the orientation of each battery matches
the positive (+) and negative (–) symbols shown in the bottom of the battery compartment.
Re-attach battery compartment to control module. Green LED will illuminate. If the Green LED does
not illuminate, remove battery compartment for 10 seconds and return into place.
Faucet DOES NOT function.
A. Batteries not installed or are exhausted.
Install four (4) AA sized alkaline batteries. Check that the orientation of each battery matches the positive (+) and negative (–) symbols
shown in the bottom of the battery compartment. Reattach battery compartment to control module. Green LED will illuminate. If the Green
LED does not illuminate, remove battery compartment for 10 seconds and return into place.
B. Power Cable not installed (Hardwire models).
IInstall power cable and check connection.
C. Sensor Cable not installed.
Install sensor cable and check connection. Conrm connection guide markings are aligned.
D. Sensor range is set too short and is not detecting the target.
Increase sensor detection range.
Sensor is activated but faucet DOES NOT deliver water.
A. Faucet has initiated its adaptive sensing calibration program.
Wait 60 seconds before activating faucet.
B. Solenoid Cable not connected.
Check solenoid cable connection. Conrm connection guide markings are aligned.
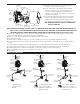
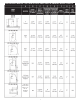
Sensor Range Requires Manual Adjustment.
Sensor Range is measured in units from 1 to 5, with 1 being closest to the faucet and 5 being farthest from the faucet. The factory default
Sensor Range is 3.
A. To determine what the current Sensor Range setting is, press the red “Sensor” button on the upper right hand corner of the Optima Control
Box for 1 second. Five seconds after pressing the button, the green LED beside it will blink to indicate the Sensor Range setting. For
example, if it is set at 2, the green LED will blink 2 times.
B. To adjust the Sensor Range, press and hold the red “Sensor” button for three seconds and release once the green LED comes on to indicate
that you are in Sensor Range adjustment mode. Then press the “Sensor” button one second at a time for however many times you wish to
increase the range. For example, if the Sensor Range is set at 2 and you wish to increase it to 4, press the “Sensor” button two times for one
second each time..
C. If you wish to decrease the Sensor Range, follow the same procedure to enter into Sensor Range adjustment mode, and then press
the “Sensor” button one second at a time. The button is designed to go up to 5 units and then back down to 1 unit. For example, if the
Sensor Range is set at 4 and you wish to decrease it to 2, press the “Sensor” button three times for one second each time.
D. To conform your changes, wait 5 seconds and then press the red “Sensor” button on the upper right hand corner of the Optima Control Box
for 1 second. Five seconds after pressing the button, the green LED beside it will blink to indicate the Sensor Range setting. For example, if it
is now set at 2, the green LED will blink 2 times.
Solenoid produces an audible “CLICK” when an object is placed in the detection zone of the sensor but
NO water flows.
A. Water supply to faucet is not open.
Open supply stop(s).
B. Inlet tting lter is clogged.
Remove, clean, and reinsert. Replace with EBF1004 solenoid lter kit if necessary.
C. Aerator or spray head is clogged.
Remove, clean, and reinsert.
Solenoid valve DOES NOT produce an audible “CLICK” and NO water flows. Green LED illuminates when
batteries installed.
A. Solenoid valve module is not working properly.
Replace EFP43A solenoid valve module.