
Installation Sheet


2
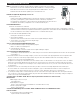
PRIOR TO INSTALLATION
• ALL PLUMBING SHOULD BE INSTALLED IN ACCORDANCE WITH APPLICABLE CODES AND REGULATIONS.
• FLUSH ALL WATER LINES PRIOR TO MAKING CONNECTIONS.
• KEEP THREAD SEALANT OUT OF YOUR WATERWAY TO PREVENT COMPONENT PART DAMAGE! DO NOT USE ANY SEALANT ON
COMPRESSION FITTINGS.
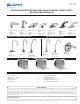
Prior to installing the Sloan Optima Faucet, install the items listed below. Also, refer to rough-in illustrations on pages 4 and 5.
• Lavatory/sink
• Drain line
• Hot and cold water supply lines or pre-tempered water supply line
IMPORTANT
MIXING VALVE
When installing the faucet with a Sloan mixing valve, these Installation Instructions AND the Installation Instructions packaged with the mixing valve
MUST be followed.
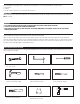
QUICK CONNECT BAK CHEK® FILTER TEE USAGE
A QUICK CONNECT BAK-CHEK® FILTER TEE MUST BE USED WITH EACH INSTALLATION.
When connecting a Sloan Optima Faucet to both hot and cold water supplies, a two inlet Quick Connect Bak-Chek® Filter Tee is provided and
required as Illustrated. Water temperature can be controlled by adjusting the supply stops. When connecting the faucet to a single line water supply or
a pre-tempered water supply, a single inlet Quick Connect Bak-Chek® Filter Tee must be used. A Quick Connect Bak-Chek® Filter Tee must also be
used when a Temperature Mixing Valve is included with the faucet.
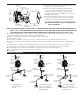
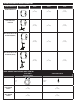
TOOLS REQUIRED FOR INSTALLATION
Gather the required tools and parts before starting installation. Additional parts may be required, depending on your installation. Check local codes.
Check existing electrical supply.
1. Open end wrenches for hex sizes: 1/2”,
9/16”, 5/8”, 15/16”
2. Basin wrench 3. Phillips head screwdriver, #2
4. Hammer (if installing plastic or hollow wall
anchors to mount valve module)
5. 1/4” drill bit (if plastic wall anchors are
used to mount valve module)
6. 5/16” drill bit (if hollow wall anchors are
used to mount valve module)
7. 3/8” drill bit (if toggle nut anchors are
used to mount valve module)
8. Spray head key
(supplied with some models)
9. 13 mm Socket