Smart Video Doorbell Instruction Manual
Welcome to the Smart Home Family! Thank you for choosing “Smart Vide Doorbell”. It is a product that integrates motion detection and video recording into a doorbell. The doorbell will provide you a safe, easy and cost-effective solution to protect your home & loved ones 24/7/365. Please take the time to unpack and familiarize yourself with the included parts and this instruction manual to learn the easy steps required to setup your “Smart Video Doorbell”.
Contents Things to Note before Getting Started ������������������������������� 1 WiFi Internet Connection ��������������������������������������������������������� 1 WiFi Network and Password ������������������������������������������������������ 1 Operating Requirements �������������������������������������������������������� 1 In the Box ��������������������������������������������������������� 2~3 Getting to Know Your Smart Video Doorbell ���������������������� 4~5 Overview ����������������������������
Things to Note before Getting Started WiFi Internet Connection - One critical factor affecting the performance of your doorbell is the relative positions of your home WiFi router and doorbell. Place your doorbell in an open area (DO NOT place it directly on the floor); the closer the doorbell is to the router, the stronger the WiFi signal will be, resulting in optimum performance and satisfaction. - A slow network speed will also affect the performance of your doorbell.
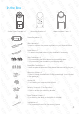
In the Box Smart Video Doorbell x 1 Mounting Bracket x 1 Water-resistant Case x 1 Power Regulator x 1 Wire Harness x 1 * Used to connect the power regvulator to your internal chime Extra Wires x 2 * To attach the power wires to your doorbell if necessary Wire Connector x 4 * 2 for connecting the Wire Harness to your existing wires * 2 for connecting the doorbell to your existing wires Extra Wire Connector x 4 * Used as optional connectors if the above ones are too big for you Mounting Screw x 4 * Used t
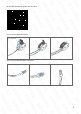
For doorbell installation, please view the video: How to Use the Wire Connectors 90 degrees How to Use the Optional Wire Connectors 3
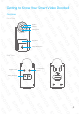
Getting to Know Your Smart Video Doorbell Overview Front View IR LEDs Camera Microphone PIR Sensor Ringer/Bell Button Rear View Tamper Switch Configuration Button Wiring Terminals 4
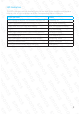
LED Indicators The LED indicators on the doorbell give you an idea of the device’s current status. Here is a list of light indicators and the corresponding status it refers to. Light indicator Status Solid red light lasts for 30 seconds and then off Powering on Green light flashes fast (once every 0.
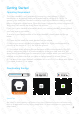
Getting Started Operating Requirement This video doorbell is only available to connect to a low voltage 8~24VAC transformer or an existing traditional doorbell with a voltage of 8~24VAC. In general, your traditional doorbell consists a ringer to be installed outdoor, and an indoor chime with a transformer. When the ringer is pressed by visitor, a ringtone of “ding dong” will remind the family there has a visitor.
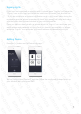
Signing Up/In If you have not registered an account with us, please press “Sign up” just below the “Sign in” icon on the App, and follow the instructions to create your account first. * If you do not receive an account verification code in your email inbox during the registration process, please remember to check your spam/junk folder and make sure the notice has not been blocked by your service provider.
Setting Up Your Doorbell Powering on To set up your doorbell, power it on first. Tap play button to view how to install your Smart Video Doorbell. Putting the Doorbell into WiFi Configuration Mode Press and hold the Configuration Button on the back until the doorbell beeps once (about 3 seconds), and then the indicator would flash red and green alternately, indicating that the doorbell has been switched into the WiFi configuration mode.
Connecting the Doorbell to Your Smartphone NOTE: Android users may need to disable cellular (mobile) data before proceeding to this step. This setting is normally found in your smartphone’s settings under Data Usage, or Mobile Networks. If you’re unable to find the setting location, we suggest searching on Google with the following syntax: Disable (Phone Model) cellular data. Go to your smartphone’s WiFi settings, and select “smanos doorbell” to connect to the doorbell.
Entering WiFi Details for the Doorbell Pick your home WiFi network from the drop down box listed on the app, and enter the WiFi network’s password. The doorbell will connect to the selected WiFi network. This binding process should take about three minutes. The doorbell indicator light will be off when a successful connection has been established.
App Operation Main Page Checking device status after setting up When the status bar turns into white, it means the device is ONLINE and available. This icon on the right of your device indicates that the device was shared to you by family or friends. If it's gray, it means the device is OFFLINE and cannot be accessed. Editting your device(s) as you wish Deleting Device Tap on the Edit Button [ the Delete Button [ ].
Live Video Please tap on the “Smart Video Doorbell” icon from the main page and enter the live video page. 1. Signal Strength Indicate the signal strength between the WiFi network and the connected devices. Note: Another critical factor affecting video quality is the upload speed of your selected home WiFi network. 2.
3. Snapshot (left) / Record (right) Real-time screenshots and video clips can be recorded directly onto your phone. Tap on “Album” to view them. 4. Listen (left) / Speak (right) Press the microphone button to speak and press it again when you finish. Anyone in the vicinity of your doorbell will hear you. If you want to listen in on the surrounding area of your doorbell, all you need to do is tap on the Listen In button. 5. Latest Alerts The latest three alerts will appear on this area.
History If you already have activated our smanos cloud service, motion-triggered alerts, accepted or missed ring logs can be reviewed from this History page directly and the corresponding 15-second videos can be played. Tap on [ ] to pick a specific day and search for an alert. Tap on the edit icon [ 15-second videoes. ] and then press the shown [ ] to delete the selected Tap on the edit icon [ 15-second videoes.
Album You can find all your manually saved video clips and snapshots on this page. Any video or snapshot found here is stored on your phone and can be edited and shared as you wish. Deleting Video(s) or Snapshot(s) Tap on edit icon [ snapshot(s). ] and then press the shown [ ] to delete video clip(s) or Sharing Video(s) or Snapshot(s) Tap on edit icon [ ], and then press the shown [ snapshots of interest.
Settings General Device Name This setting enables you to rename your doorbell, and the new name will be shown on the Device List on Main Page. Tampering Alarm This setting enables you to switch on/off the tampering function on your doorbell.
Notifications This setting enables you to: 1. Change the alert tone of the visit alert. Note: The notification for motion alerts will be sent to you without any ring tone. 2. If you want to receive an email notification whenever the motion is detected, you can turn on the “Email” function and input the receiving email addresses.
Motion Detection On/Off When the motion sensor is turned on, you will receive a push notification whenever motion is detected. Timing This is useful if you installed the doorbell in a busy area in your home where foot traffic is frequent. Define a time frame during which you wish to receive motion alerts.
Network Configuration Change WiFi (Switching between Networks) This setting enables you to connect your doorbell with another nearby WiFi network, without repeating the configuration process. Reconfiguration This setting enables you to reconfigure your doorbell when a network issue has arisen. All settings and records will NOT be cleared.
Time Setting Synchronize Time This setting enables you to choose the time zone for your doorbell, to make sure the time stamp on the recorded video is correct. When motion is detected, you will receive a push notification: (for example) Activity detected by [Smart Video Doorbell name] at 08:20:00 GMT+2 Or Activity detected by [Smart Video Doorbell name] at 07:20:00 GMT+1 DST during Daylight Saving Time. Date Format This setting enables you to change the format of the date shown on your app.
More Firmware Update This setting enables you to update your doorbell to the latest firmware if necessary. WHEN AN UPDATE IS TAKING PLACE, FORCED TERMINATION WILL CAUSE SERIOUS DAMAGE TO YOUR Smart Video Doorbell. It is highly recommended that you keep your doorbell plugged in at all times, and DO NOT SWITCH THE DEVICE OFF BEFORE AN UPDATE IS COMPLETED.
Account Management Editting Account Tap on [ ] on the main page to enter the account management. Tap on the picture, and you can add or replace your account image by taking a picture or choosing a picture from your phone’s album. If you want to change your account name, just tap on the [ new name. ] button and enter a Changing your password can also be done on this page.
My Shares Sharing device(s) with family or friends By choosing “My shares” on the menu and pressing the [+] Add Button, you can share access to your device(s) with other registered accounts. Enter the email address and nickname of the account you want to share with, and then select the device(s) after setting access limit.
Access Setting There are two types of sharing way with some key differences: the Administrator and the User who has been invited to the devices. Admin (Full Access) With Admin (Full Access), the shared user in this group will be able to do almost everything as the Owner can to the devices you’re shared, with few exceptions, like re-sharing to others. Important: Because people in Admin group with access to a device can do so much, you should only invite people you really trust.
Specifications Model No DB-20 Camera Full HD 1080p Angle of view horizontal 170°, vertical 90° Video compression H.264 Night vision Automatic IR-cut filter WiFi 802.11b/g/n/ac with WEP/WPA/WPA2 encryption 2.4GHz + 5GHz Power supply AC 8-24V Operating conditions temperature -20~+50°C ( -4~+122°F), humidity < 95% RH (non-condensing) Dimensions (LxWxH) 131.7 x 62.2 x 36.2mm Water-resistant case dimensions (LxWxH) 193.2 x 66.
FAQs * WiFi and Network: 1. I have a poor WiFi signal, what can I do? Please check the WiFi connection strength from live video page or test your network’s speed from www.speedtest.net or from the speedtest app. If it shows the connection is weak, you should re-attempt the setup procedure, and try moving your router closer to your doorbell, or exploring possible sources of WiFi interference such as large appliances, or other wireless products that may affect the signal.
automatically reconnects. > Press the configuration button on the back of your device to put the device in Setup mode. Wait 10 seconds, then press it again and see if the device automatically reconnects. > Check to make sure your device’s battery to make sure it’s properly charged. * Motion alerts: 4. Why am I receiving false alerts? An infrared sensor is used for motion detection meaning it could be triggered from a moving object which produces heat.
* Notifications 8. My device is not sending me notifications, how can I fix this? Notifications will be sent to your mobile phone once the bell is rung or any motion is detected by the doorbell (if this function is enabled). Be sure your device is online and your phone is allowed to receive notifications from smanos home(for iPhone only). You may check from the front page to see the status of the device. When the status bar turns into teal, it means the device is ONLINE and available.
10. How can I access my doorbell’s live view? The “live view” feature lets you access a live video feed from your smart doorbell at any time. Tap the “live view” button to watch a live video from your app. The green light will be on when you watch the live video. Press the microphone button to speak and press it again when you finish. Anyone in the vicinity of your doorbell will hear you. If you want to listen in on the surrounding area, all you need to do is tap on the Listen In button. * Battery 11.
Technical Support: Website: http://www.smanos.com You may send emails to: support@smanos.us (North America) support@smanos.