
Installation manual


4
www.smartavi.com
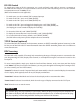
Product - Installation Diagram
Installation
1. Turn o all computers, speakers and the display.
2. Connect the DVI extension cables, USB cables, and audio cables (not included) to the computers and to
the “IN” ports on the DVN-16P.
3. Connect the display to the “OUT” DVI connector on the DVN-16P.
4. Connect USB devices, including mouse and keyboard, to the “OUT” USB connector on the DVN-16P.
5. Connect speakers to the “OUT” audio connector on the DVN-16P.
6. Connect the power supply to the DVN-16P.
7. Power on the computers, speakers and the display.
8. Use the front panel buttons, an RS-232 connection or infrared remote control to select the desired input port.
RG B
When using the SRC-2A infrared remote control:
• To switch to a specic port, use the keypad to enter the two-digit number of the
desired port and press the ENTER button.
• To cycle through the available ports, press the CH up/down buttons.
Switching Between Ports
There are three ways to switch between inputs on the DVN-16P: via the front panel buttons, IR remote control,
RS-232 connection or TCP/IP (Internet).
Front Panel Control
To switch ports using the front panel, press either the Enter button for up or the Scroll button for down to
select the port you would like to switch to. The selected port number will be indicated on the LED display.
To use the front panel to program the DDC table, see “DDC Learning”.
IR Control (optional)
To switch ports using an infrared remote control (optional accessory), connect
an SM-EYE (optional accessory) to the DVN-16P box and the unit will auto-
detect the infrared connection. Once the connection is made, you may use the
IR remote to cycle through the available ports.