
Installation guide

3
www.smartavi.com
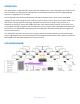
INSTALLATION
1. Turn
off all input devices and
displa
y
s
.
2. Connect the
HDMI
cables from the input devices and to
the “IN”
ports on the HDR-ULTRA matrix.
3. Connect the HDMI cables from the HDMI port of the HDX-Ultra Receivers to the HDMI displays.
4. Connect the RJ-45 port of each HDX-Ultra Receivers to the respective “OUT”
ports on the HDR-ULTRA
using CAT5e/6 cables.
5. Power on the HDX-Ultra Receivers by plugging in their power adapters (5VDC2A).
6. Connect the power cord and power-on the HDR-ULTRA.
7. Power on the input devices and the
displa
y
s
.
CONTROLLING THE HDR-ULTRA
There are multiple ways to control the HDR8X8/HDR16X16:
• Front panel
• SmartControl software
• RS-232 commands
• TCP-IP module (NET-IP-Pro)
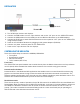
Front Panel
The HDR ULTRA front panel enables one to switch directly from the Matrix without the use of any software.
Its LCD (40x4) offers detailed information about the status of the switch at any given moment.
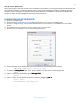
SmartControlPro Software
SmartConrolPro is the Windows® GUI application that enables users to control SmartAVI matrixes using
graphic user interface without having to write the codes and send serial commands to the devices. The
software enables configuration of the size and type of the Matrix, including a preset defined at macro. The
software also enables identification by name for each source and display.
RS-232 Commands
There are two primary modes of operation for the RS-232 control of the HDR-ULTRA: Command Mode and
Debug Mode. When connecting to the HDR-ULTRA via RS-232, it will start in Command Mode, in which raw
commands are allowed to be sent matrix to control its various functions without the use of a menu or
prompt. This mode is intended for advanced Debug mode is a more user-friendly way of operating the
HDR-ULTRA and it also includes instructional menus.