pn/ 55304501583 Smart Choice™ Washer & Steam Gas Dryer Installation Kit BEFORE BEGINNING INSTALLATION, READ ALL MANUFACTURER’S INSTALLATION INSTRUCTIONS THOROUGHLY DANGER FIRE AND ELECTROCUTION HAZARD YOU DO NOT POSSESS THE NECCESSARY This Kit Includes: One 6' Long x 3/8" OD Gas Supply Line One 3/8" OD Flare x 1/2" MIP Fitting One 3/8" OD Flare x 3/8" FIP Fitting One 3/8" OD Flare x 3/4" MIP Fitting One Tube of Thread Sealant One Tube of Leak Detector Solution Two 4" Dryer Vent Clamps Two 4" Close Elbow
Installation Checklist WARNING Please read all instructions before using washer. removed and stored Shipping bolts and spacers removed from appliance and stored Safety items throughout this manual are labeled with a WARNING or CAUTION based on the risk type as Leveling Washer is level, side-to-side and front-to-back Cabinet is setting solid on all corners Definitions This is the safety alert symbol. It is used to alert you to potential personal injury hazards.
IMPORTANT SAFETY INSTRUCTIONS-WASHER WARNING NOTE The electrical service to the washer must conform with local codes and ordinances and the latest edition of the National Electrical Code, ANSI/NFPA 70, or in Canada, the Canadian Electrical Code C22.1 part 1. FIRE HAZARD For your safety the information in this manual must be followed to minimize the risk of fire or explosion or to prevent property damage, personal injury or loss of life.
e r. your water pressure. powered generators, solar powered generators, wind powered generators or any other generator other than the local utility company is not recommended. 1 2 receptacle to be located so the power supply cord is accessible when the washer is in an installed position. wall receptacle Do not, under any circumstances, cut, remove , or bypass the grounding prong. 96” (244cm) max. 24” (61cm) min.
Clearance requirements IMPORTANT slope of 1 inch (2.5 cm). To minimize vibration or movement, reinforcement of the floor may be necessary. ventila r oor nches pa o r.
Leveling your washer Excessive noise and vibration can be prevented by properly leveling the washer. a 1 For free standing installation and with the washer within 4 feet (1 m) of its final location, place a level on top of the washer. 2 Use adjustable pliers to adjust the leveling legs so the washer is level front-to-rear and side-to-side, and stable corner-to-corner. 3 Press down on alternate corners and sides and feel for the slightest movement.
INSTALLATION INSTRUCTIONS - STEAM DRYER FILL HOSE Water Connection WATER SUPPLY REQUIREMENTS Cold water faucet MUST be installed within 42 inches (107 cm) of your dryer’s water inlet. The faucet MUST be 3/4 inch (1.9 cm) with threading for laundry hose connection. Water pressure MUST be between 30 and 120 psi. Your water department can advise you of your water pressure. 4 Inspect hose couplings for proper placement of rubber washers.
INSTALLATION INSTRUCTIONS - STEAM DRYER Water connection, continued DIRECT CONNECTION OR WITH EXTENSION* WATER INLET ON DRYER 5 If your installation has room for the COLD water supply to accept the “Y” connector directly, thread the “Y” connector to the COLD water supply and snug it by hand; then tighten it another 2/3 turn with pliers. NOTE If you were able to install the “Y” connector directly to the COLD water supply, please skip to step 8.
WASHER INSTALLATION INSTRUCTIONS (Cont.) slide it past the laundry tub, etc. so the hose does not pull o r. ose, fit can cause a siphoning action. wall receptacle Do not, under any circumstances, cut, remove , or bypass the grounding prong. grounded plug 4 5 6 that will save you time and money.
IMPORTANT SAFETY INSTRUCTIONS - DRYER WARNING For your safety the information in this manual must be followed to minimize the risk of f i re or explosion or to prevent property damage, personal injury or loss of life. Do not store or use gasoline or other flammable vapors and liquids in the vicinity of this or any other appliance. WARNING - RISK OF FIRE Read all of the following instructions before installing and using this appliance: • Destroy the carton and plastic bags after the dryer is unpacked.
IMPORTANT SAFETY INSTRUCTIONS-DRYER (Cont.) WARNING Installation Checklist Please read all instructions before using this dryer.
INSTALLATION REQUIREMENTS - GAS DRYER Electrical requirements for gas dryer CIRCUIT - Individual, properly polarized and grounded 15 amp. branch circuit fused with 15 amp. time delay fuse or circuit breaker. POWER SUPPLY - 2-wire, with ground, 120 volt, single phase, 60 Hz, Alternating Current. wall receptacle Do not, under any circumstances, cut, remove , or bypass the grounding prong. POWER SUPPLY CORD - The dryer is equipped with a 120 volt 3-wire power cord.
INSTALLATION REQUIREMENTS (Cont.) Exhaust System Requirements Use only 4 inch (102 mm) diameter (minimum) rigid or flex ible metal duct and approved vent hood which has a swing-out damper(s) that open when the dryer is in operation. When the dryer stops, the dampers automatically close to prevent drafts and the entrance of insects and rodents. To avoid restricting the outlet, maintain a minimum of 12 inches (30.5 cm) clearance between the vent hood and the ground or any other obstruction.
INSTALLATION REQUIREMENTS (Cont.) Exhaust System Requirements, continued WARNING FIRE HAZARD A clothes dryer must be exhausted outdoors. Do not exhaust dryer into a chimney, a wall, a ceiling, an attic, a crawl space or any concealed space of a building. A clothes dryer produces combustible lint. If the dryer is not exhausted outdoors, some fine lint will be expelled into the laundry area. An accumulation of lint in any area of the home can create a health and fire hazard.
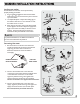
INSTALLATION REQUIREMENTS (Cont.) Exhaust system requirements, continued Install male fittings in correct direction: CORRECT Exhaust direction Directional exhausting can be accomplished by installing a quick-turn 90° dryer vent elbow directly to exhaust outlet of dryer. Dryer vent elbows are available through your local parts distributor or hardware store.
INSTALLATION REQUIREMENTS (Cont.) Manufactured or Mobile Home Installation 1 Installation MUST conform to current Manufactured Home Construction & Safety Standard, Title 24 CFR, Part 32-80 (formerly the Federal Standard for Mobile Home Construction and Safety, Title 24, HUD Part 280) or Standard CAN/CSAZ240 MH. 2 Dryer MUST be exhausted outside (outdoors, not beneath the mobile home) using metal ducting that will not support combustion. Metal ducting must be 4 inches (10.
INSTALLATION INSTRUCTIONS - GAS DRYER Electrical Installation The following are specific requirements for proper and safe electrical installation of your dryer. Failure to follow these instructions can create electrical shock and/or a fire hazard. WARNING • WARNING • • ELECTRICAL SHOCK HAZARD This appliance MUST be properly grounded. Electrical shock can result if the dryer is not properly grounded. Follow the instructions in this manual for proper grounding.
INSTALLATION INSTRUCTIONS - Gas Dryer Gas Connection 1 Ensure the manual gas supply shut off valve is in the OFF position and remove the shipping cap from the gas pipe at the rear of the dryer. Open the shutoff valve in the gas supply line to allow gas to flow through the pipe. minutes for gas to move through the gas line. to installed by a qualified gas technician. be dr ye r 2 Identify the thread size of the shut off valve.
INSTALLATION INSTRUCTIONS - DRYER General installation 1 Connect the exhaust duct to the outside exhaust system. Use of a 4” (102 mm) clamp (item A) is recommended to connect the dryer to the exhaust vent system. Use metal foil tape to seal all other joints. 2 Use a carpenter’s level to level your dryer front-to-back and side-to-side. 3 Use adjustable pliers to adjust the leveling legs so the dryer is level front-to-rear and side-to-side, and stable corner-to-corner.