
User's Manual


- When is pressed the first time the Smart Panel flashes
with the number of seconds currently set for the Entry Delay
(The factory default setting is 30 seconds)
- Each time is pressed the Entry Delay is increased by a
further 10 seconds between the adjustable range of 10 to 60
seconds
- The Entry Delay time on the LCD display will flash until the
setting is completed
Keys
(1234/
4-digit PIN)
+
Description
You must be in STANDBY
mode before adjusting the
Exit Delay
Enter the default PIN “ 1 2
3 4 ” OR your new 4-digit
PIN for setting followed by
Press then (as
to set the new Alarm
Duration
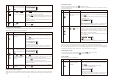
The Smart Panel will display the below image:
Note
1
2
3
4
(1234/
4-digit PIN)
+
*To make sure you are in STANDBY mode:
- Enter the default PIN “ 1 2 3 4 ” OR your new 4-digit PIN
- Press
- The Smart Panel will display the image below when you are
in STANDBY mode:
(One beep indicates that you entered a valid PIN, three
beeps indicate that an invalid operation was performed).
- When is pressed the first time the Smart Panel flashes
with the number of minutes currently set for the Alarm
Duration (The factory default setting is 1 minute)
- Each time is pressed the alarm duration is increased by
a further minute up to a maximum of 6 minutes
- The Alarm Duration on the LCD display will flash until the
setting is completed
Confirm the setting and return the Smart Panel to STANDBY
by pressing
Keys
(1234/
4-digit PIN)
+
Description
Enter 4-digit PIN, press
and for ARM
mode
Note
1
2
(1234/
4-digit PIN)
+
+
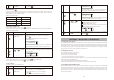
*To make sure you are in STANDBY mode:
- Enter the default PIN “ 1 2 3 4 ” OR your new 4-Digit PIN
- Press
- The Smart Panel will display the below image while you were
in STANDBY mode:
(One beep indicates that you entered a valid PIN, three
beeps indicate that an invalid operation was performed).
Exit delay: up to 20 seconds
- There is a 20 second exit delay time with a visual and
audible (beeping) countdown before the system is armed.
(Press MUTE to disable the beeping countdown, press
MUTE again to resume the beeping)
- If the Zone is enabled, a number will appear as displayed in
the image below:
- The system will then enter ARM mode after 20 seconds.
Press to complete the
setting
Keys
(1234/
4-digit PIN)
+
Description
You must be in STANDBY
mode before turning to
ARM mode
Note
1
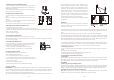
*To make sure you are in STANDBY mode:
- Enter the default PIN “ 1 2 3 4 ” OR your new 4-digit PIN
- Press
- The Smart Panel will display the below image:
when you are in STANDBY mode:
(One beep indicates that you entered a valid PIN, three
beeps indicate that an invalid operation was performed).
Enter the default PIN “ 1 2
3 4 ” OR your new 4-digit
PIN for setting followed by
The Smart Panel will display the below image:
2
3
4
(1234/
4-digit PIN)
+
Press to complete the
setting
Press then (as
to set the new Exit Delay
Confirm the setting and return the Smart Panel to STANDBY
by pressing
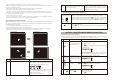
C. Adjusting the Alarm Duration
The default setting of the Smart Panel gives an alarm duration of 1 minute after being triggered. However, this
alarm duration can be increased up to 6 minutes:
D. Muting the Audible Countdown
When the Smart Panel is ARMED the audible countdown (beeper) can be silenced by pressing the MUTE
button, during the countdown. To reactivate the audible countdown (beeper) simply press the MUTE button
again.
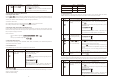
E. Arming the system
On the Key Fob Remote Control: Press to ARM the system.
On the Smart Panel: First make sure the Smart Panel is in STANDBY mode, and then ARM the system by
taking the following steps:
You must be in STANDBY
mode before turning to
ARM mode
When in ARM mode, the Smart Panel flashes RED every 5 seconds, acting as a deterrent to potential
intruders. However, if an intruder is detected the panel continuously and rapidly flashes RED.
Once an intrusion has occurred (with the zone triggered under ARM status), the alarm siren will sound and
the Smart Panel flashes RED every 1.5 seconds with the triggered zone indicated. After the initial triggering,
the alarm will immediately sound, without delay, if any other sensors are triggered.
F. Disarming the system
G. Zone settings
Programming each zone in ARM mode:
20
- 9 -- 8 -