
User's Manual


SECTION 4 – INSTALLING THE SENSORS
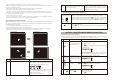
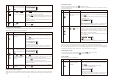
Enter 4-digit PIN for setting
followed by
Press then to set
the HOME mode
The Smart Panel will display the below image:
(One beep indicates that you entered a valid PIN, three beeps
indicate that an invalid operation was performed).
2
3
4
4-digit PIN)
+
Toggle 1, 2, 3, 4, 5, 6, 7, 8 to turn each zone in different mode
Indicates ALERT mode for a zone
Indicates ARM mode for a zone
Indicates the zone is turned OFF, number will not appear
The Smart Panel will display the below image:
(One beep indicates that you entered a valid PIN three
beeps indicate that an invalid operation was performed).
Confirm the setting and return the Smart Panel to STANDBY
by pressing
Press to complete the
setting
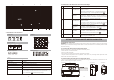
Sensor
Door/Window Sensor
Door/Window Sensor
Motion Sensor
Zone
1
2
8
Status (MODE)
ALERT
ALERT
ARM
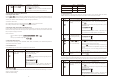
Keys
(1234/
4-digit PIN)
+
Description
You must be in STANDBY
mode before turning to
HOME mode
Enter 4-digit PIN, press
and for HOME
mode
Note
1
2
4-digit PIN
+
+
*To make sure you are in STANDBY mode:
- Enter the default PIN 1 2 3 4 OR your new 4-digit PIN
- Press
The Smart Panel will display the below image while
in STANDBY mode:
(One beep indicates that you entered a valid PIN, three
beeps indicate that an invalid operation was performed).
- Then system will enter HOME mode
- If the Zone is enabled, a number will appear as displayed in
the image below:
Press to complete the
setting
Confirm the setting and return the Smart Panel to STANDBY
by pressing
4
3.3.4 HOME mode
There are default settings that allow the system to operate after opening the package. These settings can
ARM and ALERT modes in different zones.
HOME mode default setting:
A. Entering the HOME mode
by taking the following steps:
B. Exiting the HOME mode
C. Zone settings
Programming each zone in HOME mode:
Keys
(1234/
4-digit PIN)
+
Description
You must be in STANDBY
mode before turning to
HOME mode
Note
1
You must be in STANDBY Mode before any steps.
* To make sure you are in STANDBY mode:
- Enter default PIN of 1 2 3 4 or your 4-digit PIN
- Press
- The LCD screen will display the below image:
4.1 Introduction to the Sensors
This package includes 3 wireless sensors which have a pre-programmed default setting that begins working
immediately once the battery is activated (the Key Fob Remote Control needs to be enrolled onto the system
before it can operate – see Section 4.2.3). It is advisable to install the main package first and then personalise
the settings once the system is functioning properly. This section should help you to change the system
settings in order to create a more personal home environment.
4.2 Installing the Sensors
First, determine the location of the sensors.
*Note: The sensors should be placed:
- where they are not easily accessible.
- in the most vulnerable rooms or near key entry points.
- away from extreme temperature sources (radiators, ovens, stoves etc.) and large metal objects that could
interfere with the wireless performance.
- where better RF performance can be achieved (if necessary).
Once you have selected a location for the Sensors, the system can be powered up.
4.2.1 Installing the Door/Window Sensor
The Door/Window Sensor consists of two parts, a transmitter and a magnet. Once this sensor is installed, and
the two parts are fastened onto the door or window, the sensor will trigger and transmit a message to the
Smart Panel when the door or window is opened. One Door/Window Sensor is pre-programmed in Zone 1 and
3.3 & 4.4 Zone Settings)
- 13 -- 12 -