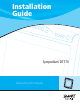
Installation Guide Sympodium DT770 ® Interactive Pen Display
Registration Benefits In the past, we've made new features available as free software upgrades. Register your SMART product to be notified of free upgrades. Keep the following information available in case you need to contact SMART Technical Support: Serial Number Date of Purchase Register online at www.smarttech.com/registration FCC Warning This equipment has been tested and found to comply with the limits for a Class A digital device, pursuant to Part 15 of the FCC Rules.
Important Information WARNING If the screen is damaged, don’t touch any liquid that leaks from it. This liquid is an irritant. If the liquid makes contact with your skin, eyes or mouth, immediately rinse the area with running water for at least 15 minutes. Consult a physician if the liquid makes contact with your eyes or mouth. WARNING Don’t open or disassemble the Sympodium® DT770 interactive pen display. You risk electrical shock from the high voltage inside the casing.
Other Precautions For proper installation, read this guide carefully and observe the following precautions. ii • Don’t place sharp or heavy objects on the DT770. • Turn off your DT770 and shut down your computer before connecting any cables. Otherwise you can damage the DT770 or your computer. • Don’t set the resolution of the DT770 to greater than 1280 × 1024. • Don’t block the DT770’s ventilation holes. Doing so can cause the DT770 to overheat.
Table of Contents Important Information............................................................................................................... i Other Precautions ..................................................................................................................... ii Overview ................................................................................................................................... 1 Interactive Screen .........................................................
Troubleshooting..................................................................................................................... 25 Checking the Power of the Interactive Pen Display ................................................................ 25 Checking the Status of the Interactive Pen Display ................................................................ 26 Image Problems ......................................................................................................................
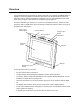
Overview The Sympodium® DT770 interactive pen display works with your computer and SMART Board™ software to create an interactive presentation environment. The DT770 includes dynamic and interactive tools for creating presentations and lessons. You can control applications and create notes using your finger or the tethered pen, all while facing the audience. The DT770 interactive pen display is a 17" (43.2 cm) LCD interactive screen.
• a USB 2.0 high speed hub to which you can connect a USB memory storage device This guide describes how to install and use the DT770 with your computer and integrate the DT770 with a projector or monitor. For information on using SMART Board software, refer to the SMART Board Software User’s Guide and the SMART Board software online Help.
NOTE: For the DT770 to interpret the location of the tethered pen, the connected computer must be running SMART Board tools. You’ll know that SMART Board tools are running if you can see the SMART Board icon in the system tray or the Dock. CAUTION Don’t touch the interactive screen with sharp, metallic objects that could scratch the screen’s coating.
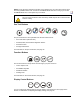
Room Control Interface Button You can open room control interface menus using the button in the top-left of the DT770 (room control system not supplied).
• the Status indicator is illuminated and green when the DT770 is communicating with SMART Board software correctly Power Indicator Status Indicator For information on the Power and Status indicators, see page 25. Mono Stand If you want to mount the DT770 at an angle of 30° or 45° degrees, you can install the DT770 on the supplied mono stand. NOTE: You will receive the mono stand in a separate box from the DT770 interactive pen display.
6 Overview
Installing the DT770 This chapter tells you how to: • determine the best location for the DT770 (this page) • remove the connection panel’s back cover (page 8) • connect the DT770 (page 8) • integrate a monitor or a projector (page 9) • connect the tethered pen (page 9) • reattach the connection panel’s back cover (page 10) (optional) • mount the DT770 on a Mono Stand (page 11) (optional) • secure the DT770 (page 12) • turn on the DT770 (page 12) • install SMART Board software (page 12)
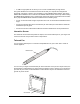
Removing the Connection Panel’s Protective Cover When you initially receive your DT770, the connection panel is inaccessible because of a protective cover. To remove the protective cover 1. Place the DT770 facedown on a flat surface. CAUTION Place the DT770 down slowly and carefully to ensure you don’t damage the buttons. Don’t place the DT770 on a surface that will mark, scratch or damage the screen or its optical components. 2.
2. Connect the supplied VGA (RGB) video cable to the Analog RGB IN port on the DT770. 12VDC IN USB Serial USB Pen Tether Analog RGB IN Analog RGB OUT 3. Connect the other end of the video cable to the monitor port on the computer. 4. Connect the supplied USB cable to the USB type B connector on the DT770. Connect the other end of the cable to an available USB port on your computer. NOTE: As an alternative, connect the supplied RS-232 cable to the Serial port on the DT770.
3. Place the pen in the recess below the interactive screen so that it’s available for use. The recess holds the pen magnetically. Pen Recess Reattaching the Connection Panel’s Protective Cover If you wish, after you have connected all of the DT770’s cables, you can reattach the protective cover. To reattach the protective cover 1. Feed the cables through the semi cylindrical channel in the back of the DT770 so that when you reattach the protective cover, it will not trap any of the cables.
Mounting the DT770 on a Mono Stand If you want to mount the DT770 at an angle of 30 or 45 degrees, you can install the DT770 on the supplied mono stand. NOTE: You can purchase and install the optional tilt stand from SMART and adjust the DT770 to a variety of angles. As an alternative, you can purchase and install a tilt stand or mounting arm that conforms to the 100 mm pattern set by the Video Electronics Standards Association (VESA).
Securing the DT770 You can secure the DT770 by attaching a cable (not supplied) between an immovable object and the Kensington® cable and lock device that’s built into the back of the unit. Turning on the DT770 Press the Power button in the top right of the DT770. Power Button Power Button Press the Power button again to turn off the DT770. Installing SMART Board Software You can install SMART Board software on your computer from the provided SMART Board software CD.
NOTE: If SMART Board software doesn’t recognize the DT770, activate the port manually using an attached keyboard or mouse. For more information, refer to the SMART Board software online Help. Also, if the DT770 is your secondary monitor, enable it. For further information, refer to the instructions that came with your computer. Since you must have SMART Board tools running to use the DT770, select the option to start SMART Board tools automatically when you start your computer.
Orienting the Screen To ensure that the pointer appears directly beneath your finger or the tethered pen when you touch the DT770’s interactive screen, the computer needs to know the exact location of the image on the screen. You can ensure the accuracy of the pointer by orienting the screen, which requires you to touch a grid of red targets precisely using the tethered pen. Use the Quick (4 Points) orientation level.
Using the DT770 The Sympodium DT770 interactive pen display is as easy to use as a pen on paper. By touching your finger or the tethered pen to the screen, you can interact with computer applications intuitively. In addition, you can access additional tools and features using the pen tool buttons and function buttons. This chapter tells you how to interact with the screen using your finger or the tethered pen, as well as how to use the pen tool and function buttons.
When you’re not using the tethered pen, place it in the recess on the front of the DT770, where it’s held in place magnetically. Pen Recess NOTE: If you place the pen in the recess and the indicator still glows, move the pen from side to side until the indicator stops glowing. The DT770 can detect objects other than the tethered pen (such as your finger) only when the pen is correctly in the recess and the indicator is off.
Press the Pointer button and then press your finger or the tip of the tethered pen on the interactive screen to activate an object. To double-click, press twice with your finger or the tethered pen. To drag an object, press and hold it with your finger or the tip of the tethered pen and drag it to its new location. IMPORTANT If the pointer doesn’t appear directly under your finger or the tip of the tethered pen, orient the interactive pen display to improve the accuracy (page 14).
To save your note as part of the file in an Aware application, save the file as you normally would. In some Windows applications, such as Microsoft Word and Excel, you can select additional toolbar options, such as saving your note into a Notebook file or saving your note as text.
• Floating Tools: a virtual palette of tools Open Notebook Software Open the Screen Capture Tools Open the Floating Tools Open the Keyboard NOTE: For more information on using or customizing the Screen Capture tools, the SMART Keyboard, Notebook software or Floating Tools, refer to the SMART Board Software User’s Guide or the SMART Board software online Help. To open the Screen Capture tools 1. Press the Screen Capture function button on the DT770. The Capture toolbar appears. 2.
Using the Room Control Interface Button You can press the Room Control Interface button to open room control interface menus (room control system not supplied). For information on setting the file location of the room control software, see page 20. NOTE: This feature is not available if your DT770 is connected to a Mac computer. Instead, if you press the Room Control Interface button, Online Help opens.
3. Press the large Pen Tray button on the left side of the dialog. 4. To change the function of the Keyboard function button or the Right-Click pen tool button, press the arrow beside the appropriate graphic and select the function you’d like. 5. Press OK to apply the new settings. Setting the Pen Tool Defaults You can set up the DT770 so that a particular pen tool is active when you turn it on. NOTE: This feature is not available if your DT770 is connected to a Mac computer.
To enable Pen Touch Only or Finger Touch Only mode 1. Press the SMART Board icon in the system tray (Windows operating systems) or in the Dock (Mac computers), and press Control Panel. 2. Press Pen and Button Settings. 3. If the dialog box displays more than one SMART product, press Sympodium. The currently selected SMART product is surrounded by a blue border 4. Press the Default Settings button. The Sympodium Pen Tool Function dialog box appears. 5.
Cleaning the DT770 This chapter offers you advice on cleaning the DT770. CAUTION Take care not to scratch, mark or otherwise damage the cameras and optical components on the front of the DT770. Cleaning the Interactive Pen Display Turn off the DT770 before you clean it. Clean the interactive pen display surface regularly. Otherwise, dust can build up and diminish the performance of the DT770. Don’t spray glass cleaner directly onto the screen surface.
Cleaning the Tethered Pen To clean the tethered pen, gently wipe the pen with a damp cloth. CAUTION 24 The tethered pen is a sealed unit that contains electronics but no batteries. If you attempt to open the tethered pen, you’ll damage these electronics. This makes the tethered pen unusable and voids the warranty.
Troubleshooting This chapter offers suggestions for troubleshooting your DT770. Checking the Power of the Interactive Pen Display The Power indicator shows whether power is reaching the interactive pen display. Power Indicator If the Power Indicator is... this indicates that the DT770 is... Illuminated and green turned on and receiving a video signal from your computer. Illuminated and orange turned on but isn’t receiving a video signal from your computer. Off turned off.
Checking the Status of the Interactive Pen Display The Status indicator shows whether the interactive pen display is communicating with your computer correctly. Status Indicator If the Status Indicator is... this indicates that the DT770... Illuminated and green is communicating correctly with SMART Board software. Flashing green is communicating with a computer that doesn’t have SMART Board software installed. Illuminated and orange can’t communicate properly with your computer.
Control and Writing Problems If the pointer doesn’t accurately follow the movement of the tethered pen or your finger, orient the DT770 (page 14). If the digital ink doesn’t appear as you expect, check the customizable pen settings within SMART Board software. For more information on setting digital ink properties (such as color, line thickness, line style and transparency) refer to the SMART Board software online Help.
Symptom Likely Cause Remedy The white in an image doesn’t appear to be white on the screen Video image problem Check the video connection. Return the screen to the factory defaults (page 30). If you like, adjust the color setting (page 29). For details on the color management features of your operating system or the application that you’re using, read the instructions provided with your operating system or the application.
Appendix A: Adjusting the Screen Settings You can fine-tune the screen settings by using the DT770’s Display Control buttons and the OnScreen Display Menu. For a functional description of all the display settings, see the table below. To adjust the screen display settings 1. Press the Menu button on the DT770. MENU Page 1 of the On-Screen Display Menu appears. 2. Select and edit the required screen display settings as follows. Press the Menu button to display the next page of the On-Screen Display Menu.
OSD Off-Time Sets the length of time before the On-Screen Display Menu turns off automatically Language Selects a language for the On-Screen Display Menu Sharpness Increases or decreases image sharpness Reset Resets all screen options to the factory default settings Volume This function isn’t used Mute This function isn’t used Input Select This function isn’t used Color Setting Adjusts the display’s red, blue and green settings Color Adjustment Red Adjusts the display’s red component Color
Waste Electrical and Electronic Equipment (WEEE) Regulations Waste Electrical and Electronic Equipment (WEEE) regulations apply to all electrical and electronic equipment sold within the European Union. When you dispose of any electrical or electronic equipment, including SMART products, we strongly encourage you to contact your local WEEE recycling agency for recycling and disposal advice. Your SMART product required the extraction and use of natural resources for its production.
32 Waste Electrical and Electronic Equipment (WEEE) Regulations
Customer Support Training Do you need training on your SMART product? Visit http://smarttech.com/trainingcenter for free training materials and information on our training services. Contacting SMART Technical Support SMART’s Technical Support team welcomes your call. However, you may first want to contact your local reseller if you experience any difficulty with your SMART product, as they may be able to solve the problem without delay. All SMART products include free telephone, fax and e-mail support.
General Inquiries Main Switchboard: 1.888.42.SMART (toll-free in Canada/U.S.) or +1.403.245.0333 (all other countries) Fax: +1.403.228.2500 E-mail: info@smarttech.com Address: SMART Technologies Inc. 1207 – 11th Avenue SW, Suite 300 Calgary, AB T3C 0M5 CANADA Warranty Product warranty is governed by the terms and conditions of SMART's "Limited Equipment Warranty" that shipped with the SMART product at the time of purchase. Registration A User Registration card was included with your SMART product.
Index A K Adjusting Screen Display Settings 29 Kensington Cable and Lock Device 12 C M Calibrating the Cameras 28 Cleaning the DT770 23 Connecting the DT770 8 Connecting the Tethered Pen 9 Connection Panel 4 Contacting SMART Technical Support 33 Creating Digital Ink 17 Customizing Buttons 20 Monitor 9 Mono Stand 11 D O On-Screen Display Menu 29, 30 Orienting 14 P E Pen see Tethered Pen Pen Tool Buttons Clicking 16 Introduction 3 Using 15 Power Indicator Introduction 4 Troubleshooting 25 Power Su
T Tethered Pen Clicking 16 Connecting 9 Introduction 2 Using 15 Writing 17 Tilt Stand 11 Troubleshooting Control and Writing 27 Image 26 Power 25 Status 26 Symptoms, Likely Causes and Remedies 27 U Using the DT770 15 W Writing Notes 17 36 Index
SMART Technologies Inc. 1207 – 11 Avenue SW, Suite 300 Calgary, AB T3C 0M5 CANADA Support +1.403.228.5940 or Toll Free 1.866.518.6791 (Canada/U.S.) Support Fax +1.403.806.1256 support@smarttech.com www.smarttech.