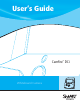
User’s Guide TM Camfire DCi Whiteboard Camera
Registration Benefits In the past, we’ve made new features available as free software upgrades. Register your Camfire DCi system to be notified of free upgrades. Keep the following information available in case you need to contact Technical Support: Serial Number Date of Purchase Register online at: www.smarttech.com/registration FCC Warning This equipment has been tested and found to comply with the limits for a "Class A" digital device, pursuant to Part 15 of the FCC rules.
Important Information Read this manual carefully before setting up and using the Camfire DCi system. With proper care, your system should provide years of trouble-free service. About This Guide This guide explains how to use the Camfire DCi system with a camera boom and a control unit. Refer to the Camfire DCi Installation Guide for installation instructions. This guide doesn’t cover the Camfire PC system, which is a different product that consists of a camera boom connected directly to a computer.
Cleaning the Control Unit Apply a mild detergent cleanser to a soft cloth and wipe the surface clean. Never use solvents or abrasive cleansers, as these may damage the surface of the control unit. Cleaning the Camera Boom Only clean the lens with a cloth designed specifically for that purpose. Lens-cleaning cloths are available from most photography stores.
Contents Important Information .............................................................................................................. i About This Guide ................................................................................................................ i Other Warnings and Safety Precautions ............................................................................ i Cleaning the Control Unit..............................................................................................
Contents
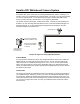
Camfire DCi Whiteboard Camera System The Camfire DCi system works with your existing whiteboard and markers, enabling you to save the notes on your whiteboard as a high-resolution, color image. You can print this image to a local or network printer. You can also save this image on a removable USB storage device, personal computer, network server, or in a temporary Web folder. The system consists of three parts: a fixed camera boom, a control unit and Image-Saving Software.
You can connect the control unit to a network or use it as a stand-alone device. Depending on the configuration you choose, you have the option of saving your whiteboard notes to a removable USB storage device, a personal computer running Image-Saving Software for PCs, a network server running Image-Saving Software for Networks, or a temporary Web folder. You can also print your whiteboard notes on a local or network printer. If you like, you can use the Camfire DCi system with multiple whiteboards.
If you only need a paper copy of your whiteboard notes, attach a printer to the stand-alone control unit and press the Print button.
When the control unit is set up to save images on a network server (using Image-Saving Software for Networks), the control unit displays a network icon. This guide explains how to use whiteboard notes saved by Image-Saving Software for Networks. For information about installing and configuring this software, refer to the Camfire Image-Saving Software for Networks System Administrator’s Guide. Internal Web Folders The control unit has built-in flash memory.
Using the Camfire DCi System at a Control Unit Using the Camfire DCi system at a whiteboard is simple. Just follow the instructions on the control unit screen. You can scroll, save, create a new folder, initiate sleep mode and activate a range of other commands with the press of a button. Depending on your current task, the functions of the command buttons vary. Refer to the control unit screen for the current function of each command button.
Creating a New Folder When whiteboard notes are saved, the images are stored in a folder named by the date and time at which it was created. To create a new folder for a USB storage device or Web folder Press the New Folder button. The Camfire DCi system stores your images in a new folder named by the time and date at which it was created. The previous folder closes when the new folder opens. To create a new folder for a personal computer or network 1. Press the New Folder button on the control unit.
To toggle through the available save modes for your configuration Press the Change Mode button. When you switch to a different mode, the folder created in the previous mode closes. NOTE: If only one mode is available, this button is disabled. Also, whenever you insert a USB storage device into the control unit, the mode automatically changes to USB Storage Device. Saving Whiteboard Notes 1. Press the Save button on the control unit.
If you have multiple whiteboards, the following screen appears. 2. Select a whiteboard, if required. 3. Press Save. Your notes are saved using the mode identified in the status area of the control unit screen. A screen indicates when the image is being saved and another screen indicates when it’s safe to erase the whiteboard. Wait until the Ready to Save screen appears before you capture any new notes.
The Activating Statusboard screen appears. 3. To save the whiteboard notes whenever you step away from the whiteboard, select Auto Detect Mode and press Next. OR To automatically save the whiteboard notes at a regular time interval, select Timer Mode and press Next. Then use the scroll button to select the save interval and press Next again. The following screen appears. 4. To archive each saved image, select Yes and press OK.
Printing Whiteboard Notes 1. Press the Print button on the control unit. The following screen appears. 2. To print the current image, use the scroll button to navigate to the image you want and press the Current Image button. OR To print all of the images within the current folder, press the All Images button. Deleting Whiteboard Notes While working at the computer, you can delete one or all of the images in the current folder. To delete whiteboard notes 1. Press the Delete button on the control unit.
The following screen appears. 2. To delete the current image, use the scroll button to navigate to the image you want and press the Current Image button. OR To delete all of the images in the current folder, press the All Images button. A confirmation message appears. 3. Press OK. If you’re using Image-Saving Software for PCs or Networks, the image on the computer or network server is also deleted.
Reactivating the Camfire DCi System After an extended period of inactivity, the Camfire DCi system automatically goes into sleep mode. You can also put the system into this mode by pressing the Sleep button. In sleep mode, the control unit screen is blank. To reactivate the system, press any button. If you assigned a control unit password, you’ll also need to enter it as explained in the next procedure.
Adjusting the Camfire DCi System at a Control Unit While working at the whiteboard, you can: • adjust the brightness of the control unit screen (page 13) • refine image alignment (page 13) Adjusting Screen Brightness If you’re having problems reading the information on the control unit screen, try adjusting the screen brightness. To adjust screen brightness 1. Press the Options button on the control unit. The Options screen appears. 2. Use the scroll button to select Screen Brightness and press OK.
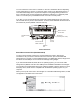
To refine the image alignment 1. Using a dry-erase marker, mark the horizontal center of the whiteboard at the top and bottom of the writing surface. Make each mark approximately 2 in. (5 cm) long, beginning at the whiteboard frame. Mark the center of the whiteboard at the top and bottom of the writing surface 2. Align the top and bottom image targets to the marks you just made. NOTE: An electronic version of these targets is available at www.smarttech.com/ products/camfire/specs.
5. Press the Options button on the control unit. The Options screen appears. 6. Use the scroll button to select Administration and press OK. If you assigned an administrator password, the Enter Administrator Password screen appears. 7. Enter the Administrator Password, if required: a. Scroll up or down to select each character. b. Scroll right to advance one space. NOTE: To delete the previous character, scroll left. c. When you finish entering the password, press OK. The Administration screen appears.
If you have multiple whiteboards, the following screen appears. 9. Select a whiteboard, if required. The following screen appears. 10. Press OK. A screen appears, indicating that the alignment is in progress. 11. Wait for the Administration screen to appear (approximately three minutes), indicating that the alignment is complete. 12. Without removing the image targets from your whiteboard, press the Save button. An image of your whiteboard appears on the control unit screen. 13.
Working with Whiteboard Notes on a Computer You can access whiteboard notes at your desk in three different ways: • If you saved the images to a USB storage device, you can access the images using any desktop computer (page 17) • If you have Image-Saving Software for PCs on a computer that’s within the same network as the control unit, you can access the files on that computer (page 17) • If you have Image-Saving Software for Networks on your network, you can access the images after they are published
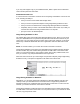
1. Double-click the Camfire Image-Saving Software for PCs icon in the system tray. Camfire Image-Saving Software for PCs Icon The following dialog box opens. 2. Click the Refresh Indexes button. 3. Click OK in the message box that appears. 4. Click OK again. To access whiteboard notes saved by Image-Saving Software for PCs 1. Use Windows Explorer to navigate to the folder you want.
2. Double-click the index.html file in the folder containing the images you want. TIP If you’re not sure which folder the images were stored in, double-click the index.html file in the root directory. A Camfire Image-Saving Software page opens in your Web browser. 3. Navigate to the folder you want. An index of images appears. 4. To view an image in greater detail, click its thumbnail. 5. To print an image, click the Printer Friendly Version (PDF) link below its thumbnail.
An intranet page with links to the whiteboard notes appears. 3. Select a folder. A calendar appears for the folder you selected. 4. Click the day that you want.
An index of images appears. 5. To view an image in greater detail, click its thumbnail. 6. To print an image, click the Printer Friendly Version (PDF) link below its thumbnail. Then select Print from the File menu. 7. To save the image in Internet Explorer, right-click its thumbnail and select Save Target As. Specify a file path and name in the Save As dialog box. OR To save the image in Netscape Communicator or Netscape Navigator®, right-click its thumbnail and select Save Link Target As.
To save the notes in a Web folder on your hard drive or network 1. Open a Web browser, such as Microsoft Internet Explorer or Netscape Communicator, on a computer that’s within the same network as the control unit. 2. Enter the control unit IP address (displayed at the top of the control unit screen) in the Address bar. NOTE: With some network setups, you can also type the control unit host name in the Address bar to access internal Web folders.
To delete a Web folder NOTE: This procedure should only be completed by a system administrator. 1. Open a Web browser, such as Microsoft Internet Explorer or Netscape Communicator, on a computer that’s within the same network as the control unit. 2. Enter the IP address of the control unit, plus /config, in the Address bar of the Web browser. The IP address appears at the top of the control unit screen when the Web folder mode is active. A password dialog box appears. 3. Enter admin as the User Name.
Customer Support Our Technical Support team welcomes your call. However, you may want to contact your local reseller first if you experience problems with any SMART product. SMART’s resellers can readily provide you with quick advice so you can enjoy the benefits of the Camfire DCi system without delay. Contacting SMART Technical Support There are a number of ways to contact SMART Technical Support: Telephone: 1.866.518.6791 (toll-free in Canada/U.S.) or +1.403.228.
Index A I Accessing Whiteboard Notes In an Internal Web Folder, 21–23 On a Network Server, 19–21 On a Personal Computer, 18–19 On a USB Storage Device, 17 Adjusting Screen Brightness on Control Unit, 13 Aligning Saved Images, 13–16 C Calibrating the Camera Boom Image Alignment, 13–16 Camera Boom Cleaning, ii Refining Image Alignment, 13–16 Changing the Save Mode, 6–7 Cleaning Camera Boom, ii Control Unit, ii Command Buttons, 5 Control Unit Activating Sleep Mode, 11–12 Activating the Statusboard Option,
R Reactivating the Control Unit, 12 Refining Image Alignment, 13–16 Registration of Product, 24 Removable USB Storage Device, 2, 17 Saving Whiteboard Notes, 6–8 S Saving Whiteboard Notes, 6–8 Activating the Statusboard Option, 8–9 Changing the Save Mode, 6–7 Network, 3–4 Personal Computer, 3 Refining Image Alignment, 13–16 USB Storage Device, 2 Web Folder, 4 Screen Brightness on Control Unit, 13 Sleep Mode, 11–12 SMART Web Site, 24 Stand-Alone Control Unit, 2 Statusboard Option, 8–9 T Technical Support, 2
Suite 600, 1177 – 11th Avenue SW Calgary, AB CANADA T2R 1K9 Main Switchboard: 1.888.42.SMART (Canada/U.S.) or +1.403.245.0333 (all other countries) Support Tel: 1.866.518.6791 (Canada/U.S.) or +1.403.228.5940 (all other countries) Support Fax: +1.403.245.0366 support@smarttech.com www.smarttech.