
User's Manual

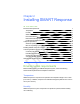


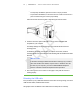

Table Of Contents
- Important information
- About SMART Response
- Installing SMART Response
- Getting started
- Using SMART Response
- About SMART Notebook
- Creating Assessments
- Adding questions to the assessment
- About question types
- About intelligent expression grading
- Adding questions using the Insert Question wizard
- Importing questions from a Word document
- Example Word document question formats
- Importing questions from an XML or SQZ file
- Importing questions from a PDF file
- Adding choices to a question
- Tagging questions
- Starting and connecting to a class
- Disconnecting students from a class
- Using clickers
- Completing assessments
- Reviewing, printing and exporting assessment results
- Maintaining SMART Response
- Hardware environmental compliance
- Waste Electrical and Electronic Equipment Regulations (WEEE directive)
- Restriction of Certain Hazardous Substances (RoHS directive)
- Batteries
- Packaging
- Covered Electronics Devices
- China’s Electronic Information Products regulations
- U.S. Consumer Product Safety Improvement Act
- California Air Resource Board – Airborne Toxic Control Measure
- Restriction of Certain Chemicals (REACH directive)
- Customer support

1 1
Connecting the receiver
I M P O R T A N T
l Do not connect the receiver to your computer until after you install SMART
Response.
l For operating safety and to avoid damage to the receiver, you must only
connect the interactive whiteboard’s USB connector to a computer that
has a USB compliant interface and that bears the USB logo. In addition,
the USB source computer must be compliant with CSA/UL/EN 60950 and
bear the CE mark and CSA and/or UL mark (s) for CSA/UL 60950.
l The receiver has a USB 2.0 full-speed peripheral interface that runs at
speeds of up to 12 Mbps. The unit works with USB 2.0- and USB 1.1-
compliant USB interfaces.
Recommended Height for Mounting the Receiver
Although SMART Response receivers don’t require an unobstructed line-of-sight
transmission path such as that required by infrared devices, you can operate SMART
Response over larger distances if you minimize interference, signal reflections and the
number and size of objects between the receiver and the clickers.
Choose a location for the receiver that’s as high as possible, and in plain view of the
students’ clickers. For permanent installations, use a USB extender to mount the
receiver high on a wall. To minimize interference from other radio-frequency equipment,
position the receiver away from other wireless products, such as 2.4 GHz routers and
cordless telephones.
W A R N I N G
To prevent product damage or personal injury, route the USB cable where it will
not be stepped on or tripped over.
To connect the receiver 1. Position the receiver in an unobstructed location away from other wireless
products, such as 2.4 GHz routers and cordless telephones.
For temporary installations, place the receiver on top of your desk.
For permanent installations, mount the receiver on a wall or on the front of a piece
of furniture using two screws (not provided).
| C H A P T E R 2 – I N S T A L L I N G S M A R T R E S P O N S E