
User's Manual

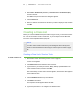

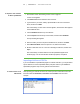


Table Of Contents
- Important information
- About SMART Response
- Installing SMART Response
- Getting started
- Using SMART Response
- About SMART Notebook
- Creating Assessments
- Adding questions to the assessment
- About question types
- About intelligent expression grading
- Adding questions using the Insert Question wizard
- Importing questions from a Word document
- Example Word document question formats
- Importing questions from an XML or SQZ file
- Importing questions from a PDF file
- Adding choices to a question
- Tagging questions
- Starting and connecting to a class
- Disconnecting students from a class
- Using clickers
- Completing assessments
- Reviewing, printing and exporting assessment results
- Maintaining SMART Response
- Hardware environmental compliance
- Waste Electrical and Electronic Equipment Regulations (WEEE directive)
- Restriction of Certain Hazardous Substances (RoHS directive)
- Batteries
- Packaging
- Covered Electronics Devices
- China’s Electronic Information Products regulations
- U.S. Consumer Product Safety Improvement Act
- California Air Resource Board – Airborne Toxic Control Measure
- Restriction of Certain Chemicals (REACH directive)
- Customer support

2 7
7. Type a student's name in the Name boxes. The student's e-mail address and tags
are optional. You can also type name and ID information directly in the table.
N O T E
You can use tags to categorize the students in custom groupings that
SMART Response uses when you create student reports.
The student information saves to the Class List as you type it.
8. Repeat these steps for each student.
Importing a list from Excel
N O T E
This feature is supported by SMART Response software for Windows operating
systems only.
If you use Microsoft Excel software to maintain class lists, you can import an .xls or
.xlsx file into Teacher Tools to create a SMARTResponse Class List. You may find it
easier to copy the list of names in your current Excel document into a new spreadsheet.
To create a class list in an
Excel spreadsheet
1. Open the Excel spreadsheet containing your students' names.
2. Insert a blank row at the top of the spreadsheet if it doesn't already have one.
3. Type ID Number in the first cell (A1).
4. Type First Name in the first cell of the second column (B1), .
5. Type Last Name in the first cell of the third column (C1).
6. Move the first and last names into columns B and C, directly below the headings.
7. Type a unique ID number of 1 to 15 digits, for each student, in column A, and then
save the spreadsheet.
| C H A P T E R 3 – G E T T I N G S T A R T E D