
User's Manual
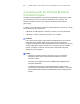
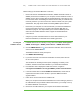
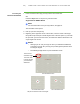


Table Of Contents
- Product Registration
- Important Information
- Contents
- About Your SMART Board 600 or SBD600 Series Interactive Whiteboard
- In This Chapter
- Features
- How Does Your SMART Board Interactive Whiteboard Work?
- Included Accessories
- Optional Accessories
- Serial RS-232 Expansion Module
- The serial expansion module connects to the controller module on the back of your interactive whiteboard.
- Wireless Bluetooth Connection
- SystemOn Expansion Module
- USB Audio System
- Active USB Extension Cables
- Projector Wall-Mount (Models 680 and SBD680 only)
- SMART Board Interactive Whiteboard Floor Stand (Models 640, 660, 680 and SBD680 only)
- SMART Board Interactive Whiteboard Table Stand
- Installing and Securing Your SMART Board Interactive Whiteboard
- In This Chapter
- Environmental Requirements
- Mounting Your SMART Board 660, 680 or SBD680 Interactive Whiteboard on a Floor Stand
- Wall-Mounting Your SMART Board Interactive Whiteboard
- Securing the Pen Tray and Interactive Whiteboard
- Removing the Pen Tray
- Connecting Your Interactive Whiteboard to Your Computer
- In This Chapter
- Overview
- System Power Safety and Precautions
- Connecting with a USB Cable
- Installing SMART Product Drivers
- Connecting Using the Optional RS-232 Serial Expansion Module
- Connecting with the Wireless Bluetooth Connection Option
- Configuring Your Computer Settings
- Orienting Your Interactive Whiteboard
- Connecting a Guest Laptop
- Connecting Multiple Interactive Products
- Using and Maintaining Your SMART Board Interactive Whiteboard
- Troubleshooting Your SMART Board Interactive Whiteboard
- In This Chapter
- Adjusting the Projected Image
- Resetting Your Interactive Whiteboard
- Troubleshooting Using the Ready Light
- Flowchart 1: Getting Started
- Flowchart 2: Ready Light Off
- Flowchart 3: Ready Light Red
- Things to try first:
- • Disconnect and then reconnect the USB cable at both ends to reset your interactive whiteboard and reestablish the link.
- • If the Ready light changes from green to red while your computer is running, the computer might become unresponsive. Restart your computer.
- • An alternating red/green light might indicate that your computer is running too many other applications or doesn’t meet minimum specifications. Reduce the load on your computer by closing unnecessary applications, or replace it with a more powe...
- Things to try first:
- Flowchart 4: Ready Light Flashing Green
- Flowchart 5: Ready Light Steady Green
- A steady green Ready light indicates that the controller is operating normally. If the pen tray failed or isn’t communicating with the controller, your interactive whiteboard will still operate in mouse mode. When you reset your interactive whitebo...
- Troubleshooting Tips
- Where to Find More Information
- Contacting SMART Technical Support
- Hardware Environmental Compliance
- Customer Support
- Index

37 | CONNECTING YOUR INTERACTIVE WHITEBOARD TO YOUR COMPUTER
To set up the wireless
USB adapter
1. If necessary, follow the included instructions to install your wireless Bluetooth
connection expansion module, and then connect your interactive whiteboard to an
AC power receptacle.
The LED indicator on the expansion module and the Ready light start flashing.
– The Ready light flashes green continuously, indicating that your interactive
whiteboard is communicating with the USB interface of the wireless Bluetooth
connection expansion module.
– The expansion module’s LED flashes green fourteen times, and then turns
red for approximately five seconds before repeating the sequence. This
pattern indicates that the expansion module isn’t communicating with its
Bluetooth-to-USB converter.
2. Press the power button on your computer to start it.
3. Connect the Bluetooth-to-USB converter to an
available USB receptacle on your computer.
The Ready light and the expansion module’s LED
turn steady green, indicating successful
communication between the wireless Bluetooth
connection components.
NOTE
If the expansion module’s LED continues to flash, press the pairing button
on both the expansion module and the Bluetooth-to-USB converter.
Wireless Component Pairing
The expansion module and the Bluetooth-to-USB converter are “paired” at the factory
so that they will only communicate with each other. You can synchronize the
components at any time, as required.
Both the wireless USB expansion module and its USB converter have a pairing
button. Install both the expansion module and the converter, and then press the
pairing button on one of the devices. It stays in pairing mode for up to two minutes,
giving you time to press the companion device’s button. When you press the pairing
button on the other device, the devices detect each other and enter Discovery mode.
If you don’t press the companion device’s
button within this interval, the first device
returns to its normal mode. After an
expansion module and its USB converter
are paired, they remain associated with
each other indefinitely.
Pairing
Buttons
Expansion
Module
Bluetooth-USB
Converter