SMART Board® MX | MX Pro series interactive displays User guide SBID-MX255-V3 / V3N | SBID-MX265-V3 / V3N | SBID-MX275-V3 / V3N | SBID-MX286-V3 / V3N SBID-MX255-V3-PW / V3N-PW | SBID-MX265-V3-PW / V3N-PW | SBID-MX275-V3-PW / V3N-PW | SBID-MX286-V3-PW / V3N-PW SBID-MX055-V3 / V3N | SBID-MX065-V3 / V3N | SBID-MX075-V3 / V3N | SBID-MX086-V3 / V3N SBID-MX055-V3-PW / V3N-PW | SBID-MX065-V3-PW / V3N-PW | SBID-MX075-V3-PW / V3N-PW | SBID-MX086-V3-PW / V3N-PW SBID-MX255-V2-C | SBID-MX265-V2-C | SBID-MX275-V2-C |
Learn more This guide and other resources for SMART Board MX and MX Pro series interactive displays are available in the Support section of the SMART website (smarttech.com/support). Scan this QR code to view these resources on your mobile device. ENERGY STAR is the government-backed symbol for energy efficiency, providing simple, credible, and unbiased information that consumers and businesses rely on to make well-informed decisions.
Important information Note Refer to the SMART Board MX and MX Pro series interactive displays installation and maintenance guide (smarttech.com/kb/171555) for important information about installing and maintaining the display. Warning l Do not open or disassemble the display. You risk electrical shock from the high voltage inside the casing. Opening the casing also voids the warranty. l Do not stand (or allow children to stand) on a chair to touch the surface of the display.
Contents Important information 3 Chapter 1 Welcome 6 About this guide About the display Identifying your specific model Accessories More information Chapter 2 Using basic features Waking up the display and putting it back to sleep Using the Home button Using the front control panel Using the remote control Using touch Writing, drawing, and erasing Adjusting the volume Freezing or hiding the screen Chapter 3 Using the iQ apps Using the Apps Library Using the Files Library Using SMART Whiteboard Using Bro
Contents Chapter 5 Troubleshooting The display isn’t turning on The screen is blank or there’s a problem with the image on the screen There’s no sound or there’s a problem with the sound Touch isn’t working as expected The pens and erasers aren’t working as expected iQ apps aren’t working as expected SMART software on connected computers isn’t working as expected The SMART OPS PC module isn’t working as expected The Intel Compute Card isn’t working as expected Contacting your reseller for additional suppor
Chapter 1 Welcome About this guide About the display Touch Writing, drawing, and erasing iQ experience Display Audio Network connectivity Room computers and guest laptops Accessory slot Front control panel Front connector panel Ambient light sensor Power status light Remote control and IR sensor Identifying your specific model Accessories SMART OPS PC module Stands USB extenders More information 6 6 7 7 8 8 8 8 9 9 10 10 10 10 10 11 11 12 12 12 13 This chapter introduces the SMART Board® MX and MX Pro ser
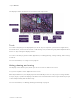
Chapter 1 Welcome The display includes an extensive set of features and components: Touch You can do everything on the display that you can do at your computer—open and close applications, meet with others, create new documents or edit existing ones, visit websites, play and manipulate videos, and so on—by touching the display’s surface. You can use an array of gestures within applications, including panning, scaling, rotating, and zooming in and out. For more information, see Using touch on page 19.
Chapter 1 Welcome iQ experience The display’s iQ experience provides one-touch access to collaborative tools, including a whiteboard, wireless screen sharing, and a web browser. With minimal network integration, there’s no need for wires, cables, or manual software and firmware updates. From the iQ experience Home screen, you can open the iQ apps, switch inputs, and adjust settings. For more information about the Home screen, see Using the Home button on page 15.
Chapter 1 Welcome You can connect to a network using Wi-Fi or the RJ45 LAN jack on the display: l Wi-Fi supports both 2.4 and 5 GHz bands. l The two RJ45 jacks allow you to connect the display and an external device, such as a computer, to a Ethernet network. Room computers and guest laptops You can connect room computers and guest laptops and use the display to view and interact with them.
Chapter 1 Welcome Front control panel The front control panel contains buttons for turning the display on and off, controlling the volume, freezing and unfreezing the screen, and showing and hiding a screen shade. For more information about the front control panel, see Using the front control panel on page 15. Front connector panel The front connector panel includes connectors for USB peripherals and a computer or other input source.
Chapter 1 Welcome Identifying your specific model There are several series of SMART Board MX and MX Pro series interactive displays: SMART Board MX (V3) series SMART Board MX (V2C) series SMART Board MX (V2) series SMART MX series SBID-MX255-V3 SBID-MX255-V2-C SBID-MX255-V2 SBID-MX365 SBID-MX265-V3 SBID-MX265-V2-C SBID-MX265-V2 SBID-MX375 SBID-MX275-V3 SBID-MX275-V2-C SBID-MX275-V2 SBID-MX386 SBID-MX286-V3 SBID-MX286-V2-C SBID-MX286-V2 SBID-MX265 SBID-MX255-V3-PW SBID-MX255-V2-CPW SBI
Chapter 1 Welcome l SMART OPS PC module l Stands l USB extenders Note For more information about these and other accessories, see smarttech.com/accessories. SMART OPS PC module SMART Open Pluggable Specification (OPS) PC modules provide a hasslefree Windows Pro installation based on Intel® Core™ processors and are designed specifically to work with a SMART display. All OPS PC modules are WHQL certified and fully licensed with Windows Pro.
Chapter 1 Welcome Notes l To extend touch using the SMART CAT 5 USB extender (CAT5-XT-1100) use a touch USB connector associated with an HDMI 1, HDMI 2, or VGA input. The extender will not function correctly if used to extend touch associated with the HDMI 3 input on the front of the display. l For more information about extending USB connections, see USB cable extenders.
Chapter 2 Using basic features Waking up the display and putting it back to sleep Using the Home button Using the front control panel Using the remote control SMART Board MX (V3, V2 and V2-C) series SMART Board MX series Using touch Writing, drawing, and erasing Writing and drawing in digital ink Using the SMART Ink dynamic (floating) toolbar Changing a pen’s default color, thickness, and other properties Erasing digital ink Adjusting the volume Freezing or hiding the screen Freezing the screen Showing and
Chapter 2 Using basic features Using the Home button You can use the Home screen to open and use iQ apps, view the input of connected computers, and more. You can also change the background and personalize other features of the Home screen. To learn more about the Home screen, see Understanding the Home screen. The Input screen shows thumbnails of connected computers and allows you to switch among inputs. You can return to the Home screen or the Input screen at any time by following the instructions below.
Chapter 2 Using basic features No. Name Procedure 3 Screen shade Press to hide screen contents behind a screen shade (see Freezing or hiding the screen on page 23). 4 Freeze Press to freeze and unfreeze the screen (see Freezing the screen on page 23). 5 Volume decrease Press to turn down the volume (see Adjusting the volume on page 22). 6 Volume increase Press to turn up the volume (see Adjusting the volume on page 22).
Chapter 2 Using basic features SMART Board MX (V3, V2 and V2-C) series The image and table below list the remote control’s functions. No. Name 1 Power Procedure l Press to enter or exit Standby mode (see Waking up the display and putting it back to sleep on page 14). Note Touch is not available right after waking up the display or turning it on. Wait a few seconds and then the display will respond to touch. l Press and hold for four seconds to turn off the display.
Chapter 2 Using basic features No. Name Procedure 6 Back Go one step back in the navigation history. 7 Input Switch input sources (see Viewing a connected computer’s input on page 35). 8 Settings Open display settings. 9 Screen shade Hide screen contents behind a screen shade (see Showing and hiding the screen shade on page 23). 10 Freeze frame Freeze and unfreeze the screen (see page 23). 11 Volume increase Increase the volume (see Adjusting the volume on page 22).
Chapter 2 Using basic features No. Name Function 1 MUTE Mute or unmute the volume 2 SOURCE Open the input source menu 3 INFO Press to show the display’s detected resolution and refresh rate for the current input source 4 SYS Open the display’s settings 5 AUDIO Change the display’s audio mode 6 VOL + / VOL - Increase or decrease volume 7 [Number buttons] Press buttons on the number pad to customize settings 8 POWER Wake the display. Enter Sleep mode. 9 FREEZE Freezes the screen.
Chapter 2 Using basic features Note Not all gestures work in all applications. Refer to an application’s documentation to learn which gestures it supports. Pan (one finger) Pan (two fingers) / scroll Pinch to zoom in / scale (enlarge) Pinch to zoom out / scale (reduce) Rotate Flick smarttech.
Chapter 2 Using basic features Erase with palm Erase with fist Writing, drawing, and erasing The display includes two pens, which you can use to write or draw in digital ink. You can erase digital ink using gestures or the eraser tool in the apps. Writing and drawing in digital ink To write or draw in digital ink 1. Pick up one of the display’s pens. 2. Use the pen to write or draw in digital ink.
Chapter 2 Using basic features Changing a pen’s default color, thickness, and other properties You can change a pen’s color, thickness, and other properties temporarily using the SMART Ink dynamic (floating) toolbar when you’re viewing a connected computer’s input. To change the pen’s default color, thickness, and other properties, see Changing pen, eraser, and button settings.
Chapter 2 Using basic features Freezing or hiding the screen You can temporarily freeze or hide the contents on the screen using the display’s freeze and screen shade features. Freezing the screen You can temporarily freeze the screen by pressing the Freeze button on the front control panel or remote control. This is particularly useful when you want to pause a video, an animation, or other moving images.
Chapter 3 Using the iQ apps The display comes with the following iQ apps: l SMART Whiteboard l Browser l Input l Screen Share l kapp Whiteboard You can use these apps along with the Files Library and Apps Library to deliver lessons in a classroom or coordinate meetings and other collaborative activities. Note Some apps, such as Screen Share, require a properly configured network connection.
Chapter 3 Using the iQ apps Using the Files Library The Files Library contains kapp Whiteboard sessions, SMART Notebook files, SMART Whiteboards, PDFs, and screenshots. If a USB drive is connected to the display, the files on the USB drive are also available in the Files Library. Although these files can be viewed on the display, they are not saved on the display. To open Files Library From the Home screen, tap Files Library .
Chapter 3 Using the iQ apps l Mac computers and iOS devices, using AirPlay l Android™ devices, using Cast Screen You can also download the SMART Screen Share app for Chromebooks, Windows computers, Mac computers, iOS devices, and Android devices. To learn how to use the other features of Screen Share, see Sharing your device’s screen to the display. Using SMART Mirror Use SMART Mirror to share content via the internet.
Chapter 3 Using the iQ apps Cleaning up the display After you’ve finished using the display, tap Clean Up for the next user. on the Home screen to clean up the display Tapping the Clean Up button does the following: l Signs out of everything in the Browser app. l Closes all applications, including third-party apps. Note Tapping Clean Up doesn’t perform a factory reset on the display. To learn more, see About the iQ experience and navigating the Home screen.
Chapter 4 Connecting computers and other devices Installing and using SMART software Downloading and installing SMART software Using SMART software Connecting room computers and guest laptops Viewing a connected computer’s input Setting a connected computer’s resolution and refresh rate Connecting USB drives, peripherals, and other devices Troubleshooting connected computers Connecting a SMART OPS PC module Connecting USB drives, peripherals, and other devices 28 29 30 31 35 36 37 37 37 38 Warning Ensure
Chapter 4 Connecting computers and other devices Software Description Notes SMART Ink Software that enables you to write and draw in digital ink over applications, files, folders, websites, and any other open window. Included with SMART Notebook and SMART Meeting Pro software SMART Remote Management Cloud-based mobile device management software for remotely maintaining, supporting, controlling, and securing the display and your other devices.
Chapter 4 Connecting computers and other devices Using SMART software For information about using SMART software, see the following pages in the Support section of the SMART website: l SMART Notebook l Lumio by SMART l SMART Learning Suite l SMART TeamWorks l SMART Meeting Pro l SMART Product Drivers and SMART Ink l SMART Remote Management SMART Product Drivers and Ink are installed and used on the computer input of the display to enable touch and digital inking features.
Chapter 4 Connecting computers and other devices Connecting room computers and guest laptops You can connect room computers and guest laptops to the display and view and interact with their inputs. l SMART Board MX (V3) series Side and bottom connector panels smarttech.
Chapter 4 Connecting computers and other devices l SMART Board MX (V2-C) series Side and bottom connector panels smarttech.
Chapter 4 Connecting computers and other devices l SMART Board MX (V2) series Side and bottom connector panels Front connector panel HDMI 3 smarttech.
Chapter 4 Connecting computers and other devices SMART Board MX series Side and bottom connector panels l HDMI 1 Front connector panel HDMI 3 HDMI 2 VGA Notes l Install SMART software on any computers you connect to the display (see Installing and using SMART software on page 28). smarttech.
Chapter 4 Connecting computers and other devices l Your organization’s installers might have connected cables to the display and run the cables behind a wall or under the floor to a desk or table where you can place your computer. l You can charge devices connected to the USB Type-C receptacle on the front connector panel of SMART Board MX (V2-C and V3) series interactive displays up to 15 W.
Chapter 4 Connecting computers and other devices To view the input of a computer connected to a SMART Board MX series display 1. Connect the computer to the display. 2. Press the Input on the front control panel. The Input selection menu appears. Note Inputs with devices connected are blue, and inputs without a connection are black. 3. Tap the computer’s input menu option.
Chapter 4 Connecting computers and other devices The following table presents the recommend resolutions and refresh rates for the display’s VGA input source: Resolution Input source aspect ratio Mode Refresh rate 1920 × 1080 16:9 [N/A] 60.000 Hz 1600 × 1200 4:3 [N/A] 60.000 Hz 1360 × 768 16:9 [N/A] 60.015 Hz 1280 × 1024 5:4 SXGA 60 60.020 Hz 1024 × 768 4:3 XGA 60 60.004 Hz XGA 70 70.069 Hz XGA 75 75.029 Hz SVGA 60 60.317 Hz SVGA 72 72.188 Hz SVGA 75 75.000 Hz VGA 60 59.
Chapter 4 Connecting computers and other devices For more information about SMART OPS PC modules, see the SMART OPS PC modules user guide (smarttech.com/kb/171747). Connecting USB drives, peripherals, and other devices The display includes the following USB Type A receptacles.
Chapter 4 Connecting computers and other devices The following table shows which USB Type-A receptacles you can use with each input source and the supported USB speed: Input source USB 3.0 Type-A receptacle3 USB 2.
Chapter 5 Troubleshooting The display isn’t turning on The screen is blank or there’s a problem with the image on the screen There’s no sound or there’s a problem with the sound Touch isn’t working as expected The pens and erasers aren’t working as expected iQ apps aren’t working as expected SMART software on connected computers isn’t working as expected The SMART OPS PC module isn’t working as expected The Intel Compute Card isn’t working as expected Contacting your reseller for additional support 40 41 4
Chapter 5 Troubleshooting The screen is blank or there’s a problem with the image on the screen Note If the issue occurs on the Home screen, the issue may be with the display. See Contacting your reseller for additional support on page 46. If the issue doesn’t occur on the Home screen, examine the connected computers or devices. Symptom The screen is blank.
Chapter 5 Troubleshooting Symptom The image on the screen is distorted. Troubleshooting steps l OR There are lines, snow or, other visual noise on the screen. on OR On SMART Board MX series displays, press Input the remote control, and then select OPS. OR The image if flickering or flashing. on the front control panel or If the Home screen appears correctly, the issue is with the video input. OR The image is dim.
Chapter 5 Troubleshooting Symptom The image is cut off or shifted to the left or right. Troubleshooting steps l Adjust any connected computers’ video settings, particularly zoom, crop, and underscan. See the computer’s operating system documentation. l l The image doesn’t fill the entire screen. l If you’re using a VGA video input and any connected computers’ desktops are entirely black, change them to dark gray or a different color.
Chapter 5 Troubleshooting Touch isn’t working as expected Symptom The display doesn’t respond to touch. Troubleshooting steps l l l l l l l l The display responds to touch intermittently. OR When you touch the screen, the pointer doesn’t appear in the correct place. Make sure SMART Product Drivers are installed and running on connected computers. (SMART Board MX (V3) displays require SMART Product Drivers 12.18 or later, and SMART Board MX (V2-C) and (V2) displays require SMART Product Drivers 12.
Chapter 5 Troubleshooting The pens and erasers aren’t working as expected Symptom Troubleshooting steps The display doesn’t respond to touch or writing with a pen. l l l l l l The display responds to touch but not to writing with a pen. When you write on the screen, the ink appears in the wrong place. l l OR l Writing is intermittent. l OR Ink disappears as you write. l l l l l You can’t write or draw in Office.
Chapter 5 Troubleshooting SMART software on connected computers isn’t working as expected Symptom Troubleshooting steps SMART Notebook software isn’t working as expected. See Troubleshooting SMART Notebook. Lumio by SMART isn’t working as expected. See Troubleshooting common issues in Lumio by SMART. SMART TeamWorks software isn’t working as expected. See Troubleshooting SMART TeamWorks 4 Room. SMART Meeting Pro software isn’t working as expected. See Basic troubleshooting for SMART Meeting Pro.
Chapter 5 Troubleshooting For SMART Board MX (V3, V2 and V2-C) series displays, the serial number is on a label located on the left side of the display (pictured). Tip Scan the QR code on the label to view the SMART Board MX or MX Pro series interactive display support pages on the SMART website. For SMART Board MX series displays, the serial number is on labels located on the bottom frame and the back of the display.
Certification and compliance Federal Communication Commission interference statement FCC Suppliers Declaration of Conformity 47 CFR § 2.1077 Compliance Information Unique Identifier: IDX55-2, IDX55-3, IDX65-1, IDX65-2, IDX65-3, IDX75-1, IDX75-2, IDX75-3, IDX86-1, IDX86-2, IDX86-3 Responsible Party – U.S. Contact Information SMART Technologies Inc. 2401 4th Ave., 3rd Floor Seattle, WA 98121 compliance@smarttech.com This device complies with Part 15 of the FCC Rules.
Certification and compliance Innovation, Science et Développement économique Déclaration du Canada Cet appareil est conforme à la norme ISED CNR-247 pour les appareils radio agréés. Son fonctionnement est soumis aux deux conditions suivantes: 1. le dispositif ne doit pas produire de brouillage préjudiciable, et 2. ce dispositif doit accepter tout brouillage reçu, y compris un brouillage susceptible de provoquer un fonctionnement indésirable. Advertissement i.
Certification and compliance Déclaration d’exposition aux radiations Cet équipement est conforme aux limites d’exposition aux rayonnements ISED établies pour un environnement non contrôlé. Cet équipement doit être installé et utilisé avec un minimum de 20 cm de distance entre la source de rayonnement et votre corps. Cet émetteur ne doit pas être coimplantés ou exploités conjointement avec une autre antenne ou émetteur.
SMART Technologies smarttech.com/support smarttech.com/contactsupport smarttech.