
User Manual
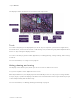
Table Of Contents
- Cover
- Important information
- Contents
- Chapter 1 Welcome
- Chapter 2 Using basic features
- Chapter 3 Using the iQ apps
- Chapter 4 Connecting computers and other devices
- Chapter 5 Troubleshooting
- The display isn’t turning on
- The screen is blank or there’s a problem with the image on the screen
- There’s no sound or there’s a problem with the sound
- Touch isn’t working as expected
- The pens and erasers aren’t working as expected
- iQ apps aren’t working as expected
- SMART software on connected computers isn’t working as expected
- The SMART OPS PC module isn’t working as expected
- The Intel Compute Card isn’t working as expected
- Contacting your reseller for additional support
- Certification and compliance

Chapter 1 Welcome
smarttech.com/kb/171554 10
Front control panel
The front control panel contains buttons for turning the display on and off, controlling the volume,
freezing and unfreezing the screen, and showing and hiding a screen shade.
For more information about the front control panel, see
Using the front control panel
on page15.
Front connector panel
The front connector panel includes connectors for USB peripherals and a computer or other input
source.
For more information about the convenience panel, see
Connecting room computers and guest laptops
on page31.
Ambient light sensor
The ambient light sensor is located in the bottom-right corner of the display’s frame.
The ambient light sensor detects the brightness of the room and adjusts the screen’s brightness
accordingly.
Power status light
The power status is located in the bottom-right corner of the display’s frame.
The power status light indicates the display’s status.
Power status light Display status
Red Standby mode
Green Normal operating mode
Remote control and IR sensor
You can use the remote control to turn the display on and off, adjust display settings, and so on.
The IR sensor for the remote control is located in the bottom-right corner of the display’s frame.
For more information about the remote control, see
Using the remote control
on page16.