
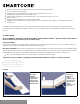
Installation Instructions
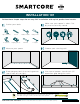
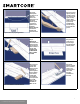

Step 1: Begin
installation
working from left
to right. Insert
spacers at ends
and edges where
planks meet wall.
Step 2: Lock
short end of
plank by
inserting tongue
into groove at an
angle and drop
in place.
Continue to end
of first row.
General Information
Raised access panels must be stable, level, flat, free and clean of existing adhesives
24" x 24" panels are recommended.
Lippage (variation of height) between of panels must notexceed 0.295” (0.75 mm)
Gaps between panels must not exceed 0.039” (1mm)
There should be no deflection of the individual panels – Concave less than 0.0295” (0.75 mm)
Flatness 1/8” in 10’
Stagger the flooring tiles/planks to overlap the access panels
Telegraphing of access panel seams may be visible and is not considered a product defect nor warranted by the flooring
manufacturer.
If needed overlay the panels with a 1⁄4” (6 mm) plywood and properly fasten to the access panels prior to the installation of the
floorcovering. Prior to underlayment installation, repair any loose or unstable panels. Use the appropriate installation methods for the
pr
oduct.
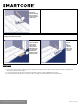
III. INSTALLATION
Tools: Tape Measure, Utility Knife, Jigsaw, Tapping Block or Rubber Mallet, Pull Bar, ¼" Spacers, T-Square, Safety Glasses,
Broom or Vacuum and, if necessary, tools for subfloor repair.
Floating Installation
WPC flooring is designed to be installed utilizing the floating method. Proper expansion space 1/4” (6.35 mm) is required. Undercut all
doorjambs. Do not fasten wall moldings and or transition strips to the planks.
Glue Down Installation: WPC products are approved for glue down installation over approved wood and concrete substrates. Follow
adhesive label application instructions. Install flooring into wet adhesive. Maintain 1/4” (6.35 mm) perimeter expansion space. Refer to
adhesive label for moisture limits of the adhesive.Roll flooring immediately after install
ation with a 100 lbs. 3‐section roller.
Recommended Adhesive:Shaw 200, T-180 or DP99 (or comparable premium adhesive)
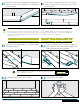
Tile patterns must be installed in a staggered (offset) brick pattern. Minimum 1/3 offset, 1/2 offset is preferred.
LAYOUT
3
For reference purposes only if printed or downloaded.