INSTALLATION INSTRUCTIONS INTERACTIVE PDF | DOWNLOAD FOR THE BEST EXPERIENCE Simple, easy-to-follow instructions for the handy DIYer. SIMPLE Start to finish, everything you need to know to install your SMARTCORE floor like a professional. TECHNICAL If you've printed these instructions, use qr code to view the installation video.
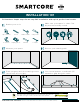
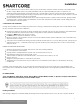
INSTALLATION 101 Follow these simple steps for an easy DIY installation with quick, professional results. Make sure your space is: clean, flat, dry and structurally sound. Gather your tools Tape Measure Pencil Rubber Mallet Utility Knife ¼" Spacers Tapping Block Pull Bar T-Square Measure your space Choose your starting wall Place tongue side in the starting corner (work from left to right). Use several spacers to maintain 1/4" expansion gap along the walls.
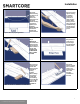
Lock the short ends together to complete your first row. Cut the planks as needed to fit the space. Start your second row. With a cut-off that is more than 8" long or start with a new plank. Remember to stagger end joints from row to row – 8+" for planks and 12+" for tiles. Planks: Use the cut-off end from the previous row to begin the next row. If the cut-off end is less than 8", cut a new plank to be 8" or more to start the next row. Connect the length side at a slight angle and rotate down.
INSTALLATION 101 Installation RESILIENT INSTALLATION GUIDELINES FOR WPC PRODUCTS I. GENERAL INFORMATION These installation guidelines apply to the WPC products only. All instructions and recommendations should be followed for a satisfactory installation. Acclimation of material prior to installation is not required; however, the floor covering should be installed in a climate controlled environment with an ambient temperature range between 55°F - 85°F (13°C-29°C) or average temperature of 70°F (21.1°C).
Installation 5. All other subfloors - Plywood, OSB, particleboard, chipboard, wafer board, etc. must be structurally sound and must be installed following their manufacturer’s recommendations. Local building codes may only establish minimum requirements of the flooring system and may not provide adequate rigidity and support for proper installation and performance. If needed add an additional layer of APA rated underlayment, fasten and secure according to the underlayment manufacturer’s recommendations. 6.
Installation Electric Radiant Floors: consist of electric cables (or) mats of electrically conductive materials mounted on the subfloor below the floor covering. Mesh systems are typically embedded in thin-set. When embedding the system components, use cementitious patching and leveling compounds that meet or exceed Shaw’s maximum moisture level and pH requirements.
Installation all doorjambs. Do not fasten wall moldings and or transition strips to the flooring. Glue Down Installation: WPC products are approved for glue down installation over approved wood and concrete substrates. Follow adhesive label application instructions. Install flooring into wet adhesive to achieve a permanent bond. Maintain 1/4” (6.35 mm) perimeter expansion space. Refer to adhesive label for moisture limits of the adhesive. Roll flooring immediately after installation with a 100 lbs.
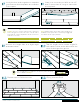
Installation Step 3: Use leftover flooring from first row as starter for second row. There must be at least 20cm between flooring end joints on adjacent rows. FOR TILE INSTALLATIONS: The distance between end joints should be Step 4: Lock long edge of flooring by inserting tongue into groove at an angle and drop in place. Slide flooring toward end of previously installed flooring until the tongue just touches the groove.
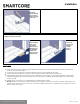
Installation Step 9: Use hammer and pull bar to lock long edges of flooring on final row. Installing underneath door jambs: Step 1: Undercut space under door jamb to allow flooring to slide freely. Tap long edge with hammer and tapping block to lock long edge. Step 2: Use hammer and pull bar to lock this piece of flooring COMPLETION Protect all exposed edges of the flooring by installing wall molding and/or transition strips. Make sure that no plank will be secured in any way to the subfloor.