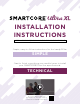
INSTALLATION INSTRUCTIONS INTERACTIVE PDF | DOWNLOAD FOR THE BEST EXPERIENCE Simple, easy-to-follow instructions for the handy DIYer. SIMPLE Start to finish, everything you need to know to install your SMARTCORE floor like a professional. TECHNICAL If you've printed these instructions, use qr code to view the installation video.
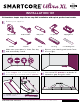
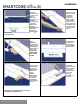
INSTALLATION 101 Follow these simple steps for an easy DIY installation with quick, professional results. Gather your supplies. Tape Measure Rubber Mallet Utility Knife ¼" Spacers Tapping Block Pull Bar T-Square Pencil Flooring Coordinating Trim Make sure your space is clean, flat, dry and structurally sound. Choose your starting wall (work from left to right). Place tongue side of the first plank in the starting corner and add 1/4" spacers.
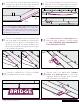
Lock the short ends together by inserting tongue into groove at an angle and drop in place. Continue to end of first row. Use a leftover plank from the first row to start the second. Stagger planks by at least 8in between end joints on adjacent rows. To cut the flooring, measure and mark the flooring. Then, use a t-square and utility knife to score and snap. You will also need to back-cut the pad on the bottom of the flooring. If you have difficulty, you can use a jigsaw, circular saw or miter saw.
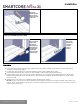
Use a rubber mallet and pull bar to lock the final piece in each row. Insert spacers at end of row and continue to final row. On the final row, use a rubber mallet and pull bar to lock long edges of flooring. Remove the 1/4" spacers and install your SMARTCORE coordinating trims Enjoy your new floor! Need SMARTCORE coordinating trim to finish your flooring installation? Order today at Lowes.
Installation RESILIENT INSTALLATION GUIDELINES FOR WPC PRODUCTS TECHNICAL INSTRUCTIONS I. GENERAL INFORMATION Installation These installation guidelines apply to the WPC products only. All instructions and recommendations should be followed for a satisfactory installation. RESILIENT INSTALLATION GUIDELINES FOR WPC PRODUCTS Acclimation of material prior to installation is not required; however, the floor covering should be installed in a climate controlled I.
Installation A. WOOD SUBFLOORS Do not install material over wood subfloors that lay directly on concrete or over dimensional lumber or plywood used over concrete. Refer to ASTM F1482 for panel underlayment recommendations. 1. Do not apply sheet plastic over wood subfloors. 2. Basements and crawl spaces must be dry. Use of a 6 mil black polyethylene is required to cover 100% of the crawl space earth.
Installation Perform Bond testing to determine compatibility of adhesive to the substrate. Shaw 9050 primer (or equivalent / comparable product) can be utilized to promote adhesion. Three internal relative humidity tests should be conducted for areas up to 1000 sq. ft. One additional test, for each additional 1000 sq. ft. Radiant Heating: Radiant-heated subfloor systems can be concrete, wood or a combination of both.
Installation III. INSTALLATION Tools: Tape Measure, Utility Knife, Jigsaw, Tapping Block or Rubber Mallet, Pull Bar, ¼" Spacers, T-Square, Safety Glasses, Broom or Vacuum and, if necessary, tools for subfloor repair. FLOATING INSTALLATION WPC flooring is designed to be installed utilizing the floating method. Proper expansion space 1/4” (6.35 mm) is required. Undercut all doorjambs. Do not fasten wall moldings and or transition strips to the flooring.
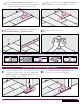
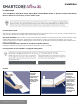
Installation equal to 30cm proper appearance. Step 3: Use leftover flooring from first row as starter for second row. There must be at least 20cm between flooring end joints on adjacent rows. FOR TILE INSTALLATIONS: The distance between end joints should be for Step 4: Lock long edge of flooring by inserting tongue into groove at an angle and drop in place. Slide flooring toward end of previously installed flooring until the tongue just touches the groove.
Installation Step 9: Use hammer and pull bar to lock long edges of flooring on final row. INSTALLING UNDERNEATH DOOR JAMBS: Step 1: Undercut space under door jamb to allow flooring to slide freely. Tap long edge with hammer and tapping block to lock long edge. Step 2: Use hammer and pull bar to lock this piece of flooring COMPLETION Protect all exposed edges of the flooring by installing wall molding and/or transition strips. Make sure that no plank will be secured in any way to the subfloor.