Don't work harder. Work smarter. ST-2SF/P AUTO DARKENING WELDING HELMET Operating Manual Revision: A Issue Date: June 2017 Manual No.
We Appreciate Your Business. Thank you and congratulations on choosing Smarter Tools. Now you can stop working harder and start working smarter. This Operating Manual has been designed to instruct you on the correct use and operation of your Smarter Tools’ product. Your satisfaction with this product and its safe operation is our ultimate concern. Therefore please take the time to read the entire manual, especially the Safety Precautions.
Table of Contents I. II. Symbol Usage ........................................................................ 1 Arc Welding Hazards .............................................................. 1 Arc rays .................................................................................. 1 Welding Helmets .................................................................... 1 Noise ..................................................................................... 2 Read Instructions ....................
Protect yourself and others from injury — read, follow, and save these important safety precautions and operating instructions. I. Symbol Usage DANGER! − Indicates a hazardous situation which, if not avoided, will result in death or serious injury. The possible hazards are shown in the adjoining symbols or explained in the text. Indicates special instructions. Indicates a hazardous situation which, if not avoided, could result in death or serious injury.
NOISE can damage hearing. Noise from some processes or equipment can damage hearing. • Wear approved ear protection if noise level is high. READ Instructions Read and follow all labels and the Owner’s Manual carefully before installing, operating, or servicing unit. Read the safety information at the beginning of the manual and in each section. • • Use only genuine replacement parts from the manufacturer.
IV. SAFETY INSTRUCTIONS WARNING! FOR YOUR SAFETY & PROTECTION, READ ALL SAFETY WARNINGS AND INSTRUCTIONS CAREFULLY AND COMPLETELY BEFORE USING THIS PRODUCT. FAILURE TO DO SO MAY CAUSE DAMAGE OR PERSONAL INJURY. • • • • • • • • • • • Do not place the helmet on a hot surface Do not immerse the filter in water or any other liquid Protect the filter from being in contact with liquid or dirt. Clean filter surface regularly.
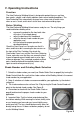
V. Operating Instructions Function The Auto-Darkening Welding Helmet is designed to protect the eyes and face from sparks, splatter, and harmful radiation under normal welding conditions. The Auto-Darkening Filter automatically changes from a clear state to a dark state when an arc is struck, and it returns to the clear state when welding stops. Before Welding The Auto-Darkening Welding Helmet comes ready for use.
Adjusting Headband Adjust the Headband so that the helmet is seated securely on your head as low as possible and close to your face. Adjust the Headband width by turning the Ratcheting Headband Knob to make sure the Front Cover Lens is aligned with your eyes. Adjust the Headband height by tightening or loosening the top strap until the Helmet fits snug on your head. Once the Headband is properly adjusted, lower the Helmet over your face until the proper angle is found.
VII. DARK SHADER SELECTION • • • • • Select the shade level according to the welding process and the value of the welding current by turning the potentiometer knob on the left side of the helmet The shade number can be between DIN9 to DIN13. Select a shade number by turning the shade knob until the arrow points to the required setting (See Shade Guide Table) ALWAYS use suggested shade numbers instead of minimum shades. Provide additional task lighting that suits welders' needs.
VIII. SENSITIVITY and DELAY SELECTION Sensitivity Control: The Sensitivity Control is designed to make the filter lens more responsive to different light levels. Welding applications and processes produce differing light levels which in turn necessitate varying filter lens sensitivity adjustments. Manually adjust the sensitivity level as required for application. Delay Control: The delay control is used to adjust the hold time of the Filter Lens after welding is completed (i.e.
IX. LENS & HELMET MAINTENANCE • • • • • DO NOT! use corrosive solvent on the filter screen or any of the helmets components DO NOT! immerse the filter lens in water or any other liquid If helmet is not in use, please keep it in a dry place. Be aware that the Auto-darkening filter should not be placed in direct light to avoid unnecessary filter adjustments. It may cause damage to control system.
X.
XI Trouble Shooting 1. Irregular Darkening Or Dimming a. Headband has been set unevenly on both sides of helmet (unequal distances from the eyes to filter's lens). b. Reset Headband to reduce difference in distances to filter, if necessary. 2. Auto-Darkening Filter Does Not Darken Or Flickers a. Front Cover Lens is dirty or damaged (clean or change the cover lens). b. Sensors are dusty or dirty (clean surface of the sensors). c. Grind mode Is selected (Adjust shade from 9 to 13) 3. Slow Response a.
LIMITED WARRANTY This information applies to Smarter Tools products purchased in the USA and Canada. July 2017 LIMITED WARRANTY: Smarter Tools™, Inc. warrants to customers of authorized distributors (“Purchaser”) that its products will be free of defects in workmanship or material.
GARANTÍA LIMITADA. Esta información se aplica a los productos más inteligentes herramientas adquiridos en los USA. y Canadá. 07 2017 GARANTÍA LIMITADA: Smarter Tools ™, Inc. garantiza a los clientes de los distribuidores autorizados ("Comprador") que sus productos estarán libres de defectos de fabricación o materiales.
XI. Solución de problemas 1. El oscurecimiento irregular o oscurecimiento a. Diadema se ha establecido de manera desigual a ambos lados del casco (distancias desiguales de los ojos a la lente de filtro). b. Restablecer diadema para reducir la diferencia en las distancias para filtrar, si es necesario. 2. Auto-oscurecimiento del filtro no se oscurece o parpadea a. Cubierta de la lente frontal está sucio o dañado (limpia o cambiar la lente cubierta). b.
X.
IX. LENTE Y CASCO DE MANTENIMIENTO • • • • • ¡NO! utilizar disolventes corrosivos para limpiar la pantalla de filtro o cualquiera de los componentes de cascos ¡NO! sumergir la lente de filtro en agua o cualquier otro líquido Si el casco no está en uso, guárdelo en un lugar seco. Tenga en cuenta que el filtro de oscurecimiento automático no se debe colocar a la luz directa para evitar ajustes de filtro innecesarios. Puede causar daños al sistema de control.
VIII. SENSIBILIDAD y RETRASO DE SELECCIÓN Control de Sensibilidad: El control de sensibilidad está diseñado para hacer que la lente de filtro más sensible a diferentes niveles de luz. Aplicaciones y procesos de soldadura producen diferentes niveles de luz que a su vez requieren diferentes ajustes de sensibilidad de lentes de filtro. Para ajustar manualmente el nivel de sensibilidad como sea necesario para su aplicación.
VII. SELECCIÓN de SHADER OSCURO • • • • • Seleccione el nivel de sombra de acuerdo con el proceso de soldadura y el valor de la corriente de soldadura girando el botón de potenciómetro para el selector de sombra de soldadura. El número de sombra puede estar entre DIN9 a DIN13. Seleccione un número de sombra girando el mando sombra hasta que la flecha apunte a la configuración requerida (Ver Guía de Colores Tabla) SIEMPRE use los números de sombra sugeridas en lugar de tonos mínimos.
Ajuste de la diadema Ajuste la diadema para que el casco está asentada firmemente en la cabeza lo más baja posible y cerca de la cara. Ajuste el ancho de la venda girando el trinquete Diadema Perilla para asegurarse que la cubierta de la lente frontal se alinea con los ojos. Ajuste la altura de la venda por apretar o aflojar la correa superior hasta que el casco se ajusta cómodamente en la cabeza.
V. Instrucciones de operación Función El oscurecimiento automático de soldadura casco está diseñado para proteger los ojos y la cara de chispas, salpicaduras y las radiaciones nocivas en condiciones normales de soldadura. El filtro de oscurecimiento automático cambia automáticamente de un estado claro a un estado oscuro cuando se golpea un arco, y vuelve al estado claro al soldar paradas. Antes de soldar El oscurecimiento automático de soldadura casco viene listo para su uso.
IV. INSTRUCCIONES DE SEGURIDAD ADVERTENCIA! PARA SU SEGURIDAD Y PROTECCIÓN, LEA TODAS LAS ADVERTENCIAS DE SEGURIDAD E INSTRUCCIONES Y EN SU TOTALIDAD ANTES DE UTILIZAR ESTE PRODUCTO. NO HACERLO PUEDE CAUSAR DAÑOS O LESIONES PERSONALES. • No coloque el casco en una superficie caliente • No sumerja el filtro en agua o cualquier otro liquid • Proteja el filtro de estar en contacto con el líquido o suciedad. Superficie Limpie el filtro con regularidad.
• • • • • • • III. • RUIDO puede dañar la audición. El ruido de algunos procesos o equipo puede dañar la audición.. Uso aprobado protección para los oídos si el nivel de ruido es alto. Lee las instrucciones Lea y siga todas las etiquetas y el manual del propietario antes de instalar, operar, o unidad de servicio. Lea la información de seguridad al principio del manual y en cada sección. • • Utilice sólo piezas de repuesto originales del fabricante..
I. Protéjase y proteja a otros contra lesiones - lea, siga y guarde estas importantes precauciones de seguridad e instrucciones de funcionamiento. Uso de símbolos PELIGRO!− Indica una situación Indica instrucciones especiales. peligrosa que, si no se evita, provocará la muerte o lesiones graves. Los peligros posibles se muestran en los símbolos adjuntos o se explican en el texto. Indica una situación peligrosa que, si no se evita, provocará la muerte o lesiones graves.
Tabla de contenidos I. II. Iii. Iv. V Vi. Vii. Viii. Ix X. Xi Uso De Símbolos ................................................................... 1 Soldadura Por Arco Peligros .................................................. 1 Rayos Del Arco ...................................................................... 1 Cascos De Soldadura............................................................. 1 Ruido .....................................................................................
Apreciamos tu negocio. Gracias y felicitaciones por la elección de Smarter Tools. Ahora usted puede dejar de trabajar más duro y empezar a trabajar más inteligentemente. Este Manual de instrucciones ha sido diseñada para instrucciones sobre el correcto uso y funcionamiento de su producto Smarter Tools’. Su satisfacción con este producto y su operación segura es nuestra preocupación última. Por lo tanto, por favor tómese el tiempo para leer todo el manual, especialmente las Precauciones de seguridad.
Don't work harder. Work smarter. ST-2SF/P OSCURECIMIENTO AUTOMÁTICO SOLDADURA CASCO Manual de instrucciones Revision: A Issue Date: June 2017 Manual No.