
User's Manual


Revised: Version 3
Dated: February 1, 2011
4"
"
Contents
One (1) metal post
One (1) Vertical Sensor
One (1) Spring assembly bracket
One (1) 6 foot outside post
One (1) Sensor PVC extender
One (1) ½ inch x
One (1) U-bolt assemblies
Two (2) Snap lock pins
One (1) User Guide
One (1) Warranty Information
One (1) Spade
Two (2) ½ inch – 13x1 inch bolts and nuts
One (1) 4-arm knob
Tools Needed
Post Driver
Post Level
GPS Locator Device
"
Installation
1. Assemble spade pole
a. Get 6” inside pole
b. Bolt spade into holes 10 & 11 from the bottom
with two (2) ¾ x ½ bolts and two (2) ¾ locknuts.
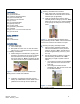
2. Installing “AA” batteries:
a. While holding the Vertical Sensor, slightly push
the battery clip farther into the sensor to release
the metal hook from the inner plastic lip and
then gently pull it out. Note: The battery clip will
only come out far enough to install the batteries.
Figure 1: Inside battery clip of a Vertical Sensor
showing where to install “AA” batteries.
b. Install two “AA” batteries and gently reinsert
battery clip. Note: Make sure the metal hook is
grabbed and secured by the inner plastic lip.
"
"
"
3. Attaching Vertical Sensor to bracket:
a. Apply Teflon tape or thread sealant to the
male threads of the Vertical Sensor and the
extension pole (if applicable).
b. Twist the Vertical Sensor into the spring
assembly bracket until tightly secured. Note:
Make sure the sensor eye is oriented parallel
to the springs and away from the mounting
holes.
Figure 2: The Vertical Sensor attached to the
spring assembly bracket. Note: Vertical orientation
of the sensor should be 30º relative to the pole.
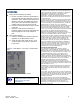
4. Mounting the spring assembly bracket:
a. Place the spring assembly bracket with
attached Vertical Sensor at the preferred
height on the post. Note: Vertical Sensor
should be approximately one foot (1’) from
the crop.
b. Secure the bracket into place by using the
bolt and twisting the black knob. Note:
Depending on height of system at time of
install:
i. If mounting the bracket onto the INSIDE
post, slide and secure the bolt into the
TOP hole.
ii. If mounting the bracket onto the
OUTSIDE post, slide and secure the bolt
into the BOTTOM hole.
Figure 3: Placement of bracket depends on metal
post – inside or outside.
"
"
"