
User's Manual

Revised: Version 2
Dated: February 1, 2011
&"
Installation
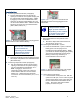
6. Connecting Watermark Probes (if equipped):
a. Run the Watermark Probe cord through the
opening in the bottom of the system and plug into
the motherboard socket labeled “WM-1”. Note:
If plugging in more than one Watermark Probe,
make sure to skip the sockets labeled “TH” and
use the sockets labeled “WM”. Additional Probes
should be connected in an incremental fashion
(WM-1, WM-2, WM-3, etc.)
"
"
Figure 2: Showing the battery power cord plugged into
the motherboard socket labeled “Battery”.
"
The LED display under
“Watermark” should light
up (and remain lit)
depending on the number
of Watermark Probes
you have connected.
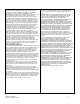
7. Placement of Temperature Probe (if equipped):
a. Place the Temperature Probe underground at the
same depth and parallel to the Watermark Probe
(Recommended).
8. Connecting Temperature Probe (if equipped)"
a. Run the Temperature Probe cord through the
opening in the bottom of the system and plug
into the motherboard socket labeled “TH-1”.
Note: if plugging in more than one
Temperature Probe, make sure to skip the
sockets labeled “WM” and use the sockets
labeled “TH”. Additional probes should be
connected in an increment fashion (TH-1, TH-2,
TH-3 etc.)."
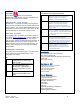
Figure 3: Showing the Watermark Probe and
Temperature Probes correctly plugged into the
motherboard.
The LED display under
“Temperature” should
light up (and remain lit)
depending on the number
of Temperature Probes
you have connected.
9. Record Watermark and Temperature Probe
Information:
a. Record the depths and board locations for
each probe for setup on C1.
10. Powering the SmartProfile system:
a. Inside the SmartProfile system, locate the
battery power cord and plug into the
motherboard socket labeled “Battery”. Note:
you should see all LED displays light up briefly.
The first LED will remain lit and then begin
blinking continuously, followed by an
occasional blink from the RF LED.
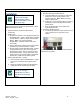
Figure 4: Showing the battery power cord plugged
into the motherboard socket labeled “Battery”.
11. Connecting the Solar Panel:
a. Locate the Solar Panel power cord. With the
system door still open, run the cord through the
opening at the bottom of the system and plug
into the motherboard socket labeled “Solar
Panel”. Ensure the Solar Panel cable is
properly secured to the pole.
"