
user manual


LampLinc Owner’s Manual
Installing LampLinc
1) Plug the lamp/device (the load) you want to control into the outlet on LampLinc
2) Plug LampLinc into an unswitched wall outlet
The load may turn on
If the LampLinc Status LED is solid green, installation is complete
If the Status LED is solid red, tap the Up button
The LampLinc Status LED will turn on solid green and the load will turn on
3) If the load does not turn on, turn it on manually using the switch on the load itself
NOTE: After completing installation, you will not be able to use the load’s built-in switch to control the load unless
Load Sensing is enabled. See Enabling/Disabling Load Sensing.
USING LAMPLINC
Using the Buttons
The LampLinc buttons will control the load and any Linked Responders. LampLinc or the Responders will behave
differently depending on whether you tap, double-tap, or hold down the buttons.
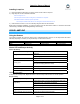
Button Tap Double-tap Press & hold
Up
Ramp to On-Level Full-bright instantly Brighten until released
Down
Ramp to Off Full-off instantly Dim until released
Status LED and Beeper Activity
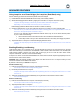
Status LED Activity
Status LED Activity LampLinc Status/Setup Mode
Load is on
Solid green
Phase Bridging Detection Mode has been initiated
Solid red Load is off
Linking Mode
Blinking green
Phases have been bridged (if used as a secondary device
during Phase Bridging Detection Mode)
Blinking red Unlinking Mode
Double-blinking green Multi-Linking Mode
Double-blinking red Multi-Unlinking Mode
Tapping the Set Button
If LampLinc is in a setup mode, tap the Set button to exit the setup mode and return to normal operation.
Beeper Activity
Beeper Activity LampLinc Status
Entered setup mode or moved to the subsequent setup mode
Exited setup mode (if Set button was tapped)
Single beep
Feature was programmed (e.g., On-Level, Ramp Rate)
Double beep Link established – LampLinc will exit setup mode
Long beep Timed out of setup mode
Continuous beep (once per second) Initiated Phase Bridging Detection Mode
Page 5 of 19