
User's Manual


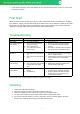

Element
Purpose
DC 12V
Port for a power adapter
A/V
Analog audio/video interface (composite + stereo audio signal)
HDMI
Audio/video interface for connecting with an HDMI-compliant device
S/PDIF
Optical audio output to audio receiver or speakers (optional)
LAN
Ethernet port, 10/100 Mbps
USB
USB 2.0 port
Note: the device appearance may differ from that shown in the picture.
Installation
1. Remove your STB from packaging.
2. Make sure that the place, where you are installing the STB, meets the following requirements:
● Place STB on a flat surface.
● Do not place the STB on slick surfaces, where there is a risk of vibration, fall or other
damages of STB.
● Do not mount the STB on soft surfaces, like a bed, carpet, etc. Such a surface impedes
access for air and normal ventilation of the STB and thereby causes overheating and
malfunctioning.
● Do not cover the STB.
● Do not shield the ventilation holes in the STB’s enclosure located at the top panel of the
STB.
● When mounting the STB, make sure that there is at least 10 cm of free space at each side
of the device. Do not place STB in closed cupboards and caves.
● Install and operate the STB with a minimum distance of 20 cm 7.8 inches) between the
device and the body.
● Do not place STB on surfaces, which can heat, for instance, on boosters.
● Do not place any things on the device.
● To avoid damage to the power adapter cable, place the cable so that it is not pressed,
pinched or mechanically affected in any way.
3. Make sure that the TV set and the STB are not connected to the power network.
4. Connect the TV set and the STB with the HDMI cable.
5. Connect the Ethernet cable to the STB. If you are going to use the Wi-Fi connection, skip this
step.
6. Connect the STB and the TV set to the power network.
Connecting to Internet via Wi-Fi
1. Turn on the STB and wait for it to boot.
2. Go to the "Settings" menu on the home screen. Next, "System" → "Native system settings" →
"Network".
3. Select your wireless network in the list of available networks.
4. Type the password for the selected network using the on-screen keyboard (if required).
5. If there are no networks available in the list, try running the scan again. To do this, change the
"Wi-Fi Off" setting to "Wi-Fi On".
– 5 –