On-Line Owner’s Manual Containing Cautionary FCC & IC Statements March 1, 2012 Portable Wireless Zone Thermostats Models: 2441ZT and 2441ZTH FCC ID: SBP2441ZT IC: 5202A-2441ZT The owner’s manual below may be accessed freely via the Internet with any web browser and supports the PDF format. http://www.smarthome.com/2441ZTH.html Complies with Section 5 of FCC document 784748 D01 Labeling Part 15 18 Guidelines v07 where cautionary statements in the user manual may be provided over the Internet.
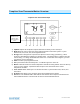
TempLinc™ INSTEON® Zone Thermostat Owners Manual (#2441ZTH) TempLinc Zone Thermostat Sample The gray buttons shown above are under the door of the TempLinc Zone Thermostat Page 4 of 25 Rev: 3/1/2012 3:06 PM
Quick-Start Guide About TempLinc Wireless Zone Thermostat Preparation Test Operation Adding a Wireless TempLinc Zone Thermostat Control Settings Factory Reset Owner’s Manual & Tech Support 1 1 1 1 2 2 2 3 About TempLinc Zone Thermostat 7 TempLinc Zone Thermostat– Features & Benefits What’s in the box? 7 7 TempLinc Zone Thermostat Button Overview 8 TempLinc Zone Thermostat Operation and Programming Thermostat Mode Button Operation TempLinc Zone Thermostat Energy Button Operation TempLinc Zone Thermos
Page 6 of 25 Rev: 3/1/2012 3:06 PM
About TempLinc Zone Thermostat TempLinc is a wireless, battery operated, 1-day programmable, INSTEON-compatible thermostat. TempLinc Zone Thermostat includes a humidity sensor and the ability to communicate via RF to other INSTEON devices and Thermostats. TempLinc Zone Thermostat does not connect directly to the HVAC (Heating Ventilating and Air Conditioning) system. If you want to control the HVAC system you need to install TempLinc Thermostat and connect it directly to the HVAC system.
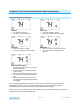
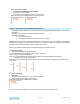
TempLinc Zone Thermostat Button Overview TempLinc Zone Thermostat Sample 1 2 The gray buttons shown here are under the door of the TempLinc Zone 9 8 7 6 5 4 3 1) Up/Down adjusts the temperature setpoint based on the mode you are currently in 2) Mode allows the user to select the current operational mode of the HVAC system. It cycles between Off, Heat, Cool, Auto, and Programmed Auto. 3) Energy button is designed as a quick access option that saves energy (and money).
TempLinc Zone Thermostat Operation and Programming Thermostat Mode Button Operation Off Mode: No setpoints are shown Up / Down do not do anything Heat Mode: Only Heat setpoint is shown Up / Down changes the Heat setpoint Cool Mode: Only Cool setpoint is shown Up / Down changes the Cool setpoint Auto Mode: Both cool and heat setpoints are shown Up / Down move both together with a set gap Programmed Auto Mode: The program mode is active in this mode (Return annotation) It is not in t
TempLinc Zone Thermostat Energy Button Operation The Energy button is designed to be a very quick to use option that saves energy (and money). When you press the Energy button (identified with the leaf), TempLinc Zone Thermostat will setback the set points by a specified value. The default value is 4 degrees from the current setting. To change the default offset value to be a value other than 4 degrees, you must use software.
From Programmed Auto Mode: Both Heat and Cool setpoints setback as specified Default setback is 4 degrees Notice that “Heating” is active on the left, but not on the right; the element reads “Heat” Note: On screen text displaying “HEAT” changes to “HEATING” and “COOL” changes to “COOLING” to indicate HVAC system is active. The status LED under the door also indicates current active state, COOLING = green, HEATING = red.
3rd press of Time / Sensor: Clock Format setting (12 or 24 Hr clock) Entire “time” sections blinks Up / Down cycles between 12 and 24 Hr clock format Note: AM / PM are not displayed when in 24 Hour format TempLinc Zone Thermostat Program Button Operation - The Program button allows you to setup the various pre-programmed modes (Wake, Leave, Return, and Sleep).
3rd press of Program: Cool setpoint Up / Down cycles through temperature 4th press of Program: Heat setpoint Up / Down cycles through temperature 5th press of Program: - Starts the process all over again to program another Mode Note: The 4 modes come pre-programmed.
TempLinc Zone Thermostat Master Button Operation The Master button makes the local device the Master temperature Controller. The logic behind this is that as the user walks around the home, they would likely want to have the local temp be the controlling temp. Since this button will only set the local to be Master, pressing the button a second time does not change anything.
Installation CAUTIONS AND WARNINGS Read and understand these instructions before installing and retain them for future reference. Tools Needed - TempLinc Zone Thermostat will primarily be used as a table-top thermostat If desired, you may wall mount TempLinc Zone Thermostat using the slotted holes in the back cover of TempLinc1 Preparation Proper installation of the TempLinc Zone thermostat will be accomplished by following these steps. However, the main use for this product will be table-top.
Auto Mode Test 18) Tap mode button once to enter auto mode 19) Note that your Heat and Cool set points are set in previous steps, unless you did not have a minimum 2 degrees gap between settings 20) Tap up once to increase both Heat and Cool set points by one degree 21) Tap down once to decrease both Heat and Cool set points by one degree 22) Tap mode once to enter Programmed Auto mode Indicated by Auto at bottom and relevant time of day to right of Heat/Cool set temps 13) Tap mode once more to return to Of
Add to a Scene Process: 1) Press & hold TempLinc Zone Thermostat Set button until it beeps TempLinc Zone Thermostat Set LED blinks GREEN TempLinc Zone Thermostat will (Beep) 2) Tap: Up or Down buttons to select Group 1 – 4 to Add to a Scene Group 1 - Cooling mode change, default Group 2 - Heating mode change Group 3 – De-humidification, high humidity setpoint Group 4 - Humidification, low humidity setpoint 3) Adjust Scene Responder, such as OutletLinc with connected humidifier, to the “state” you
TempLinc Zone Thermostat will (Beep)-(Beep) upon completion LED returns to previous state Removing TempLinc Zone Thermostat as a Controller 1) Press & hold TempLinc Zone Thermostat’s Set button until it beeps TempLinc Zone Thermostat Set LED blinks GREEN TempLinc Zone Thermostat will (Beep) 2) Press & hold TempLinc Zone Thermostat’s Set button again until it beeps TempLinc Zone Thermostat Set LED blinks RED TempLinc Zone Thermostat will (Beep) LCD display indicates the group that you are removing Scene fro
LCD display when using Up or Down buttons to select from among the 4 Controller Groups 4) Press and hold Responder’s Set button TempLinc Zone Thermostat will (Beep)-(Beep) upon completion LED returns to previous state Page 19 of 25 Rev: 3/1/2012 3:06 PM
User Setup Mode Overview IMPORTANT! Once you have Added TempLinc Zone Thermostat to TempLinc Thermostat as a wireless temperature zone, the Program and Time / Sensor buttons will no longer perform their initial function. All program and time controls will be performed on the TempLinc Thermostat. To access the Program and Time / Sensor buttons again, you must Remove TempLinc Zone Thermostat from TempLinc Thermostat.
- Sub-mode 01: Display LED on-time select (Default is 10 seconds) - Sub-mode 02: Humidity Low Set Point (Default is 30%) - Sub-mode 03: Humidity High Set Point (Default is 50%) - Sub-mode 4: Temperature format select (Default is Fahrenheit) - Sub-mode 5: Beep on button press (Default is Off) - Sub-mode 6: Status LED (Default is On) - Sub-mode 7: Button Lock (Default is Off) - Sub-mode 8: Programming lock (Default is Off) - Sub-mode 9: Activation Delay (Default is 10 minutes) 2) Press the Up or Down button t
Sub- mode 06: Status LED(Enable / Disable), On default a. Up button = On b. Down button = Off Sub- mode 07: Button Lock (disables front button presses), Off default o For common area locations in a business such as a lobby c. Up button = On d. Down button = Off Sub- mode 08: Programming lock (Locks out programming operations), Off default a. Up button = On b. Down button = Off Sub- mode 09: Delay between consecutive AC modes, 10 minutes default a. Up button = adds 1 minute increments b.
Temperature Calibration Mode 1) Once in User Setup Mode, press the Time / Sensor button to enter Temperature Calibration Mode 2) Press Mode to step between Temperature Calibration and Humidity Calibration 3) Temperature Calibration a. Press up and down arrow to adjust the displayed temp i. Each press results in a 1 degree change ii. The calculation using example numbers below is 78 = 77 + 1.4 iii. The offset range is from –10 to +10 b.
Advanced 2 Stage Heating or Cooling Systems TempLinc Zone does not have the ability to operate 1st or 2nd stages of Heat or Cool directly but can instruct TempLinc Thermostat to operate the HVAC. 1st and 2nd stage of Heat or Cool engages under the following conditions when TempLinc Thermostat is connected to the HVAC: - TempLinc Zone Thermostat’s setpoint is set at 5 degrees or more below ambient in Cool mode and 5 degrees or more above ambient in Heat mode o i.e.
Certification and Warranty FCC & Industry Canada Compliance Statement This device complies with FCC Rules Part 15C and Industry Canada RSS-210 (Rev. 8). Operation is subject to the following two conditions: (1) This device may not cause harmful interference, and (2) This device must accept any interference, including interference that may cause undesired operation of the device. Le present appareil est conforme aux CNR d'Industrie Canada applicables aux appareils radio exempts de licence.