
User's Manual


Page 16 of 25 Rev: 3/1/2012 3:06 PM
Auto Mode Test
18) Tap mode button once to enter auto mode
19) Note that your Heat and Cool set points are set in previous steps, unless you did not have a
minimum 2 degrees gap between settings
20) Tap up once to increase both Heat and Cool set points by one degree
21) Tap down once to decrease both Heat and Cool set points by one degree
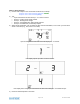
22) Tap mode once to enter Programmed Auto mode
Indicated by Auto at bottom and relevant time of day to right of Heat/Cool set temps
13) Tap mode once more to return to Off mode
Adding a Wireless TempLinc Zone Thermostat
TempLinc Zone Thermostat can be added to TempLinc Thermostat to provide a portable thermostat
wherever you want temperature control. You can add up to 2 TempLinc Zone Thermostats to a TempLinc
Thermostat.
4) Press & hold Set button on TempLinc Zone Thermostat
TempLinc Zone Thermostat Set LED blinks GREEN and unit beeps
5) Press & hold TempLinc Thermostat Set button
TempLinc Zone Thermostat will (Beep), then (Beep)-(Beep)
TempLinc Thermostat will (Beep)-(Beep)
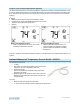
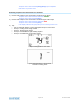
6) Test the Scene by pressing the Master button on the TempLinc Zone Thermostat
- When properly Synchronized, pressing the Master button on one TempLinc Zone Thermostat will
illuminate the “Master” segment on that same screen. Additionally, the present room temperature
of the TempLinc Zone Thermostat will be displayed in position 1on the TempLinc Thermostat as
the small temperature segments at the top center of the display.
- A visual inspection of each display will reveal Master status of TempLinc Thermostat or Zone
Thermostat.
Note: Only the TempLinc Thermostat is directly connected to the HVAC system via wires. If you plan on
operating multiple Zone Thermostats you must have at least one TempLinc Thermostat to control the
HVAC.
INSTEON Programming
Add TempLinc Zone Thermostat to a Scene as a Controller
TempLinc Zone Thermostat can be setup to control other INSTEON devices or trigger software events
when there is a change. The following TempLinc Zone Thermostat changes can be setup as a Controller:
- Group 1 - Cooling mode change (scene control)
- Group 2 - Heating mode change (scene control)
- Group 3 – De-humidification, high humidity setpoint (scene control)
- Group 4 - Humidification, low humidity setpoint (scene control)
- Group FE - broadcast on any change (info only)*
- * Can only be configured via software.
NOTE: A TempLinc Zone Thermostat can also be added to a Scene as a Controller to Groups 1 - 4.
When it is added as a Controller of a TempLinc Thermostat, the setpoints between TempLinc Zone
Thermostat and TempLinc Thermostat will always be matched. When it is not added as a Responder or
Controller to a TempLinc Thermostat, the setpoints are local only. TempLinc Zone Thermostat will send
group commands based on local temp or humidity level and the setpoint shown on the display, regardless
of whether it’s added as a Responder or Controller to a TempLinc Thermostat or not.