
User's Manual


Page 11 of 25 Rev: 3/1/2012 3:06 PM
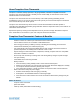
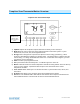
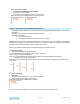
From Programmed Auto Mode:
Both Heat and Cool setpoints setback as
specified
Default setback is 4 degrees
Notice that “Heating” is active on the left, but
not on the right; the element reads “Heat”
Note: On screen text displaying “HEAT” changes to “HEATING” and “COOL” changes to “COOLING” to
indicate HVAC system is active. The status LED under the door also indicates current active state,
COOLING = green, HEATING = red. At time of activation either Heating or Cooling text will blink for 3
seconds then remain steady during the active cycle.
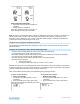
TempLinc Zone Thermostat Set Button Operation
The Set button is for INSTEON Add to and Remove from Scenes and functions like Set does for other
INSTEON devices.
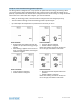
TempLinc Zone Thermostat Time / Sensor Button Operations
- The Time / Sensor button allows the user to set the time and clock format
It cycles between hours, minutes and clock format
Note: When Added to a Scene with TempLinc Thermostat, it retrieves time settings automatically
- Up / Down arrows cycle through the available options.
- Go to the next Time / Sensor step by pressing Time / Sensor button again
- Exit Time / Sensor setup by:
Time out 30 seconds
Pressing any button other than Up / Down or Time / Sensor
IMPORTANT! Once you have Added TempLinc Zone Thermostat to a Scene in TempLinc Thermostat as
a wireless temperature zone, the Program and Time / Sensor buttons will no longer function. All program
and time controls will be performed on the TempLinc Thermostat.
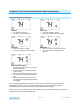
Note: Colors indicate element that is presently blinking during setting procedure
1
st
press of Time / Sensor:
Hours Time settings
Up / Down cycles through time in 1 hour
increments
Press and hold of Up / Down cycles faster
Note: AM / PM changes automatically as needed
2
nd
press of Time / Sensor:
Minutes Time setting
Up / Down cycles through time in 1 minute
increments
Press and hold of Up / Down cycles faster