
User's Manual


Page 12 of 32 2474DWH- Rev: 3/6/2012 10:13 AM
Changing the Paddle and LED Colors
You can remove the LED light pipes and/or front paddle and trim frame assembly before or after SwitchLinc is
installed. During the changeover process, power and load may remain on and operating. There are no dangerous
voltages or unsafe areas under the paddle.
1) If SwitchLinc is already installed in the wall, remove the
wallplate from the switch junction box
2) Remove the four Phillips screws that hold the paddle
assembly to the metal frame
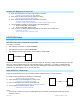
3) Pull the entire paddle straight away from the switch. You may
have to wiggle the bottom of the frame to get it free from the
Set button.
Figure 1: Paddle assembly and SwitchLinc body
separated
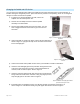
4) Using a flat blade or needle nose pliers, remove the large light pipe as
shown in Figure 2. Light pipe will snap out of the frame. Do the same
for the small light pipe.
Figure 2: Snap out the light pipes with a
flat tool
5) Choose which LEDs and/or paddle and trim frame you would like to install into SwitchLinc
6) Orient the new small light pipe with its protrusion facing toward center
of the new frame and snap it into place. If placed in backwards or
reversed, it will not click into place. Refer to Figure 3.
7) Orient the new large light pipe with side that has the most protrusions
facing toward the center of the new frame. Using only finger pressure,
snap the light pipe into the frame. Refer to Figure 3.
Figure 3: Insert the new light pipes with the
protrusions facing the center
8) If both light pipes are installed correctly, they will stick straight out from back of the frame, as
shown in Figure 4. If installed incorrectly, they will appear to be tilted as shown in Figure 5.