
User's Manual


Page 5 of 13 Rev: 12/7/2011 3:09 PM
1) Using your fan’s pull chains, turn light On and set fan to highest speed
NOTE: All fan and light controls will be done through FanLinc once
installed
2) Turn off the circuit breaker (or remove fuse) supplying power to the
fan’s location
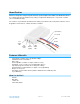
3) Identify Line, Neutral and Load lines for light and fan separately
4) Remove the light and/or fan from the electrical box
5) Disconnect the wires from the ceiling fan and/or light
6) As necessary, strip ½ inch of insulation off the wire ends
7) Connect FanLinc’s White wire and the fixture’s neutral wire to the
house NEUTRAL with a wire nut
8) Connect FanLinc’s Blue [light] wire to the fixture’s Light with a wire nut
9) Connect FanLinc’s Red [fan] wire to the fixture’s Fan with a wire nut
10) Connect FanLinc’s Black wire to LINE with a wire nut
11) Ensure all connections are solid, no exposed copper (other than ground)
12) Turn circuit breaker back on
FanLinc Set Light LED will be on Green (by default)
Fan LED will be on RED
13) To test Light, tap the Light Set Button
Light will toggle between Green (On) and Red (Off)
14) To test Fan, tap the Fan Set Button once
FanLinc will (Beep)
LED will blink Green
(Note: fan motor will not actually engage by tapping FanLinc buttons, only INSTEON
signals from a linked controller to FanLinc will activate the fan motor)
15) Tap Blue a 2
nd
time
FanLinc will (Beep)-(Beep)
LED will blink Green faster
16) Tap Blue a 3
rd
time
FanLinc will (Beep)-(Beep)-(Beep) very quickly
LED will blink Green faster still
17) Tap Blue a 4
th
time
LED will go on RED
IMPORTANT: SET UP ALL DESIRED MANUAL SCENE MANAGEMENT
BEFORE REPLACING COWLING AND RE-MOUNTING TO CEILING.
SEE “SETTING UP INSTEON SCENES”
18) Optional: Cover LED's with black electrical tape to avoid unwanted glowing at night which may be
visible in some fan cowlings
If using software and you program LED’s off, they remain on until you send a
FanLinc a fan command from an INSTEON controller
19) Carefully remount cowling with FanLinc inside (or in electrical box above). Certain installations may
require the use of a UL rated cable tie (included) to secure FanLinc to the fan bracket. Run cable tie