INSTEON LED Bulb
Contents Getting Started INSTEON LED Bulb 4 Device Overview Do Not Connect to a Dimmer Leave Your Fixture On Linking INSTEON Links Understanding Linking Linking to the INSTEON Hub using the iOS or Android App Linking with a Single-Button Controller Linking with a Multi-Button Controller Multi-Linking or Making a Scene Unlinking from a Single-Button Controller Unlinking from a Multi-Button Controller Multi-Unlinking or Removing a Scene 6 8 9 10 11 12 13 14 Software-Only Features Ramp Rate 16 Disable L
Getting Started Everything you need to quickly get up and running.
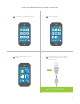
INSTEON LED Bulb Device Overview Do Not Connect to a Dimmer INSTEON LED Bulb dims using INSTEON commands. INSTEON ID X Leave Your Fixture On If your switch is OFF, communication with the LED Bulb is lost. Linking Your LED Bulb does not have a set button. To link manually, unscrew the LED Bulb for a moment and reinsert. ON ON ? switch, consider wiring as always-on.
INSTEON Links INSTEON devices can stand alone and function as a local switch or dimmer, but their real power comes when they are connected together to form a control system. Most INSTEON devices can control one another and be the recipient of control. The process of associating multiple INSTEON devices to one another is called linking.
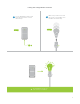
Understanding Linking Links are One-Way Links Remember a Device’s State When linking INSTEON devices, the links that are created are one-way. The current state of the controlled device is 75% A B Switch Lamp Dimmer The switch will turn on the Lamp Dimmer to 75% brightness. Controllers Responders INSTEON devices that can turn other devices INSTEON devices that receive the command of a controller are called responders.
Understanding Linking Controller-Only Responder-Only Some devices, like sensors, can only control other devices. Some devices cannot control other devices; these devices only receive INSTEON commands. X X Motion Sensor Dimmer Switch The Motion Sensor will turn on the Switch but the switch cannot control the Motion Sensor. LED Bulb Dimmer Switch Some devices can only link as responders to devices and scenes.
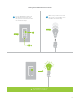
Linking to the INSTEON Hub using the iOS or Android App 1 From Rooms, navigate to All Devices. 2 Tap the Add button. All Devices Rooms All Devices Check-In Favorites Back Door Bathroom Bedroom Bathroom Bedroom Hallway Font Door Garage Door Garage Light Kitchen Living Room Outside Motion Sensor Outside Lights 72º 72º 3 Add Select LED Bulb from the list of devices. 4 and screw in the LED Bulb. The Bulb will double-beep.
Linking with a Single-Button Controller 1 On your INSTEON controller, press and hold the set button until the device beeps. 2 then screw in the LED Bulb. Your LED Bulb will double-beep. ON ON Your INSTEON controller will now control your LED Bulb.
Linking with a Multi-Button Controller 1 On your INSTEON controller, tap the desired control button and then press and hold the set button until the device beeps. 2 then screw in the LED Bulb. Your LED Bulb will double-beep. A ON B ON Your INSTEON controller will now control your LED Bulb.
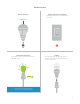
Multi-Linking or Making a Scene 1 On your INSTEON controller, press and hold the set button until the device beeps, then tap the set button. 2 Adjust your scene members to brightness level if dimming. A 50% 72% LED Bulb LED Bulb 30% ON Lamp 3 Appliance B 3 One at a time, screw in your LED Bulbs. For other devices, press and hold the set button until they double-beep. 4 Tap the set button on your building your scene. ON Your INSTEON controller will now control your scene.
Unlinking from a Single-Button Controller 1 3 On your INSTEON controller, press and hold the set button until the device beeps. 2 Press and hold the set button again until the device beeps. then screw in the LED Bulb. Your LED Bulb will double-beep. X ON ON Your INSTEON controller will no longer control your LED Bulb.
Unlinking from a Multi-Button Controller 1 On your INSTEON controller, tap the desired control button and then press and hold the set button until the device beeps. 2 Press and hold the set button again until the device beeps. A B 3 then unscrew and reinsert the LED Bulb. Your LED Bulb will doublebeep. X ON ON ON Your INSTEON controller will no longer control your LED Bulb.
Multi-Unlinking or Removing a Scene 1 On your INSTEON controller, press and hold the set button until the device beeps. Press and hold the set button again, then tap the set button. 2 One at a time, unscrew and reinsert your LED Bulbs. For other devices, press and hold the set button until they double-beep. A B ON C 3 Tap the set button on your Unlinking mode. X ® ® Your INSTEON controller will no longer control your INSTEON devices.
Software-Only Features Most INSTEON devices contain features that can only be enabled, and an INSTEON PowerLine Modem.
Software-Only Features Ramp Rate Customize the speed at which the LED Instant Disable Linking on Power-up Prevents LED Bulb from entering linking mode each time power is disconnected and LINKING 0.
Always-On Wiring controlled by a wall switch, you might consider wiring that wall switch as power. Replacing the wall switch with an INSTEON Switch will provide full control for any INSTEON device in your home.
Always-On Wiring 1 2 electrical service panel. ON Remove the old switch and lacks neutral wires, stop and contact support.
Always-On Wiring 4 Mount the Dimmer Switch into the 5 left and turn power on to the switch at the circuit breaker panel. 6 To link your switch to the LED Bulb, press and hold the set button until the device beeps. Test your switch by tapping the paddle not change but the status lights on the switch will. 7 Unscrew and reinsert your LED Bulb for a moment and reinsert. Your LED Bulb will double-beep.
Appendix Everything else you might need to know about your INSTEON product.
INSTEON Glossary Controller Responder The INSTEON transmitter The INSTEON receiver Blinking Dual-Band An INSTEON device that can send and receive both INSTEON powerline signals and INSTEON radio frequency signals Ramp Rate On-Level The preset brightness level a device will return to when turned on INSTEON A dual-band, mesh networking technology developed by INSTEON.
General Brand Key Application INSTEON Low energy, remote control lighting Product Number 2672-222A US UPC 813922013023 Patent Warranty Protected under US and Foreign Patents (see www.insteon.com/ patents) 2 years, limited INSTEON Features INSTEON RF RF Frequency Yes 915.
Operation Lumens Lumens per Watt 713 79 82.0 Color Temperature Status LED On Levels Ramp Rate 2574 K None 32 0.125 seconds to 8 minutes (software-only) Mechanical Installation Color Dimensions Weight Operating Environment Operating Temperature Range Operating Humidity Range E27 Medium Edison screw base White 2.8” diameter, 4.7” length 72mm diameter, 119mm length 6.
Troubleshooting LED Bulb won’t link to other INSTEON Devices Your LED Bulb may be out of range of other INSTEON Devices or a large appliance may be generating electrical noise, disrupting the INSTEON signal. Try this: • Check to make sure your LED Bulb is not connected to a dimmer. If so, remove the dimmer or relocate LED • Try relocating your LED Bulb to see if linking can be accomplished. If linking works normally in another area • noise.
Operation is subject to the following two conditions: (1) this device may not cause interference, and (2) this device must accept any interference, including interference that may cause undesired operation of the device. The digital circuitry of this device has been tested and found to comply with the limits for a Class B digital device, pursuant to Part 15B of the FCC Rules. These limits are designed to provide reasonable protection against harmful interference in residential installations.
Product Warranty Limited Warranty Seller warrants to the original consumer purchaser of this product that, for a period of two years from the date of purchase, this product will be free from defects in material and workmanship and will perform in substantial conformity to the description of the product in this Owner’s Manual. This warranty shall not apply to defects or errors caused by misuse or neglect.