Thank you for choosing smartpond BEFORE RETURNING TO LOWE’S Contact Customer Care: 1-888-755-4497 Merci d’avoir choisi smartpond AVANT DE RETOURNER À LOWE’S Contact Les Soins de Client: 1-888-755-4497 Gracias por elegir smartpond ® ANTES DE DEVOLVER A LOWE’S Contacte Atención al Cliente: 1-888-755-4497 Model #s: PZF850, PZF850CA ® ®
English TABLE OF CONTENTS Product Tips 1 Warnings and Cautions 2 Package Contents 2 Preparation 3 Operation Instructions 3-4 Maintenance 4-5 Replacement Parts 5 TABLE DES MATIÈRES Soins du client Français Avertissements et précautions 5 5-6 Contenu de l’emballage 6 Préparation 7 Instructions d’utilisation 7-8 Maintenance 8-9 Pièces de rechange 9 TABLA DE CONTENIDO Atención al cliente Español Advertencias y precauciones 9 9-10 Contenido del paquete 10 Preparación 11 In
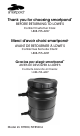
EN Pond Filter Model #PZF850, PZF850CA Questions, problems, missing parts? 1-888-755-4497 customercare@smart-pond.com Monday - Friday, 8am - 6pm ET Visit smart-pond.com/maintenance for a step by step guide and videos. Product Tips To keep your pond healthy and your pump running smoothly, smartpond® is here for you. • For optimal performance, change your filter pads annually or when visibly deteriorating with Replacement Filter Pads (Model #PUFRP / #PUFRPCA).
EN WARNINGS AND CAUTIONS IMPORTANT SAFETY INFORMATION Please read these instructions carefully prior to starting up the unit! The water system on which the operation of this product is based requires utmost care and maintenance, possibly also the use of chemicals, in order to prevent and keep the occurrence of micro-organisms and harmful bacteria, especially legionellae that are responsible for legionnaire’s disease, under control.
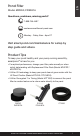
EN PREPARATION Before beginning assembly or operation of product, make sure all parts are present. Compare parts with package contents list and diagram. If any part is missing or damaged, do not attempt to assemble, install or operate the product. Contact Customer Care for replacement parts. • Estimated Assembly Time: 20 minutes • Tools required for assembly: Hacksaw OPERATION INSTRUCTIONS For maximum water flow, it is recommended that the largest tubing size for your pump is used.
EN Step 6. Turn over the filter cover and locate the groove along the outside edge of the raise surface. Inspect the o-ring to find the flat edge. One side will have a curve and the other side will be flat. Insert the flat side of the o-ring down as you place into the groove. Step 7. Turn the cover with the o-ring back over and place in the opening in the filter. 6 7 8 Step 8. Screw the lid onto the top of the tank. Make sure the lid is secure or the filter will leak. Step 9.
EN The best time of the year to “breakdown” your system is in early spring before the water temperatures begin to rise. This is also the ideal time to replace the filter pads. • Filter pads should be replaced annually or when visibly deteriorating. Use smartpond Replacement Filter Pads model #PUFRP / #PUFRPCA for a new fine and coarse filter pad. • Reconnecting the pump to the power source when you are finished. FR For more information on product maintenance and maintenance videos, visit www.smart-pond.
ticulier les légionelles, responsables de la maladie du légionnaire. Le non-respect de ces consignes pour la mainte-nance et l’entretien corrects peuvent entraîner la prolifération de bactéries dangereuses pour la santé. FR Du fait que les ajutages projettent de l’eau dans l’air à des fins décoratives, des gouttes d’eau contenant des bactéries présentant un danger pour la santé peuvent atteindre les poumons et causer des maladies mettant la vie en péril.
PRÉPARATION Avant de commencer l’assemblage ou l’utilisation d’un produit, assurezvous que toutes les pièces sont présentes. Comparez les pièces avec la liste du contenu de l’emballage et le diagramme ci-dessus. Si une pièce est manquante ou endommagée, n’essayez pas d’assemblez, d’installer ou d’utiliser ce produit. Contactez le service à la clientèle pour des pièces de rechange. FR • Temps de montage estimé : 20 minutes.
FR filtre et localisez la rainure le long du bord extérieur de la surface de levage. Inspectez le joint torique pour trouver le bord plat. Un côté aura une courbe et l’autre côté sera plat. Insérez le côté plat du joint torique vers le bas lorsque vous le placez dans la rainure. Étape 7. Tournez le couvercle avec le joint torique et placezle dans l’ouverture du filtre Étape 8. Vissez le couvercle sur le dessus du réservoir.
devrait pas être fait pendant la saison chaude, car cela pourrait prendre jusqu’à 8 semaines pour rétablir l’équilibre de l’environnement. La meilleure période de l’année pour nettoyer votre système est au début du printemps avant que les températures ne montent. C’est également la période idéale pour remplacer les tampons filtres. FR • Les tampons filtreurs doivent être remplacés à chaque année ou lorsqu’ils se détériorent visiblement.
el empleo de productos químicos para limitar los microorganismos y las bacterias patógenas, especialmente también las legionellas, que provocan la legionelosis. En caso de incumplimiento de esta indicación para un mantenimiento y cuidado correctos se pueden propagar las bacterias peligrosas para la salud.
PREPARACIÓN Antes de comenzar a ensamblar y a hacer funcionar el producto, asegúrese de que no falte ninguna pieza. Compare las piezas con la lista de contenidos del paquete y con el diagrama de arriba. Si alguna pieza falta, o si hay piezas dañadas, no intente ensamblar ni utilizar el producto. Póngase en contacto con el servicio al cliente para obtener las piezas de reemplazo. • Tiempo calculado para el ensamblaje: 20 minutos. • Herramientas necesitan para el ensamblaje: sierra para metales.
Paso 6. Gire la tapa del filtro y localice la ranura a lo largo del borde exterior de la superficie de elevación. Inspeccione el anillo O para encontrar el borde plano. Un lado tendrá una curva y el otro lado será plano. Inserte el lado plano del anillo O hacia abajo al colocarlo en la ranura. Paso 7. Vuelva a girar la tapa con el anillo O y colóquela en la abertura en el filtro. SP Paso 8. Atornille la tapa sobre la parte superior del tanque. Asegúrese de que esté seguro.
limpiado a fondo utilizando agua tibia. Esto no se debe hacer durante la temporada de verano, ya que puede tardar hasta 8 semanas para restablecer el equilibrio del medio ambiente. La mejor época del año para “colapso” del sistema es a principios de primavera antes de que las temperaturas del agua comiencen a elevarse. Este es también el momento ideal para reemplazar las almohadillas de filtro. • Las almohadillas filtrantes deben ser reemplazadas anualmente o cuando se deterioren visiblemente.
Show us your ponds and projects! Share with us Use #smartpondProject for a chance to be featured by smartpond® smartpond® ©GeoGlobal Partners, LLC. smartpond is a registered trademark of GeoGlobal Partners, LLC 09/17 Need help? Call Customer Care at 1-888-755-4497 (US) or visit www.smart-pond.