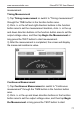
www.newsmartsafe.com iSmartEV P03 User Manual measurement. Timing Measurement 1) Tap Timing measurement or switch to "Timing measurement" through the TIME button in the function button area. 2) Click -/+ or the left and right direction buttons in the function button area to set the measurement duration, click -/+ or the up and down direction buttons in the function button area to set the output voltage value, and then tap Begin the Measurement or long press the TEST button to start measurement.
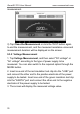
iSmartEV P03 User Manual www.newsmartsafe.com measurement. 3) Tap Close the Measurement or click the TEST button again to end the measurement, and the measured resistance value and measurement duration will be displayed on the screen. 9.3.2 Voltage Measurement 1. Tap Voltage Measurement, and then select "DC voltage" or "AC voltage" according to the type of power supply to be measured. You can also switch to the required option through the MODE button. 2.
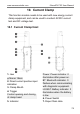
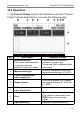
www.newsmartsafe.com iSmartEV P03 User Manual 10. Current Clamp This function module needs to be used with new energy current clamp equipment, and can be used to conduct AC/DC current test and DC voltage test. 10.1 Current Clamp Host 1. Jaw φ16mm×18mm 2. Direct current positive input indication 3. Clamp Mouth 4. Trigger Control opening and closing of clamp head 5. Indicator Power: Power indicator. It illuminates after power-on. BT: Bluetooth indicator.
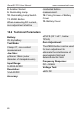
iSmartEV P03 User Manual 8. Aviation Socket www.newsmartsafe.com 9. Illuminating Lamp conducted before measurement. 10. Illuminating Lamp Switch 11. ZERO Button 12. Fixing Screws of Battery Cover When measuring DC current, zero adjustment shall be 13. Battery Cover 10.
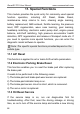
www.newsmartsafe.com iSmartEV P03 User Manual 10.3 Operation 1. Tap Current Clamp on the main interface or click the "Current Clamp" function switch button to access the following page. No.
iSmartEV P03 User Manual 8 Start/stop 9 Save waveform www.newsmartsafe.com waveforms. Click to start/end measurement. Click to save the current waveform. 2. Turn on the power switch on the current clamp, and the power indicator lamp will be on. 3. Click the "not connected" button on the screen to start searching for the current clamp. Click the Bluetooth name of the current clamp to be connected (the Bluetooth name is the serial number of the current clamp device) to connect.
www.newsmartsafe.com iSmartEV P03 User Manual clamp the positive and negative cables of the power supply to be tested at the other end, and then conduct the measurement.
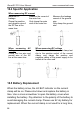
iSmartEV P03 User Manual www.newsmartsafe.com 10.4 Specific Application When measuring DC current Measure DC leakage: Clamp the positive and negative wire of the DC line at the same time. Measure the current of the main line: Only clamp the main wire of the main line. When measuring AC leakage Clamp the live wire and neutral wire of the AC line at the same time Measure the leakage current of the ground wire: Only clamp the ground wire.
www.newsmartsafe.com iSmartEV P03 User Manual take out the battery.
iSmartEV P03 User Manual www.newsmartsafe.com 11.
www.newsmartsafe.com iSmartEV P03 User Manual cycle. 11.4 Steering Angle Calibration This function enables you to reset the steering angle, after replacing the steering angle position sensor, replacing steering mechanical parts (such as steering gearbox, steering column, end tie rod, steering knuckle), performing four-wheel alignment, or recovering car body. 11.
iSmartEV P03 User Manual www.newsmartsafe.com Cases when throttle learning is required: 1) After the replacement of the ECU, the ECU does not store the characteristics related to the working of the throttle, so the throttle matching is required. 2) After the power-off of the ECU, the memory of the ECU memory is lost, and throttle matching is required. 3) After replacing the throttle assembly, the throttle matching is required.
www.newsmartsafe.com iSmartEV P03 User Manual (such as high temperature heating combustion, fuel additive or catalyst reduce PM ignition combustion) to stabilize the filter performance. It needs to be performed in the following cases: 1) The exhaust back pressure sensor is replaced. 2) The PM trap is removed or replaced. 3) The fuel additive nozzle is removed or replaced. 4) The catalytic oxidizer is removed or replaced. 5) The DPF regeneration MIL is on and maintenance is performed.
iSmartEV P03 User Manual www.newsmartsafe.com 11.13 Coolant Bleed Use this function to activate the electronic water pump before venting the cooling system. 11.14 Engine Power Balance Monitoring It is used to monitor crankshaft acceleration in the power stroke of each cylinder, to determine the relative power provided by each cylinder. 11.15 IMMO Prog This function supports the reading and writing of car key chip, EEPROM chip, MCU chip, EEPROM and flash of engine ECU and transmission ECU. 11.
www.newsmartsafe.com iSmartEV P03 User Manual increased and engine output power is reduced. In this case, the GPF replacement or regeneration must be performed. 11.19 Transport Mode In order to reduce power consumption, the following functions may be disabled, including limiting the vehicle speed, not waking up the door opening network, and disabling the remote control key, etc. At this time, the transport mode needs to be deactivated to restore the vehicle to normal. 11.
iSmartEV P03 User Manual www.newsmartsafe.com code in the ECU to the injector code of the corresponding cylinder, so as to more accurately control or correct cylinder injection quantity. It needs to be performed in the following cases: After the ECU or injector is replaced. 11.25 Stop/Start Reset This function is used to open or close the automatic start-stop function via setting the hidden function in ECU (provided that the vehicle has a hidden function and supported by hardware). 11.
www.newsmartsafe.com iSmartEV P03 User Manual AC system relearn/ initialization must be performed when the vehicle AC ECU or actuator is replaced or the ECU memory is lost. 11.31 Seats Calibration This function is applied to match the seats with memory function that are replaced and repaired. 11.32 AFS (Adaptive Front-lighting System) Reset This function can be used to initialize the adaptive headlamp system.
iSmartEV P03 User Manual www.newsmartsafe.com 12. ADAS Calibration The ADAS calibration function is used to calibrate driver assistance systems with various cameras and radars, such as front-facing cameras for lane departure warning systems, and radar sensors for ACC (Adaptive Cruise Control), etc. 12.1 Activate ADAS Calibration Function The ADAS calibration function on the device is disabled default. Users need to use the activation card to activate function before using it.
www.newsmartsafe.com iSmartEV P03 User Manual (3) Scrape the coating area of the ADAS activation card to display the activation code. Enter the 24-digit activation code, and then tap Activate to activate the ADAS function. (4) After successful activation, the calibration function of ADAS can be used normally. 12.2 Start Calibration Users need to perform the calibration as prompted on the host. The ADAS calibration function is introduced through the ADAS demo program as follows.
iSmartEV P03 User Manual www.newsmartsafe.com 12.2.2 ADAS System Scan Use this function to scan which ADAS systems are installed on the test vehicle. The ADAS system supports two display modes: System Topology and System List. Tap Start Scanning to scan the ADAS system one by one.
www.newsmartsafe.com iSmartEV P03 User Manual diagnostic functions. 12.2.3 ADAS Calibration Function Users can use this option to perform ADAS calibration operations. To perform this function, please coordinate with a calibration tool such as ADAS Mobile or ADAS PRO+. The calibration tool is used to locate the calibration target, and the tablet is used to guide the user on how to position the calibration tool and provide detailed calibration steps.
iSmartEV P03 User Manual www.newsmartsafe.com under the Other -> Reports -> ADAS Reports tab. 12.2.4 Health Report After the calibration of the ADAS system, use this option to perform a full vehicle scan to confirm that the vehicle fault code has been cleared.
www.newsmartsafe.com iSmartEV P03 User Manual 13. Remote Diagnose The module is used to remotely assist users in diagnosis operations. Tap Remote Diagnose to enter the following page: 13.1 Messages Tap Messages to enter the messages page, here you can see all the messages received. 13.2 Contacts Tap Contact to enter the following page.
iSmartEV P03 User Manual www.newsmartsafe.com contact list including maintenance technicians and added friends. Enter “Username/Nickname/Serial Number" in the search bar to search and add a friend. The added friends will appear in the contacts list. Select the maintenance technician in the list to enter the interactive page. In the interactive page, you can communicate with text and voice messages, send files and pictures, invite remote diagnose assistance, etc. 13.
www.newsmartsafe.com iSmartEV P03 User Manual To request a technician for Remote Diagnose, please follow the below steps. 1. Turn on the WEB Remote Diagnose switch and choose the car model to be diagnosed. 2. The remote technician logs in to the WEB Remote Diagnose platform http://remote.x431.com, inputs the device S/N, and remotely connects to your device for diagnosis. Note: Before use, ensure stable network connection in order not to affect Remote Diagnose.
iSmartEV P03 User Manual www.newsmartsafe.com 14. IMMO Matching This function enables you to perform the anti-theft key matching function, so that the immobilizer control system on the car identifies and authorizes remote control keys to normally use the car. 14.1 Anti-theft Matching 14.1.1 Vehicle Connection 1. For most vehicles, just use the included OBD II extension cable to connect the VCI to the vehicle’s DLC port. 2.
www.newsmartsafe.com iSmartEV P03 User Manual 14.1.2 Operations Here we take the BMW for example to demonstrate how to perform the functions of key adding and all lost for BMW CAS4/CAS4 + anti-theft system module. 1. Tap IMMO Matching on the main interface and select BMW as the vehicle brand. 2. Check that the VCI, vehicle and iSmartIMMO G3 are correctly connected according to the prompts in the software picture, and then tap OK. 3. Tap Anti-Theft Key Matching.
iSmartEV P03 User Manual www.newsmartsafe.com 4. Tap CAS4/CAS4+ IMMO. If you are not sure about the type of anti-theft system, tap Automatic Detection. 5. Tap Preprocessing to perform Read anti-theft data, Key matching and more. If it has already been preprocessed, here you can perform the relevant functions. The ECU will be upgraded in this process, and files need to be downloaded online.
www.newsmartsafe.com iSmartEV P03 User Manual 6. After preprocessing, tap OK. 7. Return to the function menu page and tap Key Learning. 8. After the key information successfully read, select the unused key position and tap Key Generated By Ignition Switch.
iSmartEV P03 User Manual www.newsmartsafe.com 9. Read and display the password, and tap OK. 10. Place a new key close to vehicle coil, tap OK, and wait for key generation.
www.newsmartsafe.com iSmartEV P03 User Manual 11. After the dealer key is successfully generated, please try to start the vehicle. Now the key matching is finished and the new key is ready for use. 14.2 IMMO PROG The iSmartIMMO G3 is required when performing this operation. It has the following functions: • Read transponder data (including Mercedes Benz infrared smart key), and generate exclusive keys. • Read/write on-board EEPROM chip data, and read/write MCU/ECU chip data.
iSmartEV P03 User Manual www.newsmartsafe.com • You are suggested to connect the BOX shown in above diagram to the tablet via the USB cable. Using a USB cable could effectively enhance your data transmission speed. • IMMO Programming does not require a connection to the vehicle. To ensure that the iSmartIMMO G3 works properly, ONLY use the switching power supply and OBD I adaptor to supply power to the iSmartIMMO G3.
www.newsmartsafe.com iSmartEV P03 User Manual 14.2.1 EEPROM Programming This function allows you to read/write on-board EEPROM chip data. 14.2.2 Engine Programming This function allows you to read the engine data and write in the backup data after a new engine is replaced. Below procedures show you how to perform engine programming. 1. Tap Engine. 2. Select Engine Brand (e.g. Bosch). 3. Select Engine series (e.g. MED17).
iSmartEV P03 User Manual www.newsmartsafe.com 4. Tap Search For ECU Model. 5. Check ECU model (printed on the sticker on the back of your Engine), enter the engine type in the dialogue box (for example , the engine type should be MED17.7.7) and tap OK.
www.newsmartsafe.com iSmartEV P03 User Manual 6. Tap OK to confirm the engine type and enter the function selection screen. Note: The function selection screen varies by different vehicle manufacturers. a. Tap View Wiring Diagram to check how to connect the engine with the iSmartIMMO G3. Note: Vehicle engine connection could vary depending on engine types, for information how to connect the car engine, refer to the onscreen connection diagram.
iSmartEV P03 User Manual www.newsmartsafe.com D. BENCH mode cable (optional) E. Adaptor cable (optional) associated with the BENCH mode cable F. Engine b. Tap Backup EEPROM data to create a file name and save it on the tablet. c. Tap Restore EEPROM data to write the backup EEPROM data into the new engine. Stop: The EEPROM restoration applies only when you have encountered irrevocable faults or after a new engine is replaced. d.