
Installation Instructions


TRIM & FASCIA 190, 440, 540 & 2000 SERIES
INSTALLATION
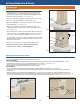
• If framing around an existing column, be sure to use pressure
treated lumber in all locations that may be touching concrete,
masonry or decking. Provide adequate framing support for the
trim to be properly fastened. (See diagram 11a)
• Be sure to use proper ashing with a minimum 4 inch (102 mm)
upper leg. A secondary WRB is recommended as well.
• Maintain a 3/8 inch (10 mm) space, and do not caulk, between
trim and ashing. (See diagram 11b)
• Maintain a minimum 1 inch (25 mm) clearance between LP
SmartSide products and any surface where water might collect.
(See diagram 11b)
•
Fasten all trim over 11 inches (279 mm) wide a maximum of every
6 inches (152 mm) o.c. around the perimeter and every 12 inches
(305 mm) o.c. along intermediate supports.
(See diagram 11b)
• For trim under 11 inches (279 mm) wide, fastener placement and
quantity must be consistent with LP® SmartSide® Trim and Fascia
Application Instructions.
• Be sure to seal all surfaces and cuts exposed to the weather.
• TRIM MUST NOT BE IN DIRECT CONTACT WITH MASONRY,
CONCRETE, BRICK, STONE, STUCCO OR MORTAR.
GENERAL REQUIREMENTS (CONTINUED)
• Trim mounting blocks should extend beyond the face of the siding.
• Seal all cut ends, edges and holes exposed to the weather.
On-site assembled:
• Use metal Z-ashing with a minimum 4 inch (102 mm) upper leg over the top side of trim mounting block. Leave a
minimum 3/8 inch (10 mm) space above Z-ashing and do not caulk. (See diagram 11d)
• Properly integrate the Z-ashing with the housewrap. (See diagram 11c)
• Apply fasteners meeting the specications in this document.
Pre-assembled:
• Properly integrate the built-in placement ange and ashing with the housewrap. (See diagram 11c)
• Fasten the built-in-placement ange to the framing meeting the pre-assembled trim mounting block manufacturer’s
instructions.
• When installing pre-assembled trim mounting blocks, leave proper spacing at the two sides and bottom between the
built-in-placement ange and the siding (minimum 3/16 inch or 5 mm). Seal these spaces with sealant. (See diagram 11d)
• Seal the space between the wall-penetrating material or xture and the mounting block cut-out. (See diagram 11d)
11a
CUTTING
11b
11c 11d
16”
6” o.c.
Housewrap
Flap
Adhesive
Flashing
Column Application
Mounting Blocks for Exterior Fixtures
Pressure
Treated
Lumber
WRB
Framing
Flashing
12”
alternating
Min. 3/8” space
(do not caulk)
Min 3/16”
space with
sealant
Housewrap
Tape
Min 3/16”
space with
sealant
LP SmartSide Trim & Fascia
11