
Installation Guide

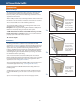


CONDITION
Snug
Flush
Visible Fiber
Countersunk
1/16 - 1/8 inch
Countersunk
more than 1/8 inch
CORRECTION
OK
OK
Paint
Apply Sealant
Apply Sealant and
re-nail
TRIM & FASCIA 190, 440, 540 & 2000 SERIES
• Fasteners: 6d (0.099”) or 8d (0.113”)
non-staining, hot-dipped galvanized
(ASTM A-153) or equal. Apply and correct
overdriven nails as shown in Table 3a.
• Sealant: Use an exterior-quality,
non-hardening, paintable sealant. Use
Class 25 or higher exterior sealant meeting
the ASTM C920 Standard for Specication
for Elastomeric Joint Sealants. Follow the
sealant manufacturer’s instructions for
application.
• Paint: Exterior-quality 100% acrylic latex
paint, specially formulated for use on wood
and engineered wood substrates, is highly
recommended. Semi-gloss or satin nish
oil or alkyd paints are acceptable. For at
alkyd paint, please check with the coating
manufacturer for their recommendations for
use on composite wood siding.
GENERAL REQUIREMENTS (CONTINUED)
• Framing: A maximum of 24 inch o.c. intermediate support
is required for sot greater than 12 inches wide. 24 inch o.c.
intermediate support is NOT required for sot 12 inches wide
and under. (See diagrams 4a and 4c)
• Framing shall be of sucient size and quality to securely attach
the sot. Installer is resposible for ensuring all framing meets
local building code requirements.
• All panel ends and edges must be supported or backed by
solid support. Additional blocking may need to be installed.
Complete perimeter framing support is required for all sot.
• Panels must be installed perpendicular to framing supports,
except in open sot applications over gabled eaves.
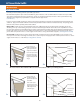
• Fastener length: Long enough to fully penetrate framing
support a minimum of 1 inch. (See diagram 3b)
• Fastener placement: 3/8 inch from ends and edges.
• Fastener spacing: Space nails a maximum of every 6 inches
o.c. at panel edges and a maximum of every 12 inches o.c. along
intermediate supports. (See diagrams 4b and 4d)
• For information on fastening LP® SmartSide® sots in high wind
speed areas, refer to APA PR-N117 and/or NER-626 found at
www.lpcorp.com.
Table 3a
3b
PREPARATION
General Application Equipment
End Joint
GENERAL REQUIREMENTS (CONTINUED)
INSTALLATION
Standard Fastening Instructions
1” min.
Space 3/16” and
apply sealant
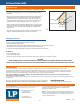
LP SmartSide CTW, Vented CTW and Sot Panels
(Long Dimension Across Supports)
Maximum Span (inches)
All Edges Supported
24
24
24
Product Category
38 Series Strand
Substrate
76 Series Strand & Fiber
Substrate
190 Series Strand
Substrate
Minimum Nail Size
and Type
6d (0.099")
hot-dipped
galvanized
or equal
8d (0.113") hot-dipped
galvanized
or equal
8d (0.113”) hot-dipped
galvanized
or equal
LP SmartSide Sot
3