
Installation Guide


N I
• In braced wall assemblies, use minimum 6d (0.113 in. shank
diameter) hot-dipped galvanized nails for 38 and 76 Series pan-
els and minimum 8d (0.131 in. shank diameter) for 190 Series
panels. Do not use electroplated fasteners. Refer to your local
building code to verify the minimum allowable fastener size.
• Penetrate structural framing or wood structural panels and
structural framing a minimum of 1-1/2 inches.
• For 38 Series panels, double nailing procedure meets wall
bracing requirements and
5
/
16
inch shear wall design values.
• For 76 and 190 Series panels, single nailing meets wall bracing
requirements. To meet the equivalent
3
/
8
inch shear wall design
values, double nailing procedures must be used. It may be nec-
essary to angle drive the second nail in order to penetrate the
framing. Seal nails driven below the surface.
Do
• Prime and paint all exposed surfaces including all drip
edges or where water will hang.
• Apply finish coat as soon as possible or within 180 days
of application.
F I
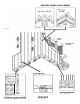
Application instructions (cont.)
•
Install kick-out flashing to direct the water into the gutter
•
Install step flashing with minimum 4 inch upper leg
•
Properly integrate flashing with the secondary water-resistive
barrier. Use housewrap, flashing tape, Z-flashing, or other
items as needed to maintain the counterflashing principle.
•
DO NOT extend the siding or trim into the kick-out flashing or
gutter
•
Maintain a clearance between the end of the gutter and the
adjoining wall to allow for proper maintenance of the siding
• Prime and p
aint ALL exposed cut edges
KicK-Out Flashing
LP Siding
Min. 1 in. clearance
between trim and roofing
Clean rain
gutter
Trim should be thick enough so the siding does not extend beyond
the face of the trim.
• Trim and fascia must be applied in a manner that will not allow
moisture intrusion or water buildup.
• LP® SmartSide® siding is not designed and/or manufactured
to be used as trim or fascia. LP SmartSide trim and fascia are
available in a variety of dimensions.
T
Do not run trim or siding inside
of the kick out flashing
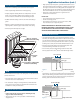
3
/
8
in. from edge
1
/
8
in. gap
Single row of nails
Nail
penetration
min. 1-
1
/
2
in.
Alignment bead
Figure 2
Double row of nails
1
/
8
in. gap
Alignment bead
Figure 1
1 in. from edge
• High-quality acrylic latex paint, specially formulated for use on
wood and engineered wood substrates, is highly recommended.
Semi-gloss or satin finish oil or alkyd paints are acceptable. For
flat alkyd paint, please check with the coating manufacturer for
their recommendations for use on composite wood siding.
• Follow the coating manufacturer’s application and
maintenance instructions.
Do not usE
• Semi-transparent and transparent stains.
• Shake and shingle paints.
• Vinyl-based resin formulas such as vinyl acetate, PVA,
vinyl acetate/acrylic copolymer paints.
HANDLE PREFINISHED LP SMARTSIDE PRODUCTS WITH
EXTREME CARE DURING STORAGE AND APPLICATION. TOUCH
UP ANY DAMAGE TO THE FINISH THAT MAY OCCUR DURING
APPLICATION PER PREFINISHERS SPECIFICATIONS.