
User manual

Package & Accessories
Included Quantity Mark Remark
Indoor Monitor 1 A Indoor monitor with LCD screen
Screw 4 B Two pairs depending on thickness
of the door
Outdoor Camera 1 C The ribbon cable will go through
Peephole to connect Indoor Part
Steel Bracket 1 D Use screZWR¿[WKHVWHHOEracket
with Outdoor part
User Manual 1
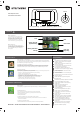
Door
D. Steel Bracket
A. Indoor monitor
B. Fixing screws
Ribbon cable
Drill Hole in door
C. Outdoor camera
12-28mm
3x
Smart Peephole Viewer/
Visual Doorbell User Manual
You will need
Either remove your current door viewer or drill a new hole at least
12mm diameter up to 28mm diameter Into your door in a suitable position
to view the visitor.
N.B. Always test the product before installation.
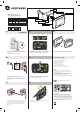
Open the battery cover of the indoor monitor (A) and insert the Micro SD card.
7KHQLQVHUW[$$EDWWHULHVPDNLQJVXUHWKH\DUHLQVHUWHGFRUUHFWO\
N.B. Please install the Micro-SD card before inserting the batteries.
7DNLQJH[WUDFDUHZLWKWKHULEERQFDEOHJHQWO\SXVKWKHLQGRRUPRQLWRU
(A) back onto the steel bracket (D) and slide down to lock into position.
Insert your selected screws (B) according to your door thickness into
the Outdoor camera (C) but do not fully tighten.
Push the door viewer (C) into position making sure the ribbon cable
is pushed through first and the up arrow on the back of the camera
is facing up.
Connect the ribbon cable by pushing it onto the connection, you will feel
a “Click” as it locks onto the circuit board. Make sure the cable is fitted
the correct way around as shown in the image.
Using the steel bracket (D), make sure the up arrow is facing up and
push the ribbon Cable through the slot. Then allow the screws to push
through the holes so the steel bracket becomes flush with the door.
7LJKWHQWKHVFUHZVWRIL[WKHVWHHOEUDFNHWDQG2XWGRRUFDPHUD
into position.
Clip the battery cover back on, the ribbon cable will fit in a small opening
allowing it to come through the cover.
01 04
1 2 3
07
02 05
03 06
Technical Specifications
Conforms to all relevant European Directives.
Recycling
This symbol is known as the ‘Crossed-out Wheelie Bin Symbol’.
When this symbol is marked on a product or battery, it means that
it should not be disposed of with your general household waste.
Some chemicals contained within electrical/electronic products or
batteries can be harmful to health and the environment. Only dispose
of electrical/electronic/battery items in separate collection schemes,
which cater for the recovery and recycling of materials contained within.
Your co-operation is vital to ensure the success of these schemes and
for the protection of the environment
Indoor-part Dimension: 136×75×18mm
Outdoor-part Dimension: 30×30×7mm
Door hole range: 12mm~28mm
Door thickness range: 35mm~90mm
%DWWHU\[Y$$/51RWLQFOXGHG
Battery life: 3 months (based on 10 operations per day)
Notes
We recommend that good quality, branded, alkaline batteries
are used.
Do not leave the product on uneven or unstable surfaces to prevent
damage caused by falling.
Try to avoid placing the product on high-temperature surfaces,
high humidity or a lot of dust, salt spray and other harsh environments
as this may reduce the lifespan of the product.
Take care with the ribbon cable on the door viewer to avoid damage.
In more detail...
Installation