
User's Manual

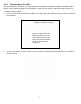
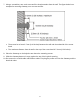
Table Of Contents

8
3.2.2 Installing the Battery
The Gateway supports two 2600mA rechargeable Lithium-Ion batteries for power failure backup. It
provides stand-by operation for eight-hour standby and five-hour talking mode in the event of the power
failure.
Before you begin the installation, you must first install the batteries in your Gateway. The following
description indicates you how to locate the batteries in the Gateway.
1. Place the Gateway on a flat surface and remove the
battery cover (with a Battery icon on the side) on the
bottom.
2. Slide the battery into the battery compartment until it is
fully seated. Repeat this step to install the second
battery.
3. Make sure that the pull-tab on the battery is accessible
and does not prevent the battery cover from closing
properly.
4. Slide the battery cover upward and snap into place.
It may take up to 24 hours for each battery to charge fully when:
The batteries are installed for the first time.
The batteries are replaced.
The batteries are fully discharged.
WARNING: There is danger of explosion if the battery is mishandled or incorrectly replaced.
Replace only with the same type of battery. Dispose of the battery in accordance with local
regulations and instructions from your service provider.
Do not disassemble it or attempt to recharge the battery outside the system. Do not crush,
puncture, dispose of in a fire, short external contacts, or expose to water or other liquids.
Note: The batteries begin to charge automatically as soon as you attach the modem to the
AC electrical outlet. When you first plug in the Gateway, the Power LED illuminates. If you
choose to operate the Gateway without a battery, you risk losing your telephone service
during a power outage. Under normal circumstances, the battery should last for several
years. The Battery LED turns off to indicate that the battery should be replaced soon. Contact
your service provider to obtain replacement batteries and for disposal instructions.