
User's Manual


Copyright
©
2010 SMC Networks
Page 1
All Rights Reserved
I/M SMCDW01-Z rev. 1.0
8/24/10
1
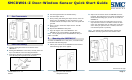
Key Components
2
Insert the Battery
A.
Find the locking mechanism on the bottom of the
SMCDW01-Z.
B.
Holding the SMCDW01-Z in one hand, carefully insert the
tip of a screwdriver into the locking mechanism.
C.
Push lightly upwards from the back of the SMCDW01-Z
until the back plate separates from the sensor.
D.
Find the supplied CR2 3-volt lithium battery.
E.
Find the tamper switch.
F.
While pressing and holding the tamper switch, insert the
battery into the SMCDW01-Z, with the positive (+) end
oriented towards the tamper switch. The front panel LED
goes ON.
G.
After 1 second, release the tamper switch. The LED
blinks green.
H.
Replace the SMCDW01-Z back plate.
I.
Align the magnet next to the SMCDW01-Z. The
SMCDW01-Z can now be added to the SMA Gateway.
Note: Do not physically mount the SMCDW01-Z until you
add it to the SMA.
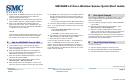
3
Mounting the SMCDW01-Z
To mount the SMCDW01-Z to a wall, door, or window frame,
use double-sided mounting tape:
A.
Identify the locations on the SMCDW01-Z where double-
sided mounting tape can be applied.
B.
Wipe clean the surface where the SMCDW01-Z will be
mounted. Dust and particles can reduce the adhesion of
double-sided mounting tape you will use to mount the
SMCDW01-Z.
C.
Place the main sensor unit and magnet unit in such a
way that when the door or window is closed, the man
sensor unit and magnet unit are within 2cm. from each
other. When you open the door or window, these two
units should separate in proximity.
Note: For optimal radio communications, position the
SMCDW01-Z vertically against the door/window frame.
SMC
DW
01
-
Z
Door
-
Window
Sensor Quick Start Guide
continued on next page