
User's Manual


– 24 –
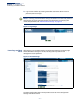
2 Initial Configuration
The AP’s initial configuration steps can be made through the CLI or web browser
interface. If the AP is not configured with an IP address that is compatible with your
network. You can first use the command line interface (CLI) as described below to
configure a valid IP address.
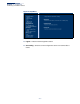
CLI Initial Configuration Steps
First connect to the AP’s console port and log in to the CLI, as described in “Console
Port Connection” on page 19. Then proceed with the required configuration.
Setting an IP Address If the default IP address is not compatible with your network or a DHCP server is not
available, the AP’s IP address must be configured manually using the CLI.
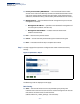
Type “configure” to enter configuration mode, then type “interface ethernet” to
access the Ethernet interface-configuration mode.
SMC#configure
SMC(config)#interface ethernet
SMC(config-if)#
First type “no ip dhcp” to disable DHCP client mode. Then type “ip address ip-
address netmask gateway,” where “ip-address” is the access point’s IP address,
“netmask” is the network mask for the network, and “gateway” is the default
gateway router. Check with your system administrator to obtain an IP address that
is compatible with your network.
SMC(if-ethernet)#no ip dhcp
SMC(if-ethernet)#ip address 192.168.2.2 255.255.255.0 192.168.2.254
SMC(if-ethernet)#
After configuring the access point’s IP parameters, you can access the management
interface from anywhere within the attached network. The command line interface
can also be accessed using Telnet from any computer attached to the network.
Note:
Command examples shown later in this manual abbreviate the console
prompt to “AP” for simplicity.