
Datasheet


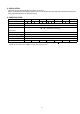


5. TROUBLESHOOTING
DEMARCATION PHENOMENON
1. 1.
2. 2.
3. 3.
4. 4.
5. 5.
6. 6.
1. 1.
2. 2.
3. 3.
4. 4.
5. 5.
1. 1.
2. 2.
3. 3.
4. 4.
5. 5.
6. 6.
1. 1.
2. 2.
1. 1.
2. 2.
Note) The grease used recommends JX Nippon oil & Energy corporation diamond multipurpose No.2.
Replace the check valve assembly.
Foreign materials caught in check
valve seat.
Check valve adheres to the check
valve assembly.
Back flow
mecha-nism
Foreign materials caugth in the check
valve seat.
Replace the check valve assembly.
Foreign materials caugth in the check
valve seat.
Replace the check valve assembly.
The back flow
mechanism does
not operate.
Replace the check valve assembly.
Pressure
Set pressure does
not return to zero
when pressure
handle is
loosened.
Foreign materials caugth in valve seat
or valve "O" ring.
7
Replace the adjust spring.
Replace the valve spring.
Remove the valve guide and clean valve
seat or valve "O" ring. Grease up after
washing the sliding surface of valve "O"
ring.
Foreign materials caugth in valve seat
or valve "O" ring.
Foreign materials caugth in the check
valve seat.
Replace the check valve assembly.
Refer to
「
6. CONSTRUCTION / PARTS LIST
」
(P8 to P9),
「
8. DISASSEMBLY DRAWING
」
(P13 to P14).
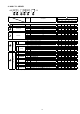
TROUBLE
POSSIBLE CAUSE REMEDY
Replace the valve.
Opposite flow direction or opposite
installation of regulator.
Adjust spring is damaged.
Valve spring is damaged.
Check flow diretion and install the
regulator correctly if wrong.
Pressure is not
regulated.
Valve rubber seat is damaged.
Valve adheres to the valve guide.
Remove the valve guide and clean valve
seat or valve "O" ring. Grease up after
washing the sliding surface of valve "O"
ring.
Replace the valve.
Valve rubber seat is damaged.
Valve spring is damaged. Replace the valve spring.
Foreign materials caugth in valve seat
or valve "O" ring.
Wash the sliding surface of valve "O" ring
and grease up.
Replace the diaphragm assembly.
Foreign material is caught in the
relieving valve seat.
Clean the relieving valve seat, or replace
the diaphragm assembly.
Valve rubber seat is damaged. Replace the valve.
Remove the valve guide and clean valve
seat or valve "O" ring. Grease up after
washing the sliding surface of valve "O"
ring.
Air leaks
Back pressure exceeding the set
pressure is applied to the outlet.
Revise the air circuit so that back
pressure does not exceed the set
pressure.
Air leaks between
the bonnet and
the body.
Loosened bonnet.
Diaphragm is damaged.
Fasten the bonnet.
Replace the diaphragm assembly.
Air leaks from the
bonnet exhaust
port.
Diaphragm is damaged.