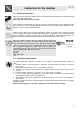
Contents 1 INSTRUCTIONS FOR SAFE AND PROPER USE ________________________________4 2 INSTALLATION OF THE APPLIANCE__________________________________________6 3 ADAPTATION TO DIFFERENT TYPES OF GAS _________________________________9 4 FINAL OPERATIONS ______________________________________________________15 5 DESCRIPTION OF FRONT PANEL CONTROLS ________________________________17 6 USE OF THE COOKING HOB _______________________________________________19 7 USE OF THE OVEN _________________________
Introduction 1 INSTRUCTIONS FOR SAFE AND PROPER USE THIS MANUAL IS AN INTEGRAL PART OF THE APPLIANCE AND THEREFORE MUST BE KEPT IN ITS ENTIRETY AND IN AN ACCESSIBLE PLACE FOR THE WHOLE WORKING LIFE OF THE COOKER. WE ADVISE READING THIS MANUAL AND ALL THE INSTRUCTIONS THEREIN BEFORE USING THE COOKER. ALSO KEEP THE SERIES OF NOZZLES SUPPLIED. INSTALLATION MUST BE CARRIED OUT BY QUALIFIED PERSONNEL IN ACCORDANCE WITH THE REGULATIONS IN FORCE.
Introduction LOWER THE GLASS COVER SLOWLY AND BY HAND. WARNING: THE GLASS COVER MAY SHATTER IF IT OVERHEATS. SWITCH OFF ALL RINGS AND WAIT FOR THEM TO COOL DOWN BEFORE CLOSING THE COVER. DURING USE THE APPLIANCE BECOMES VERY HOT. TAKE CARE NOT TO TOUCH THE HEATING ELEMENTS INSIDE THE OVEN. THE APPLIANCE IS DESIGNED FOR USE BY ADULTS. DO NOT ALLOW CHILDREN TO GO NEAR OR PLAY WITH IT. WHEN OPERATING THE GRILL ALL ACCESSIBLE PARTS COULD BECOME VERY HOT: KEEP OUT OF THE WAY OF CHILDREN.
Instruction for the installer 2 INSTALLATION OF THE APPLIANCE It is the law that all gas appliances are installed by competent persons. Corgi gas installers are approved to work to safe and satisfactory standards. All gas installation, servicing and repair work must be in accordance with the gas safety regulations 1984 (installation and use) as amended 1990.
Instruction for the installer 2.1 Electrical connection Make sure that the power line voltage matches the specifications indicated on the rating plate located inside the storage compartment. This rating plate must never be removed. If the appliance is hooked-up to the supply by means of a fixed connection, install a multipolar cut-out device on the line, with contact opening distance equal to or greater than 3 mm, located near the appliance and in an easily reachable position.
Instruction for the installer 2.3 Connecting to natural and LPG gas (Please see connection diagram) Make the connection to the appliance using flexible bayonet style hose in accordance to B.S. 669. The hose connection at the rear of the appliance has a ½” BSP internal thread. Please use seal C between the flexible connection L and the appliance supply tube B. When making the connection, make sure that no stress of any kind is applied to the cooker and that the hose does not touch any sharp edges.
Instruction for the installer 3 ADAPTATION TO DIFFERENT TYPES OF GAS Before performing any cleaning or maintenance work, detach the appliance from the electrical socket. The cooker hob is set for natural gas G20 (2H) at a pressure of 20 mbar for cookers with maxi oven, and for LPG G30/G31 (3+) at a pressure of 28/37 mbar for cookers with gas-bottle compartments. In the case of functioning with other types of gas the burner nozzles must be changed and the minimum flame adjusted on the gas taps.
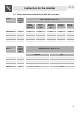
Instruction for the installer 3.2 Burner Burner and nozzle characteristics table (60 cm models) Rated heating capacity (kW) LPG – G30/G31 28/37 mbar Nozzle diameter 1/100 mm By-pass mm 1/100 Reduced flowrate (W) Flowrate g/h G30 Flowrate g/h G31 Auxiliary 1.0 50 30 350 73 71 Semi-rapid 1.75 65 33 450 127 125 Rapid (3) 3.0 85 45 800 218 214 Rapid (5) 2.3 75 45 800 167 164 Triple crown 3.2 91 65 1500 233 229 Oven 3.2 87 48 850 233 229 Grill 2.
Instruction for the installer 3.3 Burner Auxiliary Semi-rapid Rapid Triple crown Oven Maxi oven Grill Burner Auxiliary Semi-rapid Rapid Triple crown Oven Maxi oven Grill Burner and nozzle characteristics table (80 cm models) Rated heating capacity (kW) 1 1.75 2.3 3.5 3.2 4.6 3.7 Rated heating capacity (kW) 1 1.75 2.3 3.5 3.2 4.6 3.
Instruction for the installer 3.4 Burner Auxiliary Semi-rapid Rapid Triple crown Fish pan Oven Maxi oven Grill Grand grill Burner Auxiliary Semi-rapid Rapid Triple crown (8) Triple crown (4) Fish pan Oven Maxi oven Grill Grand Grill 12 Burner and nozzle characteristics table (90 cm. models) Rated heating capacity (kW) 1 1.75 3 3.2 1.9 3.2 5.2 2.9 4.0 Rated heating capacity (kW) 1 1.75 3 3.5 3.5 1.9 3.2 5.2 2.9 4.
Instruction for the installer 3.5 Arrangement of burners on cooking hob BURNERS 1. 2. 3. 4. Auxiliary Semi-rapid Rapid (60 X 60) Triple crown 5. Rapid (60 X 50) 3.6 Arrangement of burners on cooking hob BURNERS 1. 2. 3. 4. 5. 6. 7. 8.
Instruction for the installer 3.7 Adjustment of the oven burner (only for gas oven models) To adjust the oven burners follow the procedure described below from inside the oven: • Open the oven door; • Remove the oven dish and shelf. • Lift up the oven floor and remove. 3.7.1 • • • Loosen the fixing screws A on the oven burner. Push the burner B towards the right to get to the nozzle. Use a 13 socket wrench to change the nozzle, fitting the one for the type of gas to be used (see point “3.2/3.
Instruction for the installer 4 FINAL OPERATIONS After replacing the nozzles, reposition the flame-spreader crowns, the burner caps and the grids. Following adjustment to a gas other than the preset one, replace the gas adjustment label fixed to the appliance with the one corresponding to the new gas. This label is in the packet together with the nozzles. 4.1 Regulation of the hob burner minimum level for natural gas Light the burner and turn it to the minimum position .
Instruction for the installer 4.4 • • • • 4.5 Mounting the rear top skirtboard (where applicable) Loosen screws A located beneath the skirt. Loosen nuts B. Position the skirt above the top, taking care to align pins C with holes D. Secure the skirt to the top by tightening screws E. Positioning and levelling of the appliance (Depending on models) Having carried out the electricity and gas hook-up, level the appliance using the four adjustable legs. For best cooking the appliance must be perfectly level.
Instruction for the user 5 DESCRIPTION OF FRONT PANEL CONTROLS All the oven controls are grouped together on the front panel. The table below provides a description of the symbols used.
Instruction for the user GAS OVEN THERMOSTAT KNOB (CERTAIN MODELS ONLY) This knob is used to ignite the gas burner inside the oven. The cooking temperature is selected by turning the knob anticlockwise to the desired setting, between Min. and 275°C. For information on how to ignite the gas oven, see point “ 7.3 Use of the gas oven ”.
Instruction for the user 6 USE OF THE COOKING HOB 6.1 Lighting of the cooking hob burners Before lighting the hob burners check that the flame caps are in the correct position and that their burner caps are in place, making sure that the holes A in the flame caps correspond to the spark plugs and thermocouples. Before lighting the burners lift the glass cover; before lowering the cover, turn off all the burners and wait for them to cool down. The optional grid B is for use with “woks” (Chinese pans).
Instruction for the user 6.3 Diameter of containers (60 cm. models) BURNERS (60 X 50) Ø min. and max. (in cm.) BURNERS (60 X 60) 1. Auxiliary 12 – 14 1. Auxiliary 2. Semi-rapid 16 – 22 2. Semi-rapid 5. Rapid 18 – 24 3. Rapid Ø min. and max. (in cm.) 12 – 14 16 – 24 18 – 26 4. Triple crown 18 – 26 6.4 6.5 Diameter of containers (90 cm. models) Ø min. and max. (in cm.) 1. 2. 3. 4. 7.
Instruction for the user 6.6 Switching on the electric hob 6.6.1 Switching on the electric hobs The cookers are equipped with hobs of different diameters. These are controlled by a switch and are turned on by turning the knob to the desired position. On the front panel above each knob a small drawing shows which hob corresponds to each knob. A yellow warning light lights up when the hob is switched on. 6.6.2 How to use the electric hobs The rapid hobs offer the advantage of ultra-rapid cooking.
Instruction for the user 7 USE OF THE OVEN For those models with electronic programmer, before using the oven make sure that the display shows the symbol . For those models with analogue clock and timer, place on the symbol 7.1 . Warnings and general advice Using the oven and the grill for the first time, heat them to the maximum temperature (260°C for electric oven and 275°C for gas oven) for as long as it takes to burn off any production oil residues which could give a nasty flavour to the food.
Instruction for the user 7.3 7.3.1 Use of the gas grill Manual lighting of the gas grill burner position, placing a lit Having opened the oven door, press the knob and turn it clockwise to the grill match to the burner on the roof of the oven. Once the burner is lit, hold the knob down for about 10 seconds. If the burner does not stay lit after this time, release the knob and wait for at least one minute before trying again.
Instruction for the user How to use the grill Once the grill is lit, the red warning light will come on. Leave the oven to heat up for five minutes before placing the food inside. Food should be flavoured and basted with oil or melted butter before cooking. An oven dish should be used to contain the sauces.
Instruction for the user 7.6 Upright (certain models only). Some models have an additional storage compartment beside the oven; this can be used to store the metal accessories supplied with the cooker when they are not in use. 7.7 Removable basket (certain models only). On some models, the compartment beside the oven houses a removable basket with 2 shelves, which can be used to store various objects. The basket is not designed to take heavy loads. No more than 3-3.
Instruction for the user 8 ELECTRONIC PROGRAMMER (ONLY ON EQUIPPED MODELS) LIST OF FUNCTIONS MINUTE-COUNTER KEY COOKING TIME KEY END-OF-COOKING KEY DECREASE TIME KEY INCREASE TIME KEY 8.1 Clock adjustment When using the oven for the first time, or after a power failure, the display flashes regularly and indicates . Press the keys and at the same time the keys or : each single press changes the time by 1 minute either up or down.
Instruction for the user 8.4 End of cooking When cooking is over, the oven will automatically switch off and, at the same time, an intermittent alarm will sound. After switching off the alarm, the display will once again show the right time together with the symbol , indicating that the oven has returned to manual operation mode. 8.5 Adjusting alarm volume The acoustic alarm has three different settings. These can be operated, while the alarm is sounding, by pressing key . 8.
Instruction for the user 9 DIGITAL TIMER (CERTAIN MODELS ONLY) This component allows an on-off beeper to be set to indicate the end of the cooking time. It is therefore just a timer, with no programming functions. LIST OF FUNCTIONS TIME-SETTING BUTTON VALUE DECREASE BUTTON VALUE INCREASE BUTTON 9.1.1 Setting the time When the oven is used for the first time, or after a power blackout, the display flashes on and off at regular intervals showing . Press the key and use the or keys to set the current time. 9.
Instruction for the user 11 CLEANING AND MAINTENANCE 11.1 Cleaning stainless steel and enamelled versions To maintain stainless steel in good condition it must be cleaned regularly after each use, once it has cooled down. 11.1.1 Ordinary Daily Cleaning To clean and preserve the stainless steel surfaces, always use only specific products that do not contain abrasives or chlorine-based acids.
Instruction for the user 11.2.4 The spark plugs and thermocouples To function properly the spark plugs and thermocouples must always be clean (on the models which are equipped with them). Check them regularly and clean with a damp cloth if necessary. Any dry residues can be removed with a toothpick or a needle. 11.3 Cleaning of oven For best oven upkeep clean regularly after having allowed to cool. Take out all removable parts. • • Clean the oven grill with hot water and non-abrasive detergent.
Instruction for the user 12 EXTRAORDINARY MAINTENANCE The oven may require extraordinary maintenance or replacement of parts subject to wear such as seals, bulbs, and so on. The following instructions describe how to carry out these minor maintenance operations. Before any intervention, disconnect the power supply of the device. 12.1 Lubrication of the taps and gas oven thermostat In time the taps and gas oven thermostat may be difficult to turn or may be blocked.