
Range Instructions for Installation and Use


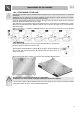

Table Of Contents
- 1. INSTRUCTIONS FOR PROPER USE
- 2. SAFETY INSTRUCTIONS
- 3. KNOW YOUR HOB
- 4. BEFORE FIRST USE
- 5. COOKING ZONES
- 6. DESCRIPTION OF CONTROL ON THE FRONT CONTROL PANEL
- 7. USE OF THE COOKING HOB
- 7.1 Hobs with knobs
- 7.2 Hobs with touch-control buttons
- 7.2.1 Switching on the hob
- 7.2.2 Single cooking zones
- 7.2.3 Dual cooking zones
- 7.2.4 Triple cooking zones
- 7.2.5 Heating zone
- 7.2.6 Cooking zone lock-out
- 7.2.7 Cooking zone layout
- 7.2.8 Timer (on some models only)
- 7.2.9 Modifying the data set
- 7.2.10 Residual heat
- 7.2.11 Control circuit board thermal protection
- 7.2.12 Operator Error
- 7.2.13 Switching off the cooking zones
- 7.2.14 Switching off
- 7.3 Cooking tips
- 7.4 Holding function “A”
- 8. CLEANING AND MAINTENANCE
- 9. SOMETHING WRONG?
- 10. INSTALLATION

Instructions for the installer
31
10.4 POSITIONING OF THE HOB
The following operation requires building and/or carpentry work so must be carried out by a competent
tradesman.
Installation can be carried out on various materials such as masonry, metal, solid wood or plastic
laminated wood as long as they are heat resistant (T 90°C).
Create an opening with the dimensions shown in the figure in the top surface of the counter, keeping a
minimum distance of 50 mm from the rear edge.
This appliance can be mounted against walls higher than the work surface on condition that a certain
distance “X” be kept between the appliance and the wall as shown in the figure so as to avoid damage
from overheating.
Make sure there is a minimum of 750 mm between the hob and any shelf that may be installed
directly above them.
10.5 Mounting
Before mounting the device to the unit, lay the provided adhesive sponge onto
the glass surface to separate it from the unit.
After fixing the provided adhesive sponge (B) to the glass, mount the device to
the unit with the mounting brackets (A) provided with the device itself, as
shown in the figure.
When fixing the hob to the cabinet, use only the holes provided, illustrated here.
This appliance must not be built-in above a dishwasher.
Installation of an oven without cooling fan underneath the hob is forbidden.
Pass the power supply cable through the back of the unit, taking care that it does not touch the bottom
casing of the hob or the oven (if any) installed underneath it.