
Range Instructions for Installation and Use


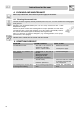
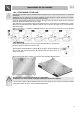

Table Of Contents
- 1. INSTRUCTIONS FOR PROPER USE
- 2. SAFETY INSTRUCTIONS
- 3. KNOW YOUR HOB
- 4. BEFORE FIRST USE
- 5. COOKING ZONES
- 6. DESCRIPTION OF CONTROL ON THE FRONT CONTROL PANEL
- 7. USE OF THE COOKING HOB
- 7.1 Hobs with knobs
- 7.2 Hobs with touch-control buttons
- 7.2.1 Switching on the hob
- 7.2.2 Single cooking zones
- 7.2.3 Dual cooking zones
- 7.2.4 Triple cooking zones
- 7.2.5 Heating zone
- 7.2.6 Cooking zone lock-out
- 7.2.7 Cooking zone layout
- 7.2.8 Timer (on some models only)
- 7.2.9 Modifying the data set
- 7.2.10 Residual heat
- 7.2.11 Control circuit board thermal protection
- 7.2.12 Operator Error
- 7.2.13 Switching off the cooking zones
- 7.2.14 Switching off
- 7.3 Cooking tips
- 7.4 Holding function “A”
- 8. CLEANING AND MAINTENANCE
- 9. SOMETHING WRONG?
- 10. INSTALLATION

Instructions for the installer
32
MOD. 60 CM
MOD. 77 CM
The diagrams illustrate the cutting sizes and additional shaping required for the installation hole if you
decide to install the hob flush with the work-top surface. The work-top hole and shaping dimensions
are purely guideline; it is essential to refer to your actual ceramic hob before making any cuts.
Once the appliance has been installed, fill the gaps between the product and the work-top surface
with insulating silicone and clean to remove any overflows.