User Manual C3174N2P Notice d'utili‐ sation Benutzerin‐ formation Fridge Freezer Réfrigéra‐ teur/congéla‐ teur Kühl - Ge‐ frierschrank
CONTENTS Safety information Safety instructions Operation First use Daily use 2 3 5 8 8 Hints and tips Care and cleaning Troubleshooting Installation Technical information 10 11 12 15 19 Subject to change without notice. SAFETY INFORMATION Before the installation and use of the appliance, carefully read the supplied instructions. The manufacturer is not responsible if an incorrect installation and use causes injuries and damages. Always keep the instructions with the appliance for future reference.
• • • • • • • Do not use mechanical devices or other means to accelerate the defrosting process, other than those recommended by the manufacturer. Do not damage the refrigerant circuit. Do not use electrical appliances inside the food storage compartments of the appliance, unless they are of the type recommended by the manufacturer. Do not use water spray and steam to clean the appliance. Clean the appliance with a moist soft cloth. Only use neutral detergents.
electrician to change the electrical components. • The mains cable must stay below the level of the mains plug. • Connect the mains plug to the mains socket only at the end of the installation. Make sure that there is access to the mains plug after the installation. • Do not pull the mains cable to disconnect the appliance. Always pull the mains plug. Use WARNING! Risk of injury, burns, electrical shock or fire. • Do not change the specification of this appliance. • Do not put electrical appliances (e.
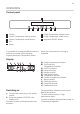
OPERATION Control panel 1 8 1 2 3 4 5 7 6 Display Freezer Temperature warmer button Freezer Temperature colder button OK Mode It is possible to change predefined sound of buttons to a loudly one by pressing together Mode and Temperature colder 5 4 3 2 6 Fridge Temperature warmer button 7 Fridge Temperature colder button 8 Appliance ON/OFF button button for some seconds. Change is reversible. Display A B C D E F G Off min L K J I H Switching on 1.
If "dEMo" appears on the display, refer to "Troubleshooting" chapter. Switching off 1. Press the appliance ON/OFF button for 5 seconds. The display switches off. 2. Disconnect the mains plug from the power socket. Temperature regulation Set the temperature of the appliance by pressing the temperature regulators. Default set temperature: • +5°C for the fridge ; • -18°C for the freezer. The temperature indicators show the set temperature. The set temperature will be reached within 24 hours.
The Holiday indicator flashes. The temperature indicator shows the set temperature. 2. Press the OK to confirm. The Holiday indicator is shown. The function switches off by selecting a different set temperature. FastFreeze function This function stops automatically after 52 hours. To switch on the function: a. Press Mode until the corresponding icon appears. The FastFreeze indicator is flashes. b. Press OKbutton to confirm. The FastFreeze indicator is shown.
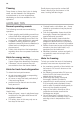
If the function is activated automatically the FreeStore indicator is not shown (refer to "Daily use"). The activation of the FreeStore function increase the energy consumption. FIRST USE Cleaning the interior Before using the appliance for the first time, the interior and all internal accessories should be washed with lukewarm water and some neutral soap to remove the typical smell of a brand-new product, then dried thoroughly.
To freeze small amount of fresh foods it is not necessary to change the present setting. To freeze fresh food activate the FastFreeze function at least 24 hours before placing the food to be frozen in the freezer compartment. The maximum amount of food that can be frozen in 24 hours is specified on the rating plate, a label located on the inside of the appliance. The freezing process lasts 24 hours: during this period do not add other food to be frozen.
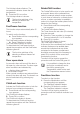
Thawing Deep-frozen or frozen food, prior to being used, can be thawed in the refrigerator compartment or at room temperature, depending on the time available for this operation. Small pieces may even be cooked still frozen, directly from the freezer: in this case, cooking will take longer. HINTS AND TIPS Normal operating sounds The following sounds are normal during operation: • A faint gurgling and bubbling sound from coils sound when refrigerant is pumped.
• lean foods store better and longer than fatty ones; salt reduces the storage life of food; • water ices, if consumed immediately after removal from the freezer compartment, can possibly cause the skin to be freeze burnt; • it is advisable to show the freezing in date on each individual pack to enable you to keep tab of the storage time.
compartment, driven by an automatically controlled fan. Periods of non-operation When the appliance is not in use for long periods, take the following precautions: Defrosting the freezer The freezer compartment is frost free. This means that there is no build up of frost when it is in operation, neither on the internal walls nor on the foods. 1. Disconnect the appliance from electricity supply. 2. Remove all food. 3. Clean the appliance and all accessories. 4.
Problem Possible cause Solution The temperature in the appliance is too high. Contact a qualified electrician or contact the nearest Authorised Service Centre. The lamp does not work. The lamp is in stand-by. Close and open the door. The lamp does not work. The lamp is defective. Contact the nearest Authorised Service Centre. The compressor operates continually. Temperature is set incorrectly. Refer to "Operation" chapter. Many food products were put in at the same time.
Problem Possible cause Solution Temperature cannot be set. The FastFreeze or IntensiveCooling function is switched on. Switch off FastFreeze or IntensiveCooling manually, or wait until the function resets automatically to set the temperature. Refer to "FastFreeze or IntensiveCooling function". DEMO appears on the display. The appliance is in demonstration mode. Keep the Mode pressed for approximately 10 seconds until a long sound is heard and display shuts off for a short time.
INSTALLATION Positioning Ventilation requirements This appliance can be installed in a dry, well ventilated indoor where the ambient temperature corresponds to the climate class indicated on the rating plate of the appliance: The airflow behind the appliance must be sufficient. Climate class Ambient temperature SN +10°C to + 32°C N +16°C to + 32°C ST +16°C to + 38°C T +16°C to + 43°C Some functional problems might occur for some types of models when operating outside of that range.
5. Remove the lower door. 6. Loosen and remove the lower pin. 7. Tighten the lower pin on the opposite side. Do a final check to make sure that: • All screws are tightened. • The magnetic seal adheres to the cabinet. • The door opens and closes correctly. If the ambient temperature is cold (i.e. in Winter), the gasket may not fit perfectly to the cabinet. In that case, wait for the natural fitting of the gasket.
7. Attach the appliance to the niche with 4 screws. 2 I 1 I 4. Push the appliance in the direction of the arrows (2) against the cupboard on the opposite side of the hinge. 5. Adjust the appliance in the niche. Make sure that the distance between the appliance and the cupboard frontedge is 44 mm. The lower hinge cover (in the accessories bag) makes sure that the distance between the appliance and the kitchen furniture is correct.
Hb Ha C D E Hc E Hd 17. Install the part (Ha) on the inner side of the kitchen furniture. B ca. 50 mm 10. Install the vent grille (B). 11. Attach the hinge covers (E) to the hinge. 12. Connect the appliance laterally to the kitchen furniture sidewall. 13. Loosen the screws of the part (G) and move the part (G) till the furniture sidewall. 90° 21 mm 90° ca. 50 mm G H 21 mm 18. Push the part (Hc) on the part (Ha). Ha 14. Tighten the screws of the part (G) again. 15.
8 mm Ha Hb Hb 22. Remove the brackets and mark a distance of 8 mm from the outer edge of the door where the nail must be fitted (K). 25. Press the part (Hd) on the part (Hb). 8 mm Hb Hd K Ha Do a final check to make sure that: • All screws are tightened. • The sealing strip is attached tightly to the cabinet. • The door opens and closes correctly. 23. Place the small square on the guide again and fix it with the screws supplied. 24.
Frequency Hz 50 The technical information are situated in the rating plate, on the external or internal side of the appliance and in the energy label. ENVIRONMENT CONCERNS Recycle the materials with the symbol . Put the packaging in applicable containers to recycle it. Help protect the environment and human health and to recycle waste of electrical and electronic appliances. Do not dispose appliances marked with the symbol with the household waste.
TABLE DES MATIÈRES Consignes de sécurité Instructions de sécurité Fonctionnement Première utilisation Utilisation quotidienne 21 22 24 27 27 Conseils Entretien et nettoyage En cas d'anomalie de fonctionnement Installation Caractéristiques techniques 29 31 32 35 40 Sous réserve de modifications. CONSIGNES DE SÉCURITÉ Avant d'installer et d'utiliser cet appareil, lisez soigneusement les instructions fournies.
• • • • • • • • Veillez à ce que les orifices de ventilation, situés dans l'enceinte de l'appareil ou dans la structure intégrée, ne soient pas obstrués. N'utilisez aucun dispositif mécanique ou autre appareil pour accélérer le processus de dégivrage que ceux recommandés par le fabricant. N'endommagez pas le circuit frigorifique. N'utilisez pas d'appareils électriques à l'intérieur des compartiments de conservation des aliments de l'appareil, sauf s'ils sont du type recommandé par le fabricant.
Connexion électrique AVERTISSEMENT! Risque d'incendie ou d'électrocution. • L'appareil doit être relié à la terre. • Vérifiez que les données électriques figurant sur la plaque signalétique correspondent à celles de votre réseau. Si ce n'est pas le cas, contactez un électricien. • Utilisez toujours une prise de courant de sécurité correctement installée. • N'utilisez pas d'adaptateurs multiprises ni de rallonges.
• Retirez la porte pour empêcher les enfants et les animaux de s'enfermer dans l'appareil. • Le circuit frigorifique et les matériaux d'isolation de cet appareil préservent la couche d'ozone. • La mousse isolante contient un gaz inflammable. Contactez votre service municipal pour obtenir des informations sur la marche à suivre pour mettre l'appareil au rebut. • N'endommagez pas la partie du circuit de réfrigération située à proximité du condenseur thermique.
C) D) E) F) /Indicateur de température Voyant ON/OFF IntensiveCooling Fonction Holiday Fonction FastFreeze Mise en marche 1. Branchez la fiche électrique de l'appareil à la prise de courant. 2. Appuyez sur la touche ON/OFF de l'appareil si l'affichage est éteint. L'alarme sonore peut se déclencher au bout de quelques secondes. Les indicateurs de température indiquent la température programmée par défaut. Pour réinitialiser l'alarme, reportez-vous au paragraphe « Alarme haute température ».
quelques secondes la température la plus élevée atteinte, puis affiche à nouveau la température programmée. Le voyant d'alarme continue de clignoter jusqu'à ce que les conditions normales soient restaurées.
Fonction DrinksChill La fonction DrinksChill sert à régler une alarme sonore à une heure souhaitée, ce qui est utile, par exemple, si vous souhaitez refroidir une préparation pendant un certain temps dans le cadre d'une recette de cuisine, ou pour refroidir rapidement des bouteilles dans le congélateur. 1. Appuyez sur la touche Mode jusqu'à ce que le symbole correspondant s'affiche. L'indicateur DrinksChill clignote. Le minuteur indique pendant quelques secondes la valeur programmée (30 minutes). 2.
Pour congeler de petites quantités d'aliments frais, il n'est pas nécessaire de modifier le réglage actuel. Activez la fonction FastFreeze au moins 24 heures avant d'introduire des aliments frais à congeler dans le compartiment congélateur. La quantité maximale de denrées que vous pouvez congeler par tranche de 24 heures figure sur la plaque signalétique, située à l'intérieur de l'appareil.
Si ce n'est pas le cas (B), réglez le thermostat sur une température inférieure et attendez 12 heures avant de vérifier à nouveau. Vous pouvez également activer manuellement le dispositif si nécessaire (reportez-vous au chapitre « Fonction FreeStore »). La fonction FreeStore s'arrête si la porte est ouverte et redémarre sitôt la porte refermée. Production de glaçons Cet appareil est équipé d'un ou plusieurs bacs à glaçons. N'utilisez pas d'instruments métalliques pour décoller les bacs du congélateur.
• Un bruit de craquement soudain provenant de l'intérieur de l'appareil provoqué par une dilatation thermique (un phénomène naturel et inoffensif). • Un léger cliquetis du thermostat lorsque le compresseur s'active ou se désactive. Conseils d'économie d'énergie • Évitez d'ouvrir trop souvent la porte du congélateur et ne la laissez ouverte que le temps nécessaire. • S'ils sont inclus, n'enlevez pas les accumulateurs de froid du panier de congélation.
Conseils pour le stockage des aliments surgelés Pour obtenir les meilleures performances possibles : • assurez-vous que les denrées surgelées achetées dans le commerce ont été correctement entreposées par le revendeur ; • prévoyez un temps réduit au minimum pour le transport des denrées du magasin d'alimentation à votre domicile ; • évitez d'ouvrir trop souvent la porte du congélateur et ne la laissez ouverte que le temps nécessaire ; • une fois décongelés, les aliments se détériorent rapidement et ne
pour empêcher l'eau de déborder et de couler à l'intérieur de l'appareil. En cas de non-utilisation prolongée Si l'appareil n'est pas utilisé pendant de longues périodes, prenez les précautions suivantes : Dégivrage du congélateur 1. Débranchez l'appareil de l'alimentation électrique. 2. Retirez tous les aliments. 3. Nettoyez l'appareil et tous les accessoires. 4. Laissez la porte/les portes ouverte(s) pour éviter la formation d'odeurs désagréables. Le compartiment congélateur est sans givre.
Problème Cause probable Solution Les signaux sonores et visuels sont activés. L'appareil a récemment été mis en marche ou la température est toujours trop élevée. Consultez le paragraphe « Alarme porte ouverte » ou « Alarme haute température ». La température à l'intérieur de l'appareil est trop élevée. Consultez le paragraphe « Alarme porte ouverte » ou « Alarme haute température ». La porte est laissée ouverte. Fermez la porte. La température à l'intérieur de l'appareil est trop élevée.
Problème Cause probable Solution Le compresseur ne démarre pas immédiatement après avoir appuyé sur la touche IntensiveCooling, ou après avoir changé la température. Ce phénomène est normal, il ne s'agit pas d'une anomalie. Le compresseur démarre au bout d'un certain temps. De l'eau s'écoule à l'intérieur du réfrigérateur. L'orifice d'écoulement de l'eau de dégivrage est obstrué. Nettoyez l'orifice d'écoulement de l'eau de dégivrage.
Problème Cause probable Solution La fonction FastFreeze est activée. Consultez le paragraphe « Fonction FastFreeze ». La fonction IntensiveCooling est activée. Consultez le paragraphe « Fonction IntensiveCooling ». L'air froid ne circule pas dans l'appareil. Assurez-vous que de l'air froid circule dans l'appareil. Si ces conseils n'apportent pas de solution à votre problème, veuillez contacter votre service après-vente agréé.
terre séparée conformément aux réglementations en vigueur, en consultant un électricien spécialisé. • Le fabricant décline toute responsabilité en cas de non-respect de ces consignes de sécurité. • Cet appareil est conforme aux directives CEE. Exigences en matière de ventilation Veillez à garantir une circulation d'air suffisante à l'arrière de l'appareil. 5 cm min. 200 cm2 5. Retirez la porte inférieure. 6. Dévissez, puis retirez le pivot inférieur. 7. Serrez le pivot inférieur sur le côté opposé.
Faites une dernière vérification pour vous assurer que : • Toutes les vis sont bien serrées. • Le joint magnétique adhère bien à l'appareil. • La porte s'ouvre et se ferme correctement. Si la température ambiante est basse (par exemple, en hiver), il se peut que le joint n'adhère pas parfaitement. Dans ce cas, attendez que le joint reprenne sa taille naturelle. Si vous ne voulez pas effectuer personnellement les opérations décrites ci-dessus, contactez le service après-vente agréé le plus proche.
4 mm 44 mm 9. Fixez les protections (C, D) sur les ergots et dans les trous des charnières. 7. Fixez l'appareil au meuble d'encastrement à l'aide de 4 vis. C D E I E B I 8. Retirez la pièce correcte du cachecharnière (E). Assurez-vous que vous retirez bien la pièce DX s'il s'agit de la charnière droite, SX s'il s'agit de l'autre charnière. 10. Mettez en place la grille d'aération (B). 11. Fixez les cache-charnières (E) sur la charnière. 12.
Ha G H Hc 14. Serrez de nouveau les vis de la pièce (G). 15. Fixez la pièce (H) à la pièce (G). 16. Détachez les pièces (Ha), (Hb), (Hc) et (Hd). Hb 19. Ouvrez la porte de l'appareil et la porte du meuble de cuisine à un angle de 90°. 20. Insérez le petit carré (Hb) dans le guide (Ha). 21. Assemblez la porte de l'appareil et la porte du meuble puis marquez les trous. Ha 8 mm Hc Hd Ha 17. Installez la pièce (Ha) sur la face intérieure du meuble de cuisine. 22.
25. Appuyez la pièce (Hd) sur la pièce (Hb). 8 mm Hb K Ha Hd 23. Placez de nouveau le petit carré sur le guide et attachez-le avec les vis prévues à cet effet. 24. Alignez la porte du meuble de cuisine et celle de l'appareil en réglant la pièce (Hb). Faites une dernière vérification pour vous assurer que : • Toutes les vis sont bien serrées. • Le joint d'étanchéité est solidement fixé au meuble. • La porte s'ouvre et se ferme correctement.
EN MATIÈRE DE PROTECTION DE L'ENVIRONNEMENT Recyclez les matériaux portant le symbole . Déposez les emballages dans les conteneurs prévus à cet effet. Contribuez à la protection de l'environnement et à votre sécurité, recyclez vos produits électriques et électroniques. Ne jetez pas les appareils portant le symbole avec les ordures ménagères. Emmenez un tel produit dans votre centre local de recyclage ou contactez vos services municipaux.
INHALTSVERZEICHNIS Sicherheitsinformationen Sicherheitsanweisungen Betrieb Erste Inbetriebnahme Täglicher Gebrauch 42 43 45 48 48 Tipps und Hinweise Reinigung und Pflege Fehlersuche Montage Technische Daten 50 52 53 56 61 Änderungen vorbehalten. SICHERHEITSINFORMATIONEN Lesen Sie vor der Montage und dem Gebrauch des Geräts zuerst die Gebrauchsanleitung. Der Hersteller übernimmt keine Verantwortung für Verletzungen und Beschädigungen durch unsachgemäße Montage.
• • • • • • • • Achten Sie darauf, dass die Belüftungsöffnungen im Gehäuse, um das Gerät und in der Einbaunische nicht blockiert sind. Versuchen Sie nicht, den Abtauvorgang durch andere als vom Hersteller empfohlene mechanische oder sonstige Hilfsmittel zu beschleunigen. Beschädigen Sie nicht den Kältekreislauf. Betreiben Sie in den Lebensmittelfächern des Geräts keine anderen als die vom Hersteller empfohlenen Elektrogeräte. Reinigen Sie das Gerät nicht mit einem Wasser- oder Dampfstrahl.
Elektrischer Anschluss WARNUNG! Brand- und Stromschlaggefahr. • Das Gerät muss geerdet sein. • Stellen Sie sicher, dass die elektrischen Daten auf dem Typenschild den Daten Ihrer Stromversorgung entsprechen. Wenden Sie sich andernfalls an eine Elektrofachkraft. • Schließen Sie das Gerät nur an eine ordnungsgemäß installierte Schutzkontaktsteckdose an. • Verwenden Sie keine Mehrfachsteckdosen oder Verlängerungskabel.
• Trennen Sie das Gerät von der Stromversorgung. • Schneiden Sie das Netzkabel ab, und entsorgen Sie es. • Entfernen Sie die Tür, um zu verhindern, dass sich Kinder oder Haustiere in dem Gerät einschließen. • Der Kältekreislauf und die Isolierungsmaterialien dieses Gerätes sind ozonfreundlich. • Die Isolierung enthält entzündliches Gas. Für Informationen zur korrekten Entsorgung des Gerätes wenden Sie sich an Ihre kommunale Behörde.
C) D) E) F) G) /Temperaturanzeige Anzeige ON/OFF IntensiveCooling Funktion Holiday Funktion FastFreeze Temperaturanzeige H) I) J) K) L) Gefrierraumanzeige Alarmanzeige Funktion ChildLock Funktion DrinksChill Funktion FreeStore Einschalten des Geräts Einschalten des Kühlschranks 1. Stecken Sie den Netzstecker in die Netzsteckdose. 2. Drücken Sie ON/OFF, wenn das Display ausgeschaltet ist. Nach ein paar Sekunden ertönt möglicherweise ein akustisches Alarmsignal.
IntensiveCooling Wenn Sie zum Beispiel nach einem Einkauf größere Mengen warmer Lebensmittel einlegen möchten, empfehlen wir die Funktion IntensiveCooling einzuschalten, um die Produkte schneller zu kühlen und um zu vermeiden, dass die bereits im Kühlschrank befindlichen Lebensmittel erwärmt werden. a. Drücken Sie Mode, bis das entsprechende Symbol angezeigt wird. Die FastFreeze Anzeige blinkt. b. Drücken Sie zum Bestätigen die Taste OK. Die FastFreeze-Anzeige erscheint.
Kühlung in den Gefrierraum gelegt haben, nicht vergessen möchten. 1. Drücken Sie Mode, bis das entsprechende Symbol angezeigt wird. Die Anzeige DrinksChill blinkt. Der Timer zeigt den eingestellten Wert (30 Minuten) einige Sekunden lang an. 2. Drücken Sie den Timerregler, um den eingestellten Wert des Timers auf 1 bis 90 Minuten zu ändern. 3. Mit OK bestätigen. Die DrinksChill-Anzeige erscheint. Der Timer beginnt zu blinken (min)..
Die Glasablage über der Gemüseschublade und der Flaschenhalter sollten jedoch nicht verstellt werden, um eine korrekte Luftzirkulation zu gewährleisten. Positionierung der Türablagen Die Türablagen können in verschiedener Höhe positioniert werden; damit ermöglichen sie das Lagern verschieden großer Lebensmittelpackungen. 1. Ziehen Sie die Ablage langsam in Pfeilrichtung, bis sie sich löst. 2. Setzen Sie die Ablage in der gewünschten Höhe wieder ein.
Herstellen von Eiswürfeln Dieses Gerät ist mit einer oder mehreren Schalen für die Herstellung von Eiswürfeln ausgestattet. Verwenden Sie zum Entnehmen der Schalen aus dem Gefrierfach keine Gegenstände aus Metall. 1. Füllen Sie die Schalen mit Wasser. 2. Stellen Sie die Eisschalen in das Gefrierfach. Temperaturanzeige Um eine korrekte Lagerung der Lebensmittel zu gewährleisten, verfügt dieser Kühlschrank über eine Temperaturanzeige.
Energiespartipps Hinweise zum Einfrieren • Öffnen Sie die Tür nicht zu häufig, und lassen Sie diese nicht länger offen als notwendig. • Nehmen Sie die Kälteakkus (falls vorhanden) nicht aus dem Gefrierkorb. Im Folgenden finden Sie einige wertvolle Tipps für einen optimalen Gefriervorgang: Hinweise für die Kühlung frischer Lebensmittel So erzielen Sie die besten Ergebnisse: • Legen Sie keine warmen Lebensmittel oder dampfende Flüssigkeiten in den Kühlschrank.
• Achten Sie unbedingt darauf, die eingekauften gefrorenen Lebensmittel in der kürzest möglichen Zeit zum Gefriergerät zu bringen. • Öffnen Sie die Tür nicht zu häufig, und lassen Sie die Tür nicht länger offen als notwendig. • Aufgetaute Lebensmittel verderben sehr schnell und eignen sich nicht für ein erneutes Einfrieren. • Das Haltbarkeitsdatum auf der Tiefkühlkostverpackung darf nicht überschritten werden. REINIGUNG UND PFLEGE WARNUNG! Siehe Kapitel Sicherheitshinweise.
Stillstandszeiten Bei längerem Stillstand des Geräts müssen Sie folgende Vorkehrungen treffen: Abtauen des Gefriergeräts 1. Trennen Sie das Gerät von der Netzstromversorgung. 2. Entnehmen Sie alle Lebensmittel. 3. Reinigen Sie das Gerät und alle Zubehörteile. 4. Lassen Sie die Tür(en) offen, um das Entstehen unangenehmer Gerüche zu vermeiden. Das Gefrierfach ist ein NoFrost-Fach. Das bedeutet, dass sich während des Betriebs weder an den Innenwänden noch an Lebensmitteln Reif bilden kann.
Problem Mögliche Ursache Abhilfe Die Temperatur im Gerät ist zu hoch. Siehe „Alarm Tür offen“ oder „Temperaturwarnung“. Die Tür ist geöffnet. Schließen Sie die Tür. Die Temperatur im Gerät ist zu hoch. Wenden Sie sich an einen qualifizierten Elektriker oder die nächste autorisierte Kundendienststelle. Die Lampe funktioniert nicht. Die Lampe befindet sich im Standby-Modus. Schließen und öffnen Sie die Tür. Die Lampe funktioniert nicht. Die Lampe ist defekt.
Problem Mögliche Ursache Abhilfe Wasser fließt in den Kühlschrank. Der Wasserablauf ist verstopft. Reinigen Sie den Wasserablauf. Die eingelagerten Lebensmittel verhindern, dass das Wasser zum Wassersammler fließt. Stellen Sie sicher, dass die Lebensmittel nicht die Rückwand berühren. Wasser läuft auf den Boden. Der Tauwasserablauf ist nicht mit der Verdampferschale über dem Kompressor verbunden. Verbinden Sie den Tauwasserablauf mit der Verdampferschale.
Bitte wenden Sie sich an den nächsten autorisierten Kundendienst, wenn alle genannten Abhilfemaßnahmen nicht zum gewünschten Erfolg führen. Austauschen der Lampe Das Gerät ist mit einer langlebigen LEDInnenbeleuchtung ausgestattet. Sie sich an Ihren autorisierten Kundendienst. Schließen der Tür 1. Reinigen Sie die Türdichtungen. 2. Stellen Sie die Tür nach Bedarf ein. Siehe hierzu „Montage“. 3. Ersetzen Sie die defekten Türdichtungen, falls erforderlich.
5 cm 7. Schrauben Sie den unteren Stift an der gegenüberliegenden Seite an. min. 200 cm2 min. 200 cm2 ACHTUNG! Beachten Sie bei der Installation die Montageanleitung. Wechseln des Türanschlags 1. Lösen und entfernen Sie den oberen Stift. 2. Entfernen Sie die obere Tür. 3. Nehmen Sie das Distanzstück ab. 4. Lösen Sie das mittlere Scharnier. 5. Entfernen Sie die untere Tür. 6. Lösen und entfernen Sie den unteren Stift. 8. Bringen Sie die untere Tür an. 9. Ziehen Sie das mittlere Scharnier fest.
Montage des Geräts ACHTUNG! Achten Sie darauf, dass sich das Netzkabel des Geräts frei bewegen lässt. 1. Schneiden Sie bei Bedarf den Dichtungsstreifen zu und bringen Sie ihn am Gerät an, wie in der Abbildung dargestellt. x 5. Richten Sie das Gerät in der Einbaunische aus. Vergewissern Sie sich, dass der Abstand zwischen dem Gerät und der Schrankvorderkante 44 mm beträgt.
einem gegenüberliegenden Scharnier Teil SX zu entfernen. G H 9. Setzen Sie die beiliegenden Abdeckkappen (C, D) in die Befestigungs- und Scharnierlöcher ein. 14. Ziehen Sie die Schrauben vom Teil (G) erneut fest. 15. Befestigen Sie Teil (H) am Teil (G). 16. Trennen Sie die Teile (Ha), (Hb), (Hc) und (Hd) ab. Hb Ha C D E E Hc Hd B 10. Bauen Sie das Belüftungsgitter (B) ein. 11. Stecken Sie die Scharnierabdeckungen (E) auf das Scharnier auf. 12.
23. Setzen Sie das Führungsstück erneut auf die Führungsschiene und schrauben Sie es mit den mitgelieferten Schrauben fest. 24. Richten Sie die Tür des Einbaumöbels und die Gerätetür mit dem Führungsstück (Hb) aus. Ha Hc 19. Öffnen Sie die Gerätetür und die Möbeltüre in einem Winkel von 90°. 20. Setzen Sie das Führungsstück (Hb) in die Führungsschiene (Ha) ein. 21. Halten Sie die Gerätetür an die Tür des Küchenmöbels und markieren Sie die Bohrungen. 8 mm Ha Hb 25.
TECHNISCHE DATEN Technische Daten Höhe mm 1780 Breite mm 560 Tiefe mm 550 Lagerzeit bei Störung Stunden 21 Spannung Volt 230 - 240 Frequenz Hz 50 Die technischen Daten befinden sich auf dem Typenschild auf der Außen- oder Innenseite des Geräts sowie auf der Energieplakette. UMWELTTIPPS Recyceln Sie Materialien mit dem Symbol mit diesem Symbol nicht mit dem Hausmüll. Bringen Sie das Gerät zu Ihrer örtlichen Sammelstelle oder wenden Sie sich an Ihr Gemeindeamt. .
222371583-A-122015