INSTRUCTION MANUAL GUIDE FOR USING THE DISHWASHER AND THE WASHING PROGRAMS
EN EN CONTENTS CONTENTS Contents Contents 1 1 2 2 3 3 4 4 5 5 INTRODUCTION.....................................................................................................................3 INTRODUCTION.....................................................................................................................3 DESCRIPTION OF THE CONTROLS..................................................................................5 DESCRIPTION OF THE CONTROLS...............................................
EN 2
EN INTRODUCTION 1 INTRODUCTION Thank you for choosing one of our products. To use this dishwasher correctly and safely, please read this manual carefully. The manual is divided into sections giving you a step-by-step guide to all your appliance’s functions. The texts are easy to understand and are complete with detailed illustrations. Following the cleaning instructions provided here will keep dishwasher performance at peak levels in the long term.
EN INTRODUCTION Symbols used in this manual (see tab. 1-01) DANGER. This symbol highlights information and warnings which, if not observed, may compromise personal safety or damage the appliance. DANGER OF ELECTROCUTION. This symbol highlights information and warnings of an electrical nature which, if not observed, may compromise personal safety or damage the appliance. This symbol highlights general information and warnings. Tab.
EN USER INSTRUCTIONS 2 DESCRIPTION OF THE CONTROLS 2.1 Upper panel All the dishwasher controls are grouped on the upper panel (see fig. 2-01). The dishwasher can only be switched on, programmed, switched off, etc. with the door open. A brief description (see tab. 2-01) of the various controls on the upper panel is given below. 2 3 QuickTime 4 5 10 9 8 7 6 12 11 1 Sanitized end ½ QuickTime FIG. 2-01 The panel shown is indicative, programs and options may vary depending on model.
EN EN USER INSTRUCTIONS USER INSTRUCTIONS 1 1 2 2 3 3 4 4 5 5 6 6 7 7 8 8 9 9 10 10 11 11 12 12 On/off button Press to power the appliance. On/off button Program indicator lights Press powerwhich the appliance. These toshow program is selected and whether there are any faults Program indicator lights (Troubleshooting). These show whichbutton program is selected and whether there are any faults Program selection (Troubleshooting). Press in sequence to select the required program.
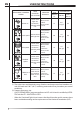
EN USER INSTRUCTIONS To select the most suitable program for the dishes to wash, consult the following table which specifies the most appropriate 2 3type 4 of 5 washing sequence 12 11 10 depending 9 8 7 6 on 14 the kind of dishes and how dirty they are (see tabs. 2-02a and 2-02b) ½ QuickTime end Auto PROGRAMME, NUMBER & SYMBOL 1 2 LOAD CROCKERY AND CUTLERY E1 E3 E4 5 E5 CONSUMPTION QuickTime 15 3.5l 0.95gal. 0.02 Wash at 45°C (113°F) Cold rinse end Rinse at 70°C (158°F) Dry 65 12 l 3,17 gal.
2 EN 3 4 5 USER INSTRUCTIONS 12 11 10 9 8 7 6 14 ½ QuickTime end Auto Sanitized PROGRAMME, NUMBER & SYMBOL 6 7 E18 + + + E2 E39 LOAD CROCKERY AND CUTLERY ENERGY KWH (1) 27 6.5l 1.72gal. 0.4 end Cold prewash Wash at 50°C Delicate dishes (122°F) LIGHT QUICK withAuto light dirt. Cold rinse Rinse at 70°C (158°F) 60 13 l 3,45 gal. 0,6 Cold prewash Wash at 60°C (140°F) Cold rinse Rinse at 70°C (158°F) 85 13 l 3,45 gal. 0,7 Dishes with normal dirt, washed immediately after use.
EN USER INSTRUCTIONS Only run the soak program with half loads. To run programmes 6, 7, 8, 9, 10, select the required standard programme and then press the quick time option button (ref. 6 fig. 2-02). After using the above tables to choose the most suitable washing cycle, program the appliance. Before starting a washing program, make sure that: • The water supply tap is open. • The correct amount of detergent has been added to the dispenser (to add detergent, see the instructions in the general manual).
EN EN USER USER INSTRUCTIONS INSTRUCTIONS 2.2.2 Selecting and starting the program • Press the program selection button (ref. 3 fig. 2-02) several times until the indicator light corresponding to the required program turns on (ref. 2 fig. 2-02); • if required, press the relative buttons to select any complementary functions (e.g.: “extra drying”, “program delay”; see para 2.2.
EN USER INSTRUCTIONS 2.2.6 Canceling the current program • To cancel the current program, open the door and press and hold down the program selection button (ref. 3 fig. 2-02) for a few seconds until the indicator lights of the fourth and fifth programs turn on (ref. pr. 4, pr. 5 fig. 2-03). • Close the door again. • After about 1 minute, the dishwasher terminates the cycle and the indicator lights of the fourth and fifth programs (ref. pr. 4, pr. 5 fig. 2-03) start flashing. EN USER INSTRUCTIONS 2.2.
EN USER INSTRUCTIONS 2.2.8 Switching off At the end of the program, the dishwasher emits a short beep and the indicator lights of the fourth and fifth program (ref. pr. 4, pr. 5 fig. 2-04) flash. Turn off the appliance by opening the door and pressing the on/off button (ref. 1 fig. 2-02). end ½ symbols programs according to the models FIG.
EN USER INSTRUCTIONS 2.3 Additional functions 2.3.1 2.3.1 ADJUSTING THEwater WATERsoftener SOFTENING Adjusting the (onSYSTEM some models only) The dishwasher with a device which allows softener setting to be N.B.:isaequipped different washing program from soakthe must be used to make varied to suit hardness of the mains water. The hardness is set using the PROthethe following adjustment. GRAM SELECTION BUTTON (3). To access setting hold the button down(ref. for 12 more 15 until seconds.
EN EN USERINSTRUCTIONS INSTRUCTIONS USER 3 ENERGY SAVING AND ENVIRONMENTAL RESPECT Always try to run the dishwasher fully loaded. Do not wash the dishes under a running tap. Use the most suitable washing program for each type of load. Do not pre-rinse. If available, connect the dishwasher to a hot water system with a temperature of up to 60°C (140°F). • When possible, skip the drying cycle by opening the door after washing: the air and the residue heat will dry the dishes to perfection. • • • • • 3.
EN USER USERINSTRUCTIONS INSTRUCTIONS 4 EN TROUBLESHOOTING The dishwasher can to signal a number of malfunctions by turning on various indicator lights, as described below (see following table): FAULT end E1 ½ E2 ½ E3 ½ E4 ½ E5 ½ end end end end DESCRIPTION Acquastop failure The anti-flooding system has tripped (only for models fitted with this feature). Activates in case of water leaks. Contact the technical assistance service.
EN EN USER USERINSTRUCTIONS INSTRUCTIONS FAULT DESCRIPTION USER INSTRUCTIONS Water pump-out malfunction USER INSTRUCTIONS USER INSTRUCTIONS ½ end E6 FAULT FAULT FAULT E6 E6 end E7 E6 ½ E7 E7 E8 E7 end ½ end E8 E9 E8 ½ E8 E9 E11 E9 E9 end Light off EN EN EN The appliance does not pump out the water or does so incorrectly. Make sure the drain hose is not kinked or DESCRIPTION crushed and that the siphon and filters are not clogged.
EN EN USERINSTRUCTIONS INSTRUCTION USER USER INSTRUCTION 5 5 EN OPERATING INSTRUCTIONS INSTRUCTIONS OPERATING BEFORE STARTING TO USE THE APPLIANCE, MAKE SURE YOU HAVE BEFORE STARTING TO USE THE APPLIANCE, MAKE SURE YOU HAVE READ AND UNDERSTOOD ALL THE WARNINGS CONTAINED IN CHAPREAD AND UNDERSTOOD ALL THE WARNINGS CONTAINED IN CHAPTER 2 “IMPORTANT SAFETY INSTRUCTION”. TER 2 “IMPORTANT SAFETY INSTRUCTION”.
EN EN USERINSTRUCTIONS INSTRUCTIONS USER SA LT A Fig. 5-02 • • • • • When using the dishwasher for the first time, in addition to the salt it is also necessary to add one liter of water to the container. Each time the salt container is refilled, make sure that the cap (ref. A fig. 5-01) is securely closed. The mixture of water and detergent must never penetrate the salt container, as this would compromise the operation of the regeneration system.
• • • 5.2 adjust the water softening system; add the regenerating salt; INSTRUCTIONS USER add the rinse-aid and detergent. EN Using the rinse-aid and detergent dispensers The detergent and rinse aid dispensers are situated on the inner part of the door: the detergent dispenser (ref. A fig. 5-03) is on the left, and the rinse-aid dispenser (ref. B fig. 5-03) is on the right. A B Fig.
EN EN USERINSTRUCTIONS INSTRUCTIONS USER 5.2.1 Adding the rinse-aid The rinse aid helps the dishes dry faster and prevents the formation of scale deposits and staining; it is automatically added to the water during the final rinse cycle, from the container situated on the inner side of the door. B A C Fig. 5-04 To add rinse aid: • Open the door. • Rotate the container cover (ref. A fig. 5-04) anticlockwise by ¼ of a turn and remove it.
EN EN USER USERINSTRUCTIONS INSTRUCTIONS • • • • • To adjust the rinse aid setting, rotate the dispenser cover (ref. A fig. 5-04) through a quarter turn in an anticlockwise direction and remove it. Then use a screwdriver to rotate the rinse aid selector to the desired position. Replace the cover (ref. A fig. 5-04) by turning it in a clockwise direction until it is fully closed. The amount of rinse aid must be increased if the washed dishes appear dull or feature circular stains.
EN EN USERINSTRUCTIONS INSTRUCTIONS USER A B Fig. 5-06 • • • • • • • • 22 When a program with hot prewash is selected (see program table in the “Description of Controls” manual), extra detergent must be placed in the cavity (ref. A or B fig. 5-06, depending on models). Only use dishwasher-specific detergents. For optimal washing results it is important to use a good quality detergent.
EN EN USER USERINSTRUCTIONS INSTRUCTION • When using detergent tabs, place them in the cutlery basket. The dispenser has been designed for powder or liquid detergent. As the cover does not open completely d uring the washing cycle, t abs are not f ully released ( dissolved). This could generate the following problems: rinse cycle. THE INTRODUCTION O F DETERGENT INTO T HE R INSE A ID D ISPENSER, EVEN IN LIQUID FORM, WILL DAMA GE THE DISHW ASHER. 5.
EN EN INSTRUCTIONS USER INSTRUCTION MAKE SURE that the items being washed are dishwasher-safe. Items which are not dishwasher-safe: • Wooden dishes, pots or pans: these may be damaged by the high washing temperatures. • Handcrafted i tems: these a re r arely suitable for washing in a d ishwasher. The relatively high water temperatures and the detergents used may damage them. • Lightweight objects: place lightweight objects in the upper rack where the water pressure is lower.
EN EN USER USERINSTRUCTIONS INSTRUCTION 5.4 Using the racks The dishwasher has a capacity of 13 place-settings, including serving dishes. Examples of loading 13 place-settings in the upper rack (see fig. 5-07) and in the lower rack (see fig. 5-08) are shown below. Fig. 5-07 Fig.
EN EN INSTRUCTIONS USER INSTRUCTION 5.4.1 Lower rack The lower rack receives the full force of the lower spray arm, and should therefore be used for the “toughest” items with a heavier degree of soiling. All types and combinations of loads are permitted, provided that the dishes, pots and pans are arranged with all the soiled surfaces exposed to the water jets coming from the bottom.
EN EN USER INSTRUCTIONS USER INSTRUCTION Loading the lower rack (see fig. 5-10) Carefully load flat plates, soup plates, dessert and serving dishes, positioning them vertically. Pots, pans and their covers must be loaded upside down. When loading soup plates and dessert bowls, be sure to leave a gap between them. Loading examples: Fig.
EN EN INSTRUCTIONS USER INSTRUCTION 5.4.2 Cutlery basket (see fig. 5-11/5-12 depending on models) The basket h as removable top grids i nto which items of c utlery s hould be inserted to keep them properly spaced and allow water to pass between them effectively. T he t op g rids a nd c entral l id a re i n the bag o f accessories. The central lid functions as a lid only. The top grids can be detached and used separately.
EN EN USER USERINSTRUCTIONS INSTRUCTION 5.4.3 Upper rack (see fig. 5-13) Depending on the models, the basket may be equipped with some or all of the following accessories: - Supports f or cups o r long objects (ladles, s poons…), on t he l eft; can b e tipped to the vertical position when not in use. - Long-stemmed glass holder, on the left; to use, simply lift and fix onto the hooks provided. - Cutlery racks, on the right, designed for knives and teaspoons; for teaspoons, pull out t he s liding support.
EN EN INSTRUCTIONS USER INSTRUCTION Loading the upper rack (see fig. Þg.5-14) 4-14) 5-12) Load plates facing forward; cups, bowls etc. must always be facing downwards. The left-hand side of the rack can be loaded with two layers of cups and glasses. The centre can be filled with plates and side-plates, fitted upright into the supports provided. Loading examples: Fig. 5-12 4-14 Fig. 5-14 Fig.
EN EN USER USERINSTRUCTIONS INSTRUCTION Adjusting tthe he uupper pper rarack ck Adjusting The upper rack can be set in three different positions on both sides. The rack The upper rack can be set in three different positions on both sides. The rack must must be level on both sides. be level on both sides. To raise the rack (ref. A Þg. 4-15), lift it with the two handles (e.g.: ref. B Þg. To raise the rack (ref. A fig. 5-16), lift it with the two handles (e.g.: ref. B fig.
EN EN USER INSTRUCTIONS USER INSTRUCTION 6 6.
EN EN USER USERINSTRUCTIONS INSTRUCTION 6.2 Cleaning the water intake filter Clean the water inlet fil er at regular intervals. After closing the delivery tap, unscrew the ring nut (ref. A fig. 6-01) on the water inlet pipe (using a pair of pliers, if necessary) and delicately clean the fil er, removing deposits or impurities. Then fi mly fix the pipe by tightening the ring nut (ref. A fig. 6-01) (use a pair of pliers, if necessary). Fig. 6-01 6.
EN EN USER USER INSTRUCTIONS INSTRUCTION A B Fig. 5-02 Fig. 6-02 A Fig. 6-03 Fig. 5-03 .
EN EN USER USERINSTRUCTIONS INSTRUCTION 6.4 6-04 5.4 Cleaning the filter unit • Periodically inspect the filter 6-05 unit (ref. A fig. 5-04) and, if necessary, clean it under running water (at room temperature), using a stiff brush. To remove the filter, grip the tabs, turn anticlockwise and lift upwards; • push the centre filter (ref. A fig.
EN 5.5 6.5 EN USERWARNINGS INSTRUCTION General warnings and recommendations for correct maintenance • Clean the filters under running water (at room temperature) using a stiff brush. • When removing the filter, take care that there are no food residues on it. If any residues fall into the washing pit (ref. A fig. 5-06), they might block hydraulic components or foul the spray arm nozzles.
EN EN WARNINGS USER INSTRUCTION 6.
EN EN WARNINGS USER INSTRUCTION 38 35
EN EN WARNINGS WARNINGS 7 IMPORTANT SAFETY INSTRUCTION (Save this instructions) THIS MANUAL FORMS AN INTEGRAL PART OF THE APPLIANCE: IT MUST ALWAYS BE KEPT INTACT TOGETHER WITH THE DISHWASHER. BEFORE USING THE APPLIANCE, CAREFULLY READ ALL THE INSTRUCTIONS CONTAINED IN THIS MANUAL. INSTALLATION MUST BE PERFORMED BY A QUALIFIED TECHNICIAN, IN COMPLIANCE WITH THE REGULATIONS IN FORCE.
EN EN WARNINGS WARNINGS BEFORE PROCEEDING WITH INSTALLATION, DISCONNECT THE MAINS POWER SUPPLY FROM THE WORK AREA. DO NOT USE EXTENSION CORDS, ADAPTORS OR SHUNT CONNECTIONS IN ORDER TO AVOID THE POSSIBILITY OF OVERHEATING OR BURNING WITH CONSEQUENT FIRE HAZARD. DURING INSTALLATION, TAKE CARE NOT TO INJURE YOURSELF ON THE SHARP EDGES OF THE APPLIANCE; WEAR SAFETY GLOVES. THE APPLIANCE MUST BE PROVIDED WITH AN EARTH CONNECTION IN ACCORDANCE WITH THE ELECTRICAL SAFETY REGULATIONS IN FORCE.
EN EN WARNINGS DO NOT INHALE OR SWALLOW DETERGENT AS THIS MAY CAUSE BURNS AND/OR PERMANENT DAMAGE TO THE NOSE, MOUTH AND THROAT, AND EVEN LEADING TO SUFFOCATION; KEEP DETERGENT AWAY FROM YOUR EYES. IF ONE OF THE ABOVE SITUATIONS OCCURS, SEEK MEDICAL ASSISTANCE IMMEDIATELY. TO PREVENT CHILDREN FROM COMING INTO CONTACT WITH DETERGENT, FILL THE DISHWASHER JUST BEFORE STARTING THE WORK PROGRAM AND THEN KEEP THE DETERGENT OUT OF THE REACH OF CHILDREN. THIS DISHWASHER MUST BE USED BY ADULTS.
EN EN WARNINGS WARNINGS DO NOT INTRODUCE ANIMALS INTO THE DISHWASHER. WHEN OPENING THE DISHWASHER DOOR DURING A CYCLE THERE IS A RISK OF SCALDING DUE TO THE HEAT CONTAINED INSIDE; DO NOT GET IN THE WAY OF THE STEAM LEAVING THE APPLIANCE AND DO NOT TOUCH THE COMPONENTS INSIDE. WAIT 20 MINUTES AFTER THE END OF THE WASHING CYCLE OR AFTER INTERRUPTING IT BEFORE REMOVING THE DISHES IN ORDER TO ALLOW THEM TO DRY.
EN EN WARNINGS AQUASTOP MODELS; THE AQUASTOP DEVICE PREVENTS FLOODING IN THE EVENT OF A WATER LEAK. WHEN THE AQUASTOP DEVICE IS TRIPPED (THE ERROR IS INDICATED ON THE DISPLAY), CALL IN A QUALIFIED TECHNICIAN TO IDENTIFY AND REPAIR THE FAULT. IN MODELS EQUIPPED WITH THE AQUASTOP DEVICE, THERE IS A SOLENOID VALVE INSIDE THE WATER INTAKE HOSE. DO NOT CUT THE HOSE AND DO NOT ALLOW THE SOLENOID VALVE TO DROP INTO WATER.
EN EN WARNINGS WARNINGS BY ENSURING THIS PRODUCT IS DISPOSED OF CORRECTLY, YOU WILL HELP PREVENT POTENTIAL NEGATIVE CONSEQUENCES FOR THE ENVIRONMENT AND HUMAN HEALTH. THE MANUFACTURER DECLINES ALL RESPONSIBILITY FOR DAMAGE TO PERSONS, ANIMALS OR PROPERTY RESULTING FROM FAILURE TO OBSERVE THE ABOVE PRECAUTIONS, FROM TAMPERING WITH EVEN A SINGLE COMPONENT OF THE APPLIANCE, OR FROM THE USE OF UNORIGINAL SPARE PARTS. IF IN DOUBT ABOUT THE CONTENTS OF THIS MANUAL, CONTACT THE TECHNICAL ASSISTANCE SERVICE.
EN EN USER INSTRUCTIONS INSTALLATION INSTRUCTIONS 8 INSTALLATION AND HOOK-UP To install and hook up this appliance, consult the attached installation manual. Bear in mind the following warnings when installing and hooking up the dishwasher. DURING INSTALLATION, TAKE CARE NOT TO INJURE YOURSELF ON THE SHARP EDGES OF THE APPLIANCE; WEAR SAFETY GLOVES. INSTALLATION, REPAIRS AND SERVICING MUST BE PERFORMED BY QUALIFIED AND AUTHORIZED TECHNICIANS.
EN EN USER INSTRUCTIONS INSTALLATION INSTRUCTIONS BEFORE MAKING ELECTRICAL CONNECTIONS, DISCONNECT THE MAINS POWER SUPPLY FROM THE WORK AREA. CHECK THAT THE MAINS SUPPLY IN THE PLACE OF INSTALLATION COMPLIES WITH THE REGULATIONS IN FORCE IN THE COUNTRY OF USE, AND THAT IT IS CORRECTLY EARTHED. THIS APPLIANCE MUST BE EARTHED. IN CASE OF A MALFUNCTION OF FAULT, THE EARTH REDUCES THE RISK OF ELECTROCUTION BY PROVIDING THE ELECTRICAL CURRENT WITH AN ALTERNATIVE, LESS RESISTANT PATH.
EN EN USER USERINSTRUCTIONS INSTRUCTION 9 9-01 from 82 cm to 89 cm (from 32-9/32” to 35-3/64”) Tab.