
Instruction manual

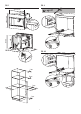
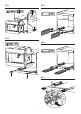
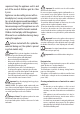
Table Of Contents
- 914780083-ALL
- Binder1 CORRETTO
- Pagine da 914780083-ALL
- IT Pagine da 914780083-ALL
- EN Pagine da 914780083-ALL-2
- FR Pagine da 914780083-ALL-3
- DE Pagine da 914780083-ALL-4
- NL Pagine da 914780083-ALL-5
- ES Pagine da 914780083-ALL-6
- PT Pagine da 914780083-ALL-17
- RU Pagine da 914780083-ALL-2
- PL Pagine da 914780083-ALL
- SV Pagine da 914780083-ALL-10
- DA Pagine da 914780083-ALL-11
- FI Pagine da 914780083-ALL-12
- NO Pagine da 914780083-ALL-13
- ZHS Pagine da 914780083-ALL-2
- ZHT Pagine da 914780083-ALL
- Binder1 CORRETTO
- AR_914780083-ALL

10
• Empty the water tank if the appliance not to be used for
a long time (holidays etc.).
• Replace the water if the appliance has not been used for
more than two days.
Installing the appliance
Important!
• Installation must be performed by a qualified
professional in compliance with legislation in force in the
country of installation (see section “Built-in
installation”).
• The packing elements (plastic bags, polystyrene foam, etc.)
should be kept out of reach of children.
• Never install the appliance in rooms where the tempera-
ture may drop to 0°C or lower.
• Customise the water hardness as soon as possible following
the instructions in the “Water hardness” section.
Connecting the appliance
Danger! Check that the mains power supply voltage
corresponds to the value indicated on the rating plate on the
bottom of the appliance.
Connect the appliance to an efficiently earthed and correctly in-
stalled socket with a minimum current rating of 10A only.
If the power socket does not match the plug on the appliance,
have the socket replaced with a suitable type by a qualified pro-
fessional. To comply with safety directives, an omnipolar switch
with a minimum contact distance of 3 mm must be installed.
Do not use multiple sockets or extensions.
Important! Safety cutout devices must be included in
the mains power supply in compliance with the installation
regulations in the country concerned.
This appliance conforms to EC Regulation 1935/2004 on
materials and articles intended to come into contact with food.
DISPOS
AL
a column and the column must be firmly fixed to the wall with
commercially available brackets.
Import
ant!
• Important: all installation or maintenance operations must
be performed with the appliance disconnected from the
mains electricity supply.
• Kitchen furniture in direct contact with the appliance must
be heat resistant (65°C min).
• To guarantee correct ventilation, leave a gap at the bottom
of the cabinet (see measurements in figure 1).
• Position the rails on the sides of the cabinet as shown in the
figure 2. Fix with the screws provided, then extract them
completely.
If the coffee machine is installed over a warmer drawer, use
the top surface of this as a reference to position the rails (fig.
2A).
In this case, there will be no surface to rest the rails on and
the retaining hook must not be installed.
• Fix the power cable with the clip (fig. 3). The power cable
must be long enough to allow the appliance to be extracted
from the cabinet to fill the coffee bean container.
The appliance must be earthed in compliance with legisla-
tion.
Electrical connections must be performed by a qualified
electrician following the instructions.
• Place the appliance on the runners (Only after they have
been secured to the cabinet. This is to prevent the machine
from being placed on an unsuitable surface), making sure
that the pins engage properly in their seats when securing it
with the screws provided (fig. 4). If the height of the
appliance requires adjusting, use the spacer disks provided.
• If necessary, correct alignment of the appliance by posi-
tioning the spacers supplied under or at the sides of the
support (fig. 5-6).
• To lift the appliance in the front (max 2 mm), turn the latch
as shown in figure 7.
• The mounting panel for the runners must be of a suitable
thickness for the fixing screws provided.
• The panel material must be suitable for the weight of the
machine, approximately 25kg.
BUILT-IN INSTALLATION
Verify the minimum measurements required for correct instal-
lation of the appliance. The coffee machine must be installed in
The appliance must not be disposed of with house-
hold waste, but taken to an authorised waste sepa
-
ration and recycling centre.
EN