MACHINE À CAFÉ AUTOMATIQUE ENCASTRABLE FR MANUEL D’UTILISATION
A15 A16 A21 A A24 A22 A17 A11 A2 A3 A5 A23 A7 A8 A6 A25 A19 A9 A1 A13 A18 A10 A4 A12 A14 2 A20
B B2 B3 B4 B5 B6 B7 00:00 B1 AROMA B11 PROFILE 1 SELECT BEVERAGE QUANTITY B8 B10 B9 ESPRESSO COFFEE CAPPUCCINO LATTE MACCHIATO C3 C C6 C4 C1 C2 C5 C7 D2 D D5 D1 D4 D7 D3 D6 3
1 2 3 4 5 6 7 8 9 10 11 12 13 14 15 4
16 17 18 19 20 21 22 23 24 25 26 27 28 29 30 5
31 32 33 34 35 36 37 38 6
TABLE DES MATIÈRES Nettoyage du pot à lait après chaque utilisation...........15 DISTRIBUTION D’EAU CHAUDE.............................................15 INTRODUCTION......................................................................8 Symboles utilisés dans ce mode d’emploi.......................8 Lettres entre parenthèses...............................................8 Problèmes et réparations................................................8 Mode d’emploi...............................................
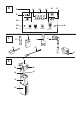
A4. A5. A6. A7. Tiroir à marc Infuseur Lumière pour éclairer le compartiment interne Bouton/Manette d’allumage/veille / (disponible seulement sur certains modèles) A8. Panneau de contrôle A9. Porte-objets A10. Gicleur eau chaude et vapeur A11. Connecteur CEI A12. Réservoir d'eau A13. Bec verseur café (réglable en hauteur) A14. Égouttoir A15. Couvercle du réservoir à grains A16. Réservoir à grains A17. Bouton de réglage du degré de mouture A18. Lumière pour éclairer les tasses A19.
Description du pot à lait de l’eau par la buse (fig. 8), puis s’éteint automatiquement. La machine à café est à présent prête pour être utilisée normalement. (page 3 - D) D1. Bouton de réglage de la mousse et de NETTOYAGE D2 Couvercle avec mousseur à lait D3. Pot à lait D4. Tube de prise du lait D5. Buse réglable du lait mousseux D6. Revêtement thermique D7.
Détartrage éclaboussures d'eau. • Pour étendre l’appareil, appuyer sur la touche (A7fig. 9). • L’écran affiche le message ARRÊT EN COURS,VEUILLEZ PATIENTER : si nécessaire l’appareil effectue un cycle de rinçage avant de s’éteindre (d’entrer en mode veille). Pour les instructions sur le détartrage, consulter la section “Détartrage”. Filtre à eau Pour les instructions relatives à l'installation du filtre (C4), consulter le chapitre “Filtre adoucisseur”.
ou 30 minute, ou 1, 2 ou 3 heures) ; À l’écran, appuyer sur jusqu’à sélectionner la valeur souhaitée ; 4. Appuyer sur pour revenir à la page-écran initiale. L'arrêt automatique est ainsi programmé. fiche à l’écran ; 4. Appuyer sur ou au niveau des heures et des minutes jusqu’à ce que l’heure actuelle s’affiche ; 5. Pour confirmer, appuyer sur (pour effacer, appuyer sur ), puis appuyer sur pour revenir à la page-écran initiale. L’heure est ainsi réglée. 3.
2. 3. 4. Appuyer sur (B10) ou (B8) jusqu’à ce que l’écran affiche PROGRAMMER LA LANGUE ; Appuyer sur : appuyer sur ou jusqu’à ce que le drapeau correspondant à la langue souhaitée s’affiche, puis le sélectionner ; Appuyer 2 fois sur pour revenir à la page-écran initiale. Valeurs d’usine Cette fonction permet de réinitialiser tous les réglages du menu et les quantités programmées et de rétablir les valeurs d’usine prédéfinies (à l’exception de la langue, qui reste celle déjà programmée).
Après la préparation, le réglage de l'arôme revient à la valeur • Pendant que la machine fait le café, la distribution peut être arrêtée à tout moment en appuyant sur . • Dès que la distribution sera terminée, si l'on veut augmenter la quantité de café en tasse il suffira d’appuyer sur : une fois la quantité souhaitée atteinte, appuyer sur . Une fois la préparation terminée, l'appareil est prêt pour une nouvelle utilisation.
Conseils pour un café plus chaud 6. La préparation commence et l’écran affiche l’image de la boisson sélectionnée, ainsi qu’une barre de progression qui se remplit au fur et à mesure que la préparation s’effectue.
Rgler la quantité de mousse “Mémoriser son propre profil”). Ne pas laisser le pot à lait trop longtemps hors du réfrigérateur : plus la température du lait monte (5°C idéale), plus la qualité de la mousse baisse. Une fois la préparation terminée, l'appareil est prêt pour une nouvelle utilisation. • Tourner le bouton de réglage de la quantité de mousse (D1), situé sur le couvercle du pot à lait pour régler la quantité de mousse du lait distribué pendant la préparation des boissons.
1. Contrôler que la buse à eau chaude/vapeur (C6) soit accrochée correctement au gicleur eau chaude/vapeur (A10) ; 2. Placer un récipient sous la buse (le plus près possible afin d’éviter les éclaboussures) ; Conseil pour l’utilisation de la vapeur pour émulsionner le lait 3. Sélectionner depuis la page-écran initiale EAU CHAUDE. L’écran (B) affiche l’image relative ainsi qu’une barre de progression qui se remplit au fur et à mesure que la préparation s’effectue ; 4.
appuyant sur ou et appuyer sur ; 5. PERSONNALISATION QUANTITÉ CAFÉ (OU EAU), APPUYER SUR STOP POUR ENREGISTRER : La préparation commence et l'appareil propose la page-écran de personnalisation de la longueur illustrée par une barre verticale. L'étoile représentée sur la barre indique la longueur actuellement programmée. 6. Lorsque la quantité atteint le niveau minimum programmable, l’écran affiche . 7. Appuyer sur lorsque la quantité souhaitée est atteinte dans la tasse. 8. ENREGISTRER NOUV.
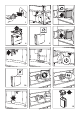
(A13) en utilisant une éponge ou un chiffon (fig. 31) ; 2. Contrôler que les trous des becs verseurs de café ne soient pas bouchés. Si nécessaire, retirer les dépôts de café à l'aide d'un cure-dent (fig. 30). Attention ! Lors de l'extraction de l'égouttoir, il est obligatoire de toujours vider le tiroir à marc même s'il est peu rempli. Si cette opération n'est pas effectuée, lors de la préparation des cafés suivants, le tiroir à marc peut se remplir plus que prévu et obstruer la machine.
2. Extraire le pot à lait (D3) du revêtement thermique (D6) en saisissant les deux points de prise latéraux. : l’écran affiche le symbole , qui rappelle que l’appareil a besoin d'être détartré. (Le message sera reproposé à chaque allumage). Pour accéder au menu de détartrage : Attention ! Le revêtement thermique ne doit pas être rempli ou plongé dans l’eau : pour le nettoyer, utiliser un chiffon humide. 1. Appuyer sur (B2) pour accéder au menu ; 2.
puyer sur ; 11. L’eau chaude sort d'abord de la buse à café et l'écran affiche le message RINÇAGE EN COURS VEUILLEZ PATIENTER ; 12. Lorsque l'eau dans le réservoir est finie, vider le récipient utilisé pour récupérer l'eau de rinçage ; 13. (Si un filtre est prévu) INSÉRER LE FILTRE DANS SON LOGEMENT (fig. 42). Appuyer sur et extraire le réservoir à eau, réinsérer, si enlevé précédemment, le filtre adoucisseur ; 14. RINCER ET REMPLIR AVEC DE L'EAU JUSQU'AU NIVEAU MAX (fig.
MESSAGES AFFICHÉS À L’ÉCRAN FR MESSAGE AFFICHÉ CAUSE POSSIBLE SOLUTION REMPLIR LE RÉSERVOIR D’EAU FRAÎCHE L’eau dans le réservoir (A12) est Remplir le réservoir à eau et/ou l'insérer correcteinsuffisante. ment, en l'enfonçant à fond jusqu'à son blocage en position. VIDER LE TIROIR À MARC Le tiroir à marc (A4) de café est plein. INSÉRER LE TIROIR À MARC Après le nettoyage, le tiroir à marc n'a pas Extraire l'égouttoir (A14) et insérer le tiroir à marc. été inséré (A4).
MESSAGE AFFICHÉ CAUSE POSSIBLE SOLUTION INTRODUIRE LE CAFÉ PRÉMOULU UNE CUILLÈRE-DOSEUSE MAXIMUM Un café LONG avec café prémoulu a été Introduire le café prémoulu dans l'entonnoir (A21) demandé (fig. 14) et appuyer sur pour continuer et terminer la distribution. REMPLIR LE RÉSERVOIR À GRAINS Le café en grains est terminé. MOUTURE TROP FINE.
MESSAGE AFFICHÉ CAUSE POSSIBLE SOLUTION INSÉRER LA BUSE À EAU La buse à eau (C6) n’est pas insérée ou est insérée de manière incorrecte Insérer la buse à eau en la poussant à fond. INSÉRER LE POT À LAIT Le pot à lait (D) n'est pas inséré correctement. Insérer le pot à lait en le poussant à fond (fig. 19). INSÉRER LE GROUPE INFUSEUR Après le nettoyage, l'infuseur n'a pas été Insérer l'infuseur de la façon décrite dans le par. réinséré dans l’appareil. “Nettoyage de l’infuseur”.
MESSAGE AFFICHÉ CAUSE POSSIBLE SOLUTION PRESSER OK POUR LANCER LE NETTOYAGE OU TOURNER LE BOUTON Le pot à lait a été inséré avec le bouton de réglage mousse (D1) sur la position CLEAN. Si l'on souhaite utiliser la fonction CLEAN, appuyer sur ou tourner le bouton de réglage mousse sur l'une des positions de préparation du lait.
MESSAGE AFFICHÉ CAUSE POSSIBLE SOLUTION DISFONCTIONNEMENT : CONSULTER LA NOTICE L'intérieur de la machine est très sale. Nettoyer soigneusement la machine de la façon décrite à la section “Nettoyage”. Si après le nettoyage, la machine affiche encore le message, contacter un Centre d'Assistance agréé. Rappel pour le détartrage et/ou le rem- La procédure décrite à la section “Détartrage” doit placement du filtre (C4) de l’appareil.
RÉSOLUTION DES PROBLÈMES Ci-après sont énumérés certains dysfonctionnements possibles. Si le problème n’est pas résolu en procédant comme décrit, contacter l’Assistance Technique. PROBLÈME CAUSE POSSIBLE SOLUTION Le café n'est pas chaud. Les tasses n'ont pas été préchauffées. Chauffer les tasses en les rinçant avec de l'eau chaude (Nota Bene : il est possible d'utiliser la fonction eau chaude).
PROBLÈME CAUSE POSSIBLE SOLUTION Le lait ne sort pas du tube d’écoule- Le couvercle (D2) du pot à lait (D) est Nettoyer le couvercle du pot à lait de la façon ment (D5) sale décrite dans le par. “Nettoyage du pot à lait”. Le lait contient des grosses bulles, ou Le lait n'est pas suffisamment froid ou Utiliser du lait totalement écrémé, ou bien desort par jets du tube d’écoulement du n'est pas demi-écrémé ou écrémé. mi-écrémé, à la température du réfrigérateur lait (D5) ou est peu mousseux (environ 5°C).
ESPRESSO Origine PROCÉDÉ Italie Mouture Infusion Café en poudre 6-11 gr (selon l'arôme) Pré-infusion • Infusion haute pression (9-12 bar) RÉSULTAT DANS LA TASSE Quantité prédéfinie ~ 40 ml Onctuosité compacte et couleur noisette Goût intense OCCASION DE CONSOMMATION petits moments de plaisir, à tout moment de la journée CAFÉ Origine PROCÉDÉ Allemagne et Europe Centrale Mouture Café en poudre 8-14 gr (selon l'arôme) Infusion Pré-infusion sans pré-infusion Infusion haute pression (9-12 bar)
CAPPUCCINO Origine PROCÉDÉ Italie Café équilibré (~ 80 ml) Lait équilibré (~ 70 ml) Mousse de lait niveau maximum Ordre de préparation d’abord le lait, puis le café RÉSULTAT DANS LA TASSE Visuel couches séparées de mousse, café et lait Mousse de lait blanc au goût de lait OCCASION DE CONSOMMATION à tout moment de la journée, pour les personnes qui souhaitent déguster café et lait séparément CAPPUCCINO+ Origine PROCÉDÉ Italie Café Doppio+ (~ 120 ml) Lait ~ 70 ml Mousse de lait niveau maximum O
Le fabricant se réserve la faculté d'apporter, sans préavis, toutes les modifications qu'il jugera utiles pour l'amélioration de ses produits. Les illustrations et les descriptions figurant dans ce manuel ne sont pas contraignantes et n'ont qu'une valeur indicative.
SMEG S.p.A. Via Leonardo Da Vinci, 4 42016 San Girolamo di Guastalla (RE) ITALY www.smeg.